Managing Deals in List & Archive View
In the Deal List View, the following fields are displayed by default: Title, Stage, Won Reason, Lost Reason, Deal Closed On, Primary Contacts, Related Contacts, Company, Deal Value, Sales Owner, and Product.
Customizing the List View: How to Edit Columns
You can customize column setting icon, so the user can add or remove fields.
-
Click the column settings icon from the top right side, displays all system and custom fields.
-
Enable or disable specific fields in the list view, by selecting or deselecting the corresponding checkboxes.
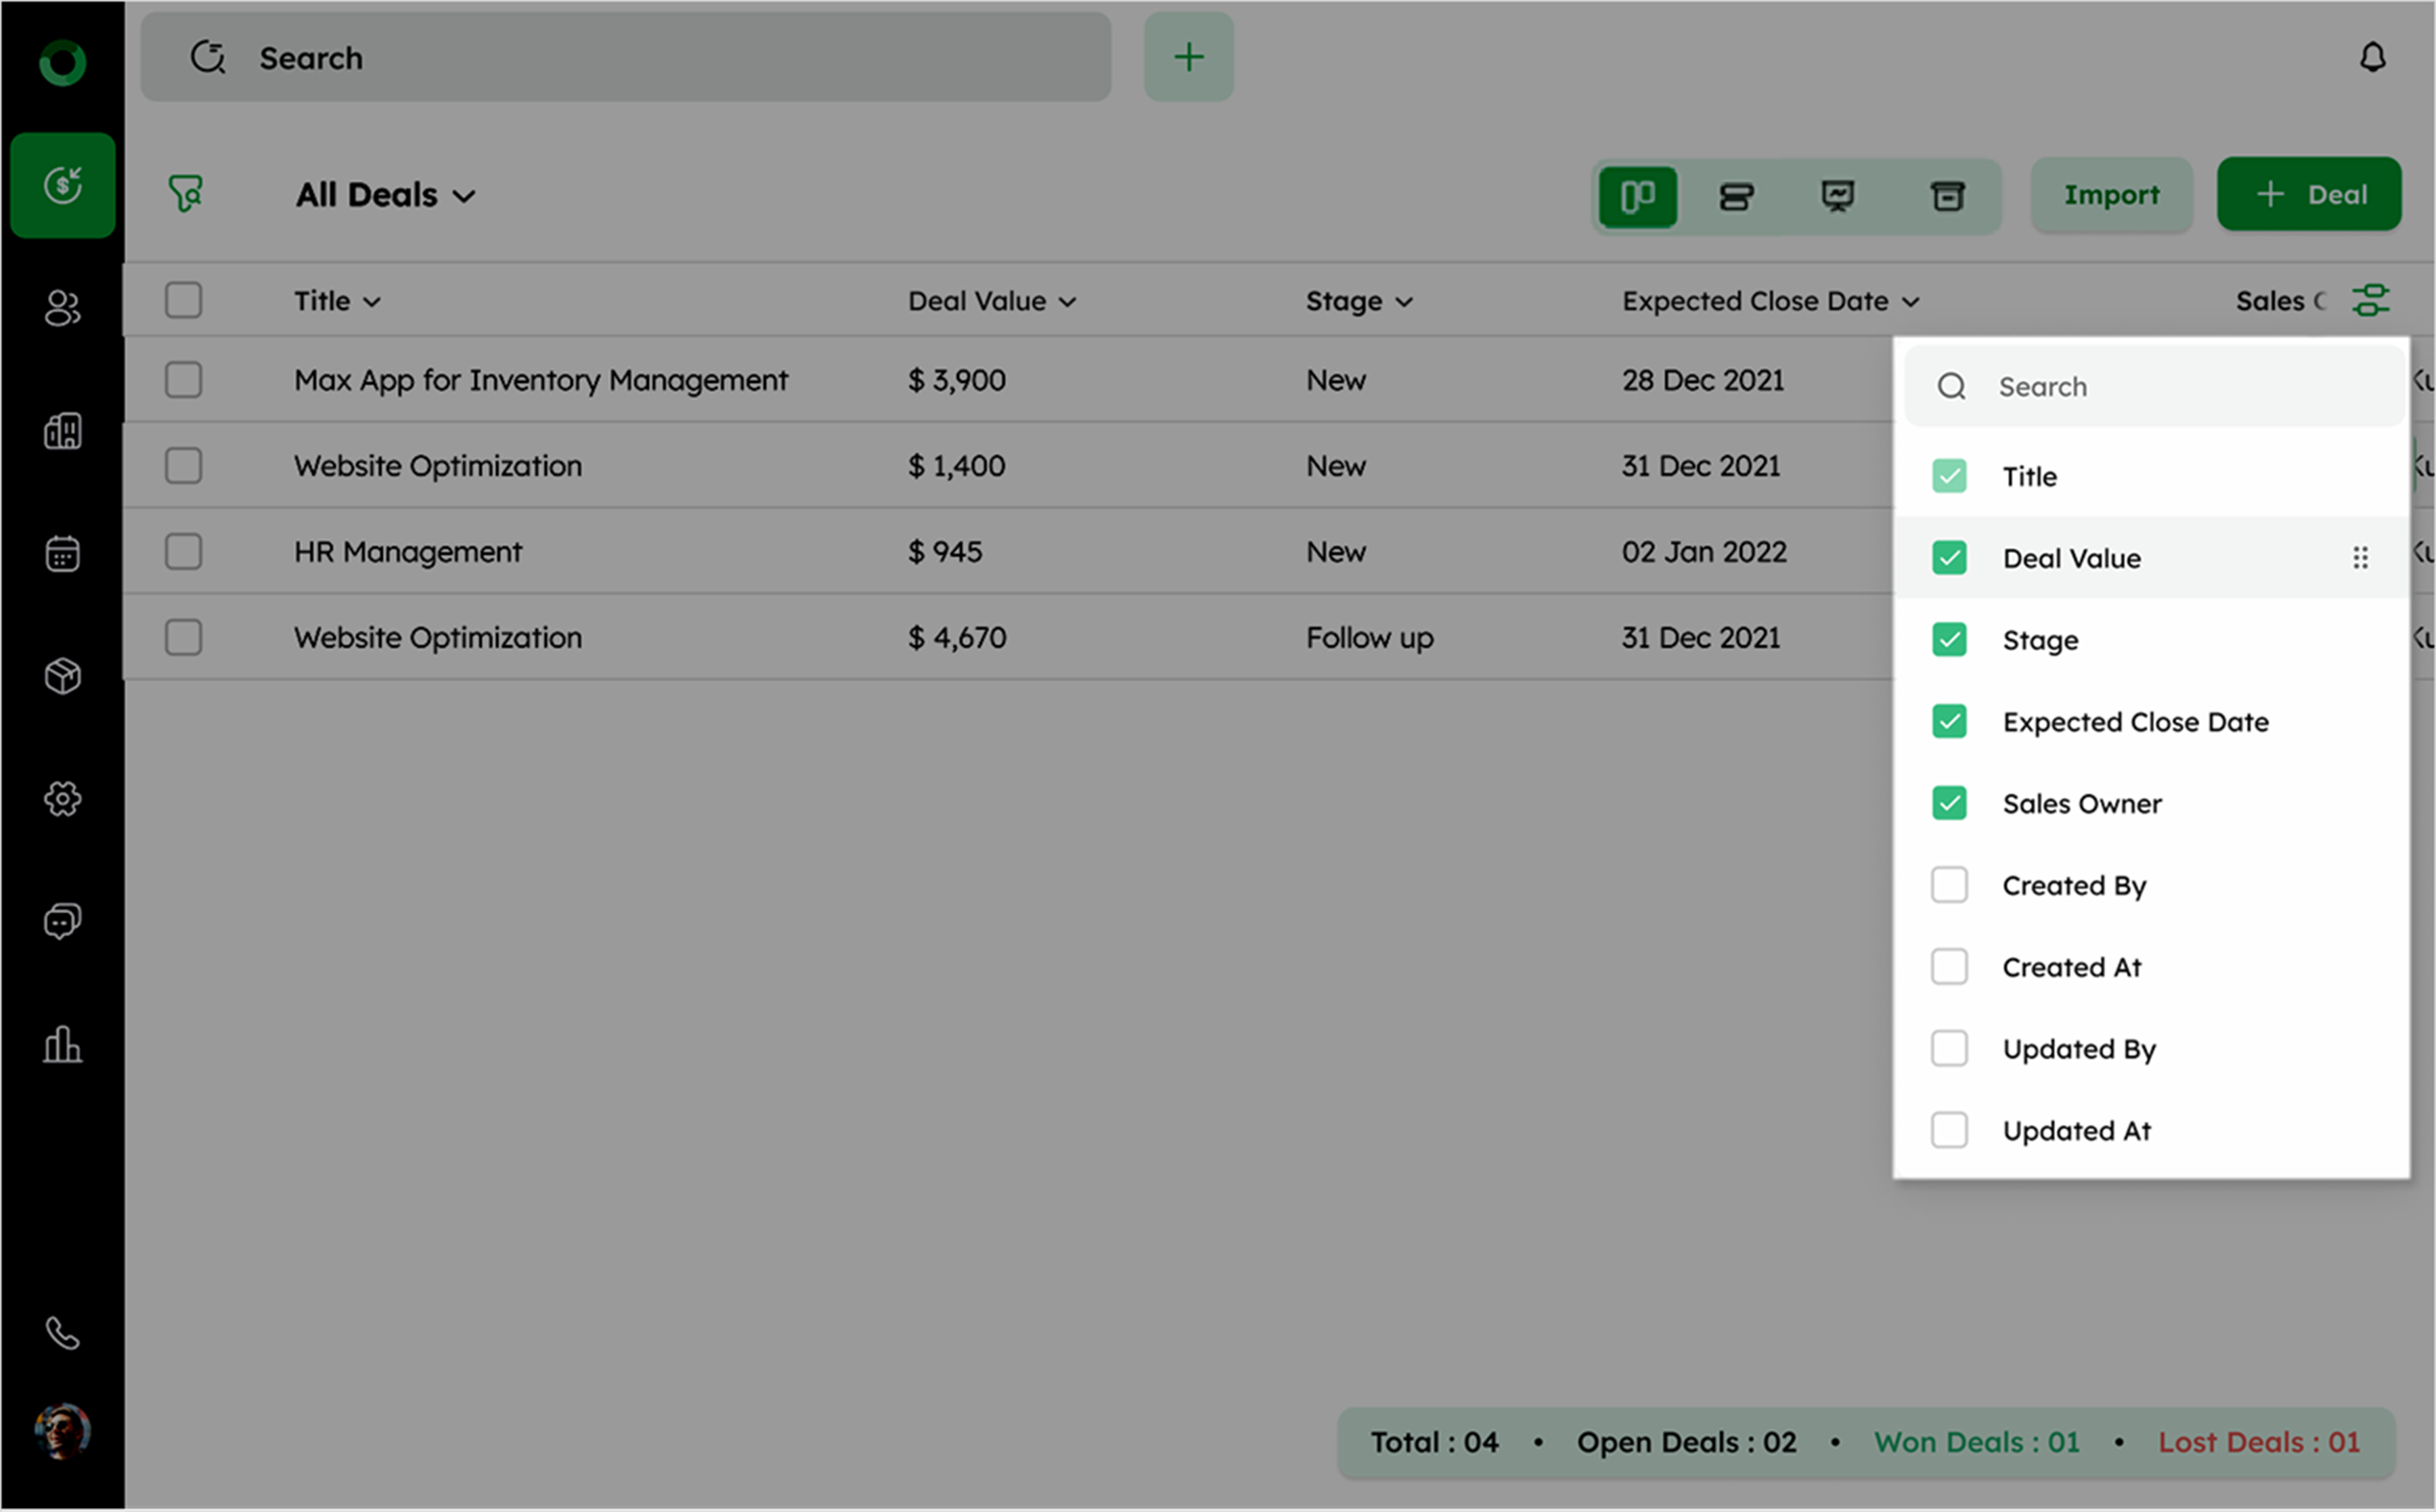
The Title field is mandatory and cannot be disabled.
- Use drag-and-drop within the dropdown menu to reorder the display of fields in the list view.
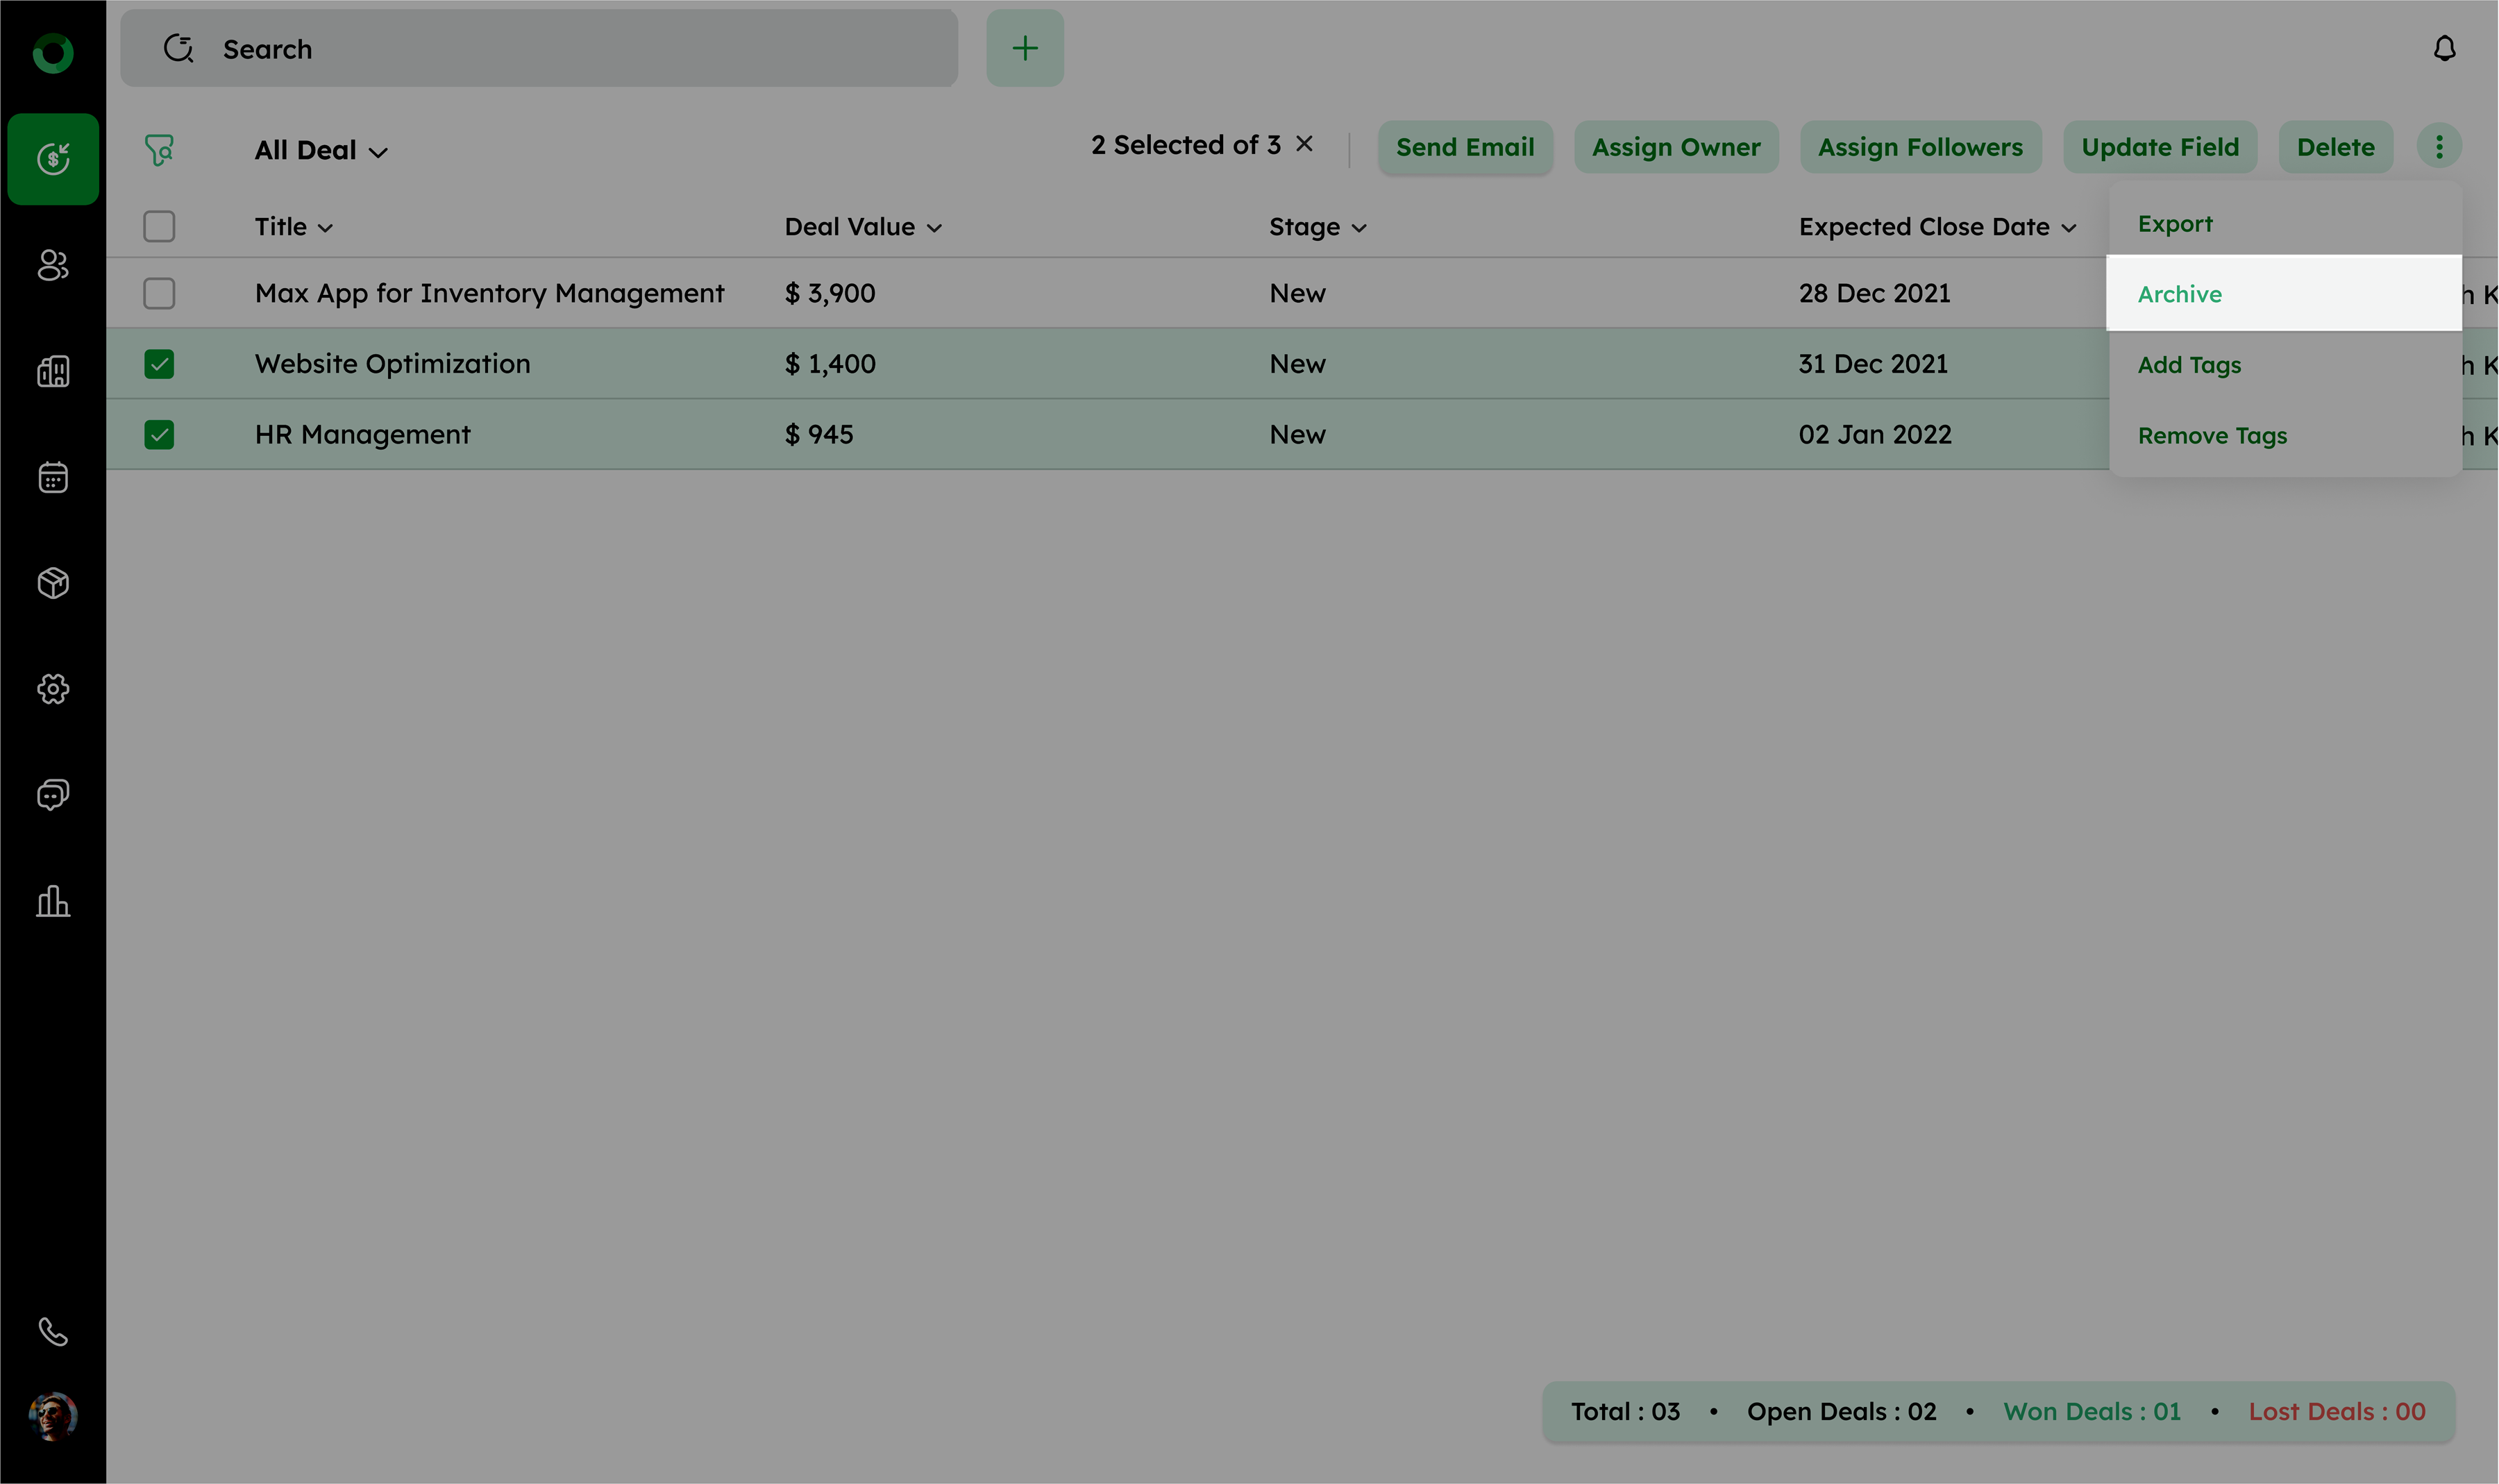
Executing Bulk actions on Multiple Deals
Selecting one or more deals in the List View activates the bulk action tray. you can manage multiple records simultaneously using these options: Send Email, Assign Owner, Assign Followers, Update Field, Add/Remove Tags, Export, Archive, and Delete.
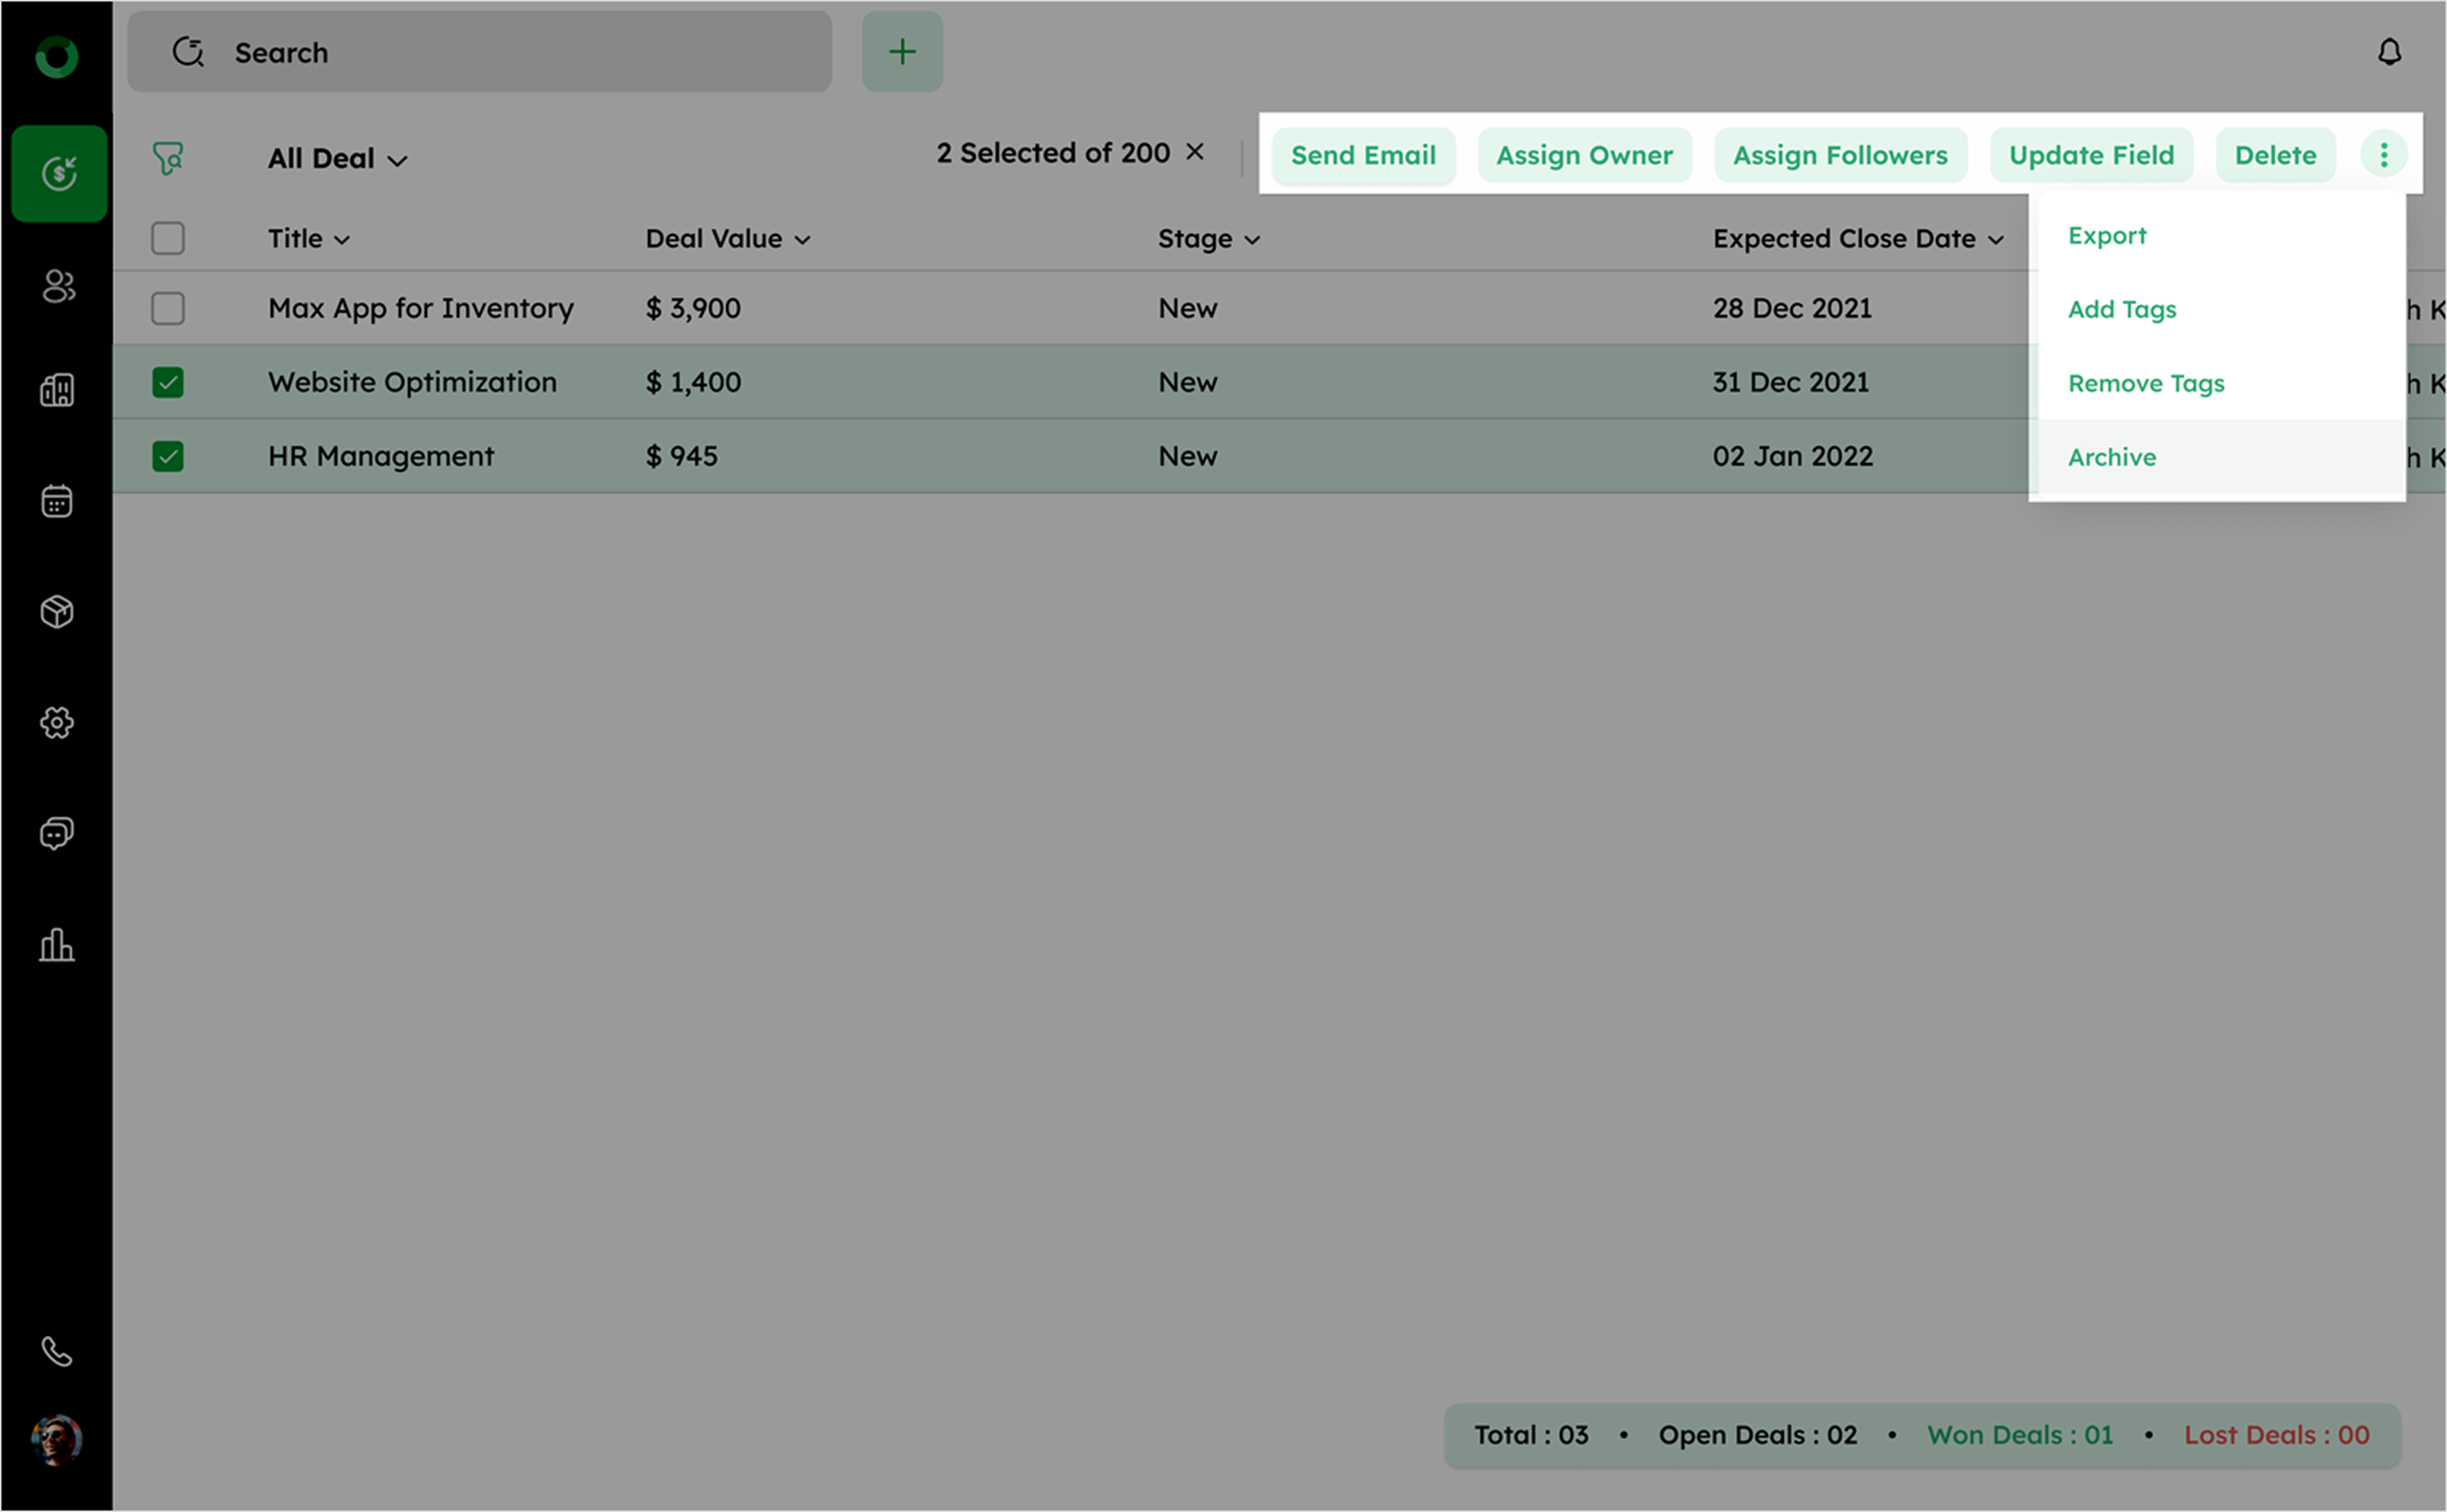
The details of these actions are explained below,
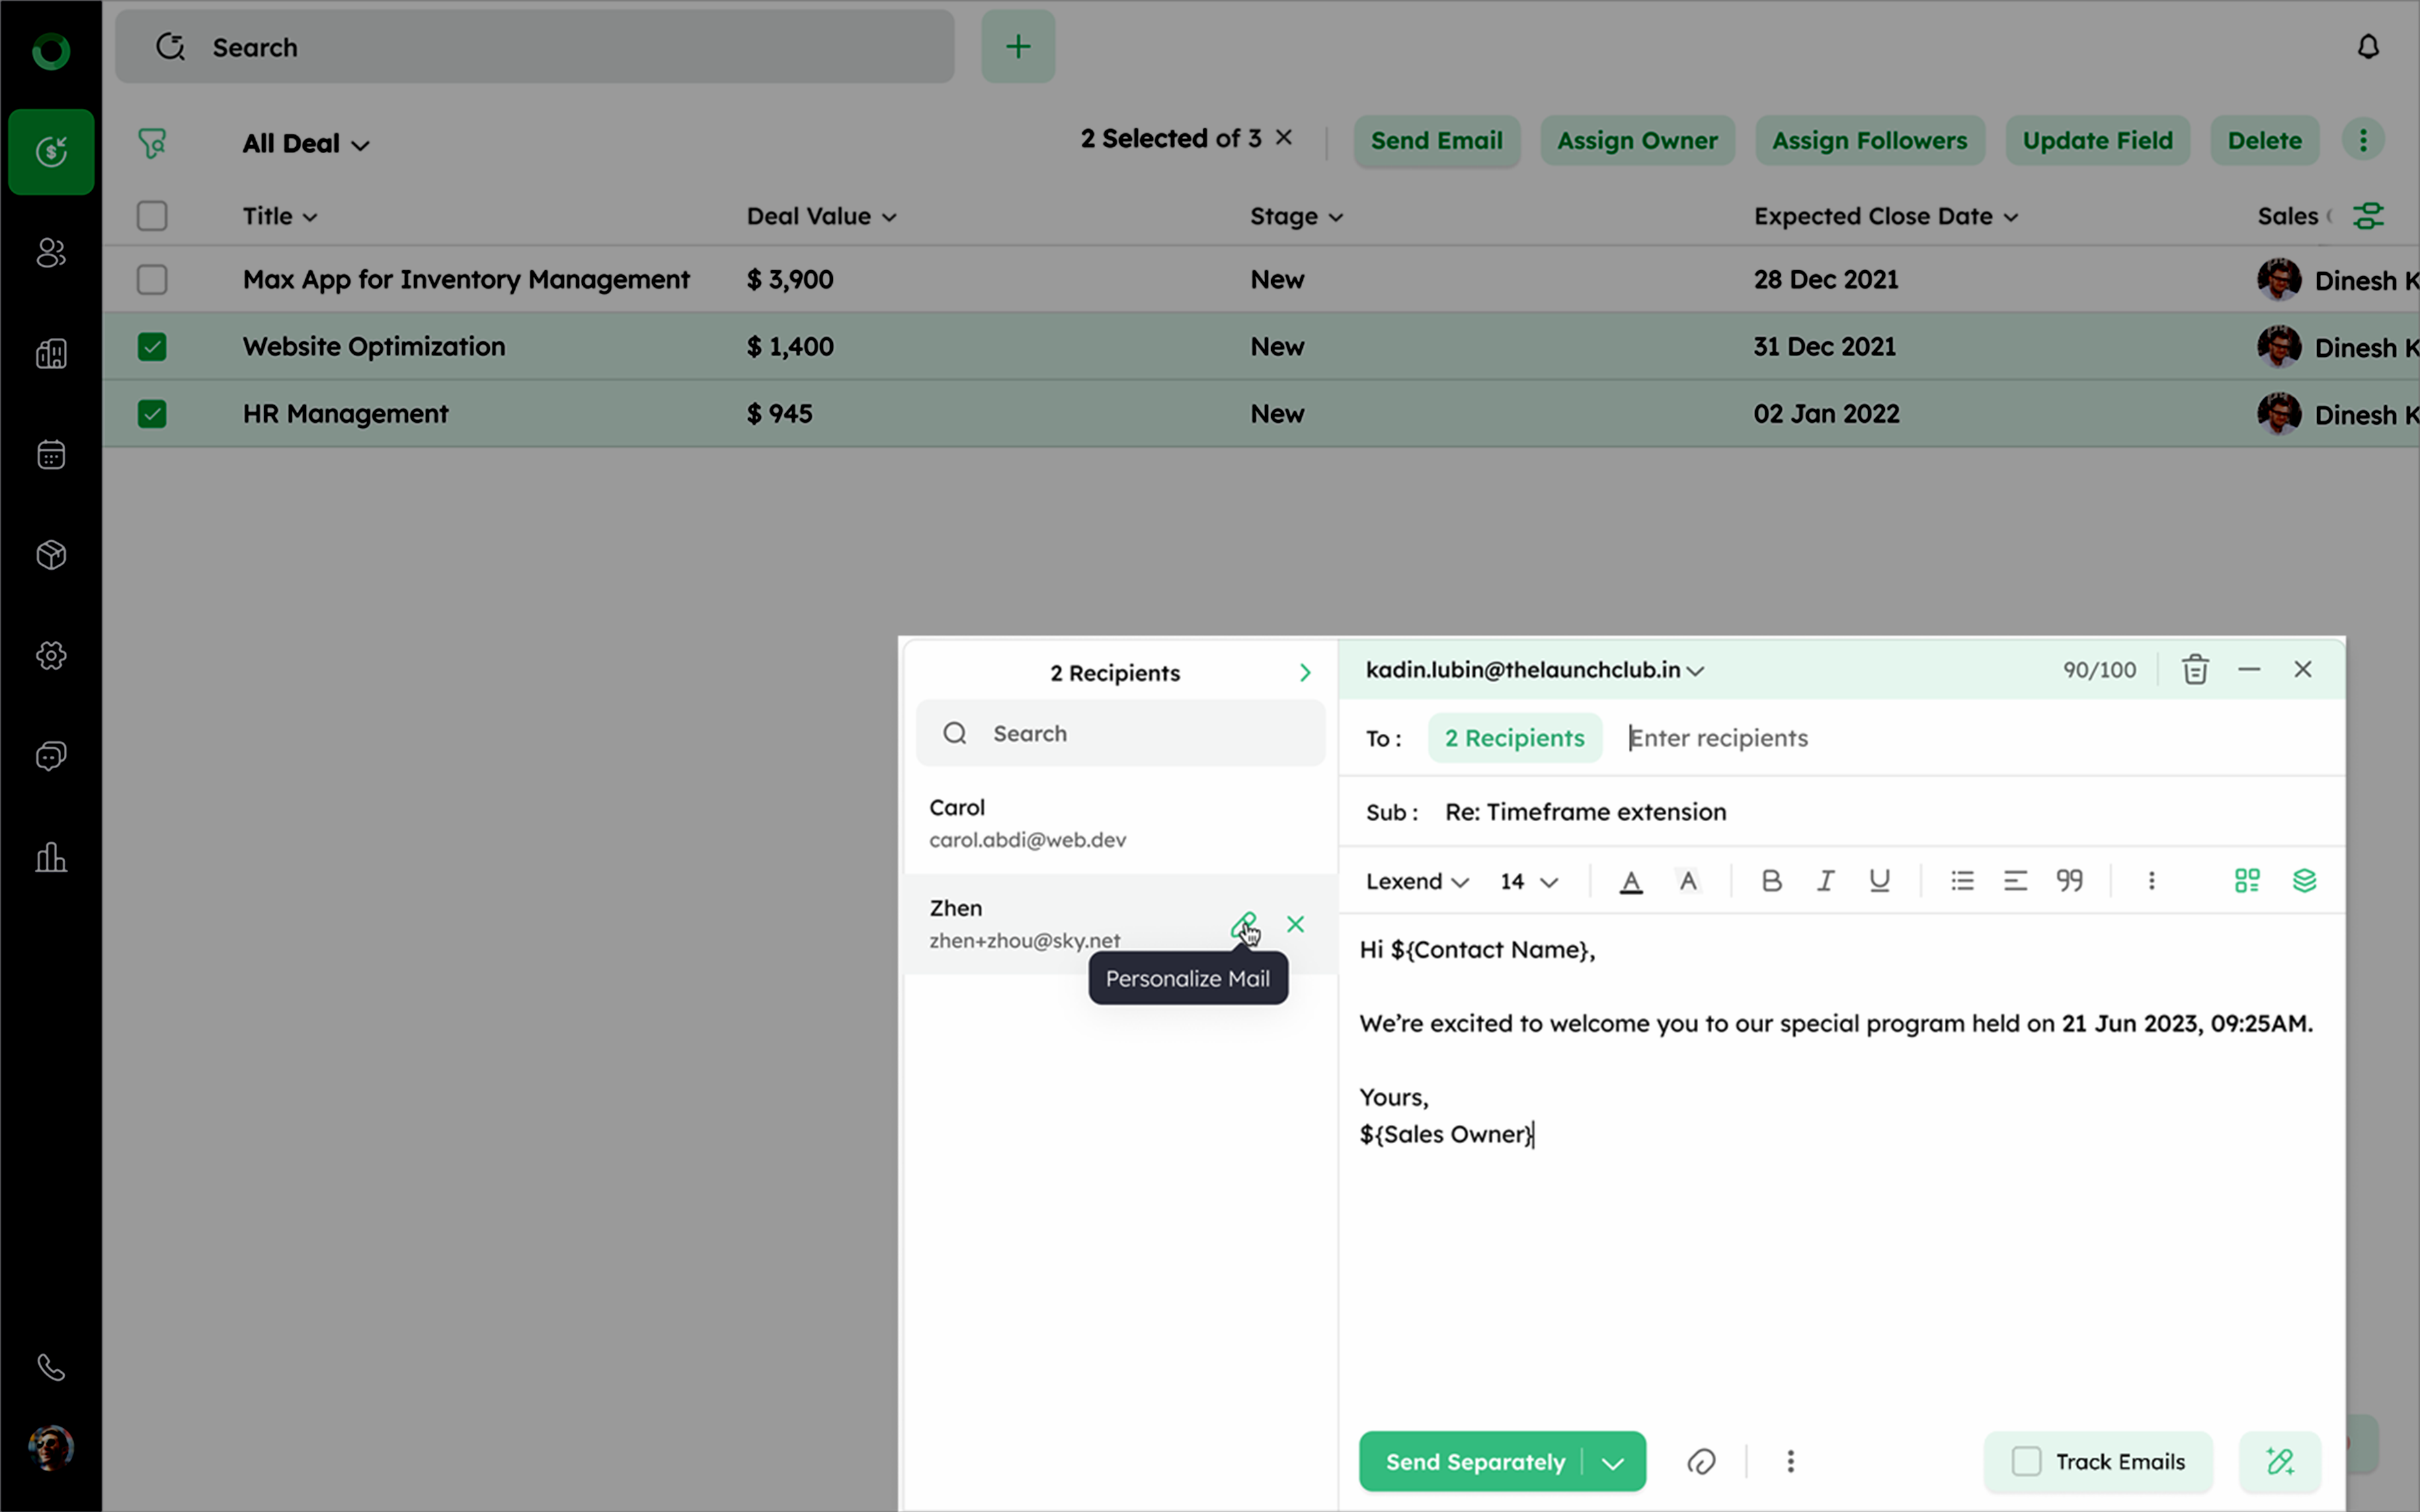
How to Send Bulk Email?
The Send Email option allows you to send emails to multiple contacts at once.
In the Deal List View, bulk emails are sent to the contact’s primary email address if multiple addresses exist.
-
Go to Deal List View.
-
Select the deals by checking the boxes next to their names, or select all records by clicking the checkbox beside the fields.
-
Once the recipients are selected, the bulk actions tray appear. Click Send Email.
-
Use placeholders to personalize emails.
-
Alternatively, select a template from the dropdown menu.
-
If you add an email address for a contact not stored in the system, you must manually enter the data for that contact.
-
Click Send Separately to ensure each email is delivered individually to its recipient.
-
You can also schedule the bulk email for a specific date and time, ensuring that your recipients receive the email at the most appropriate moment.
Each user can send a maximum of 100 bulk emails per day, even if multiple email accounts are synced.
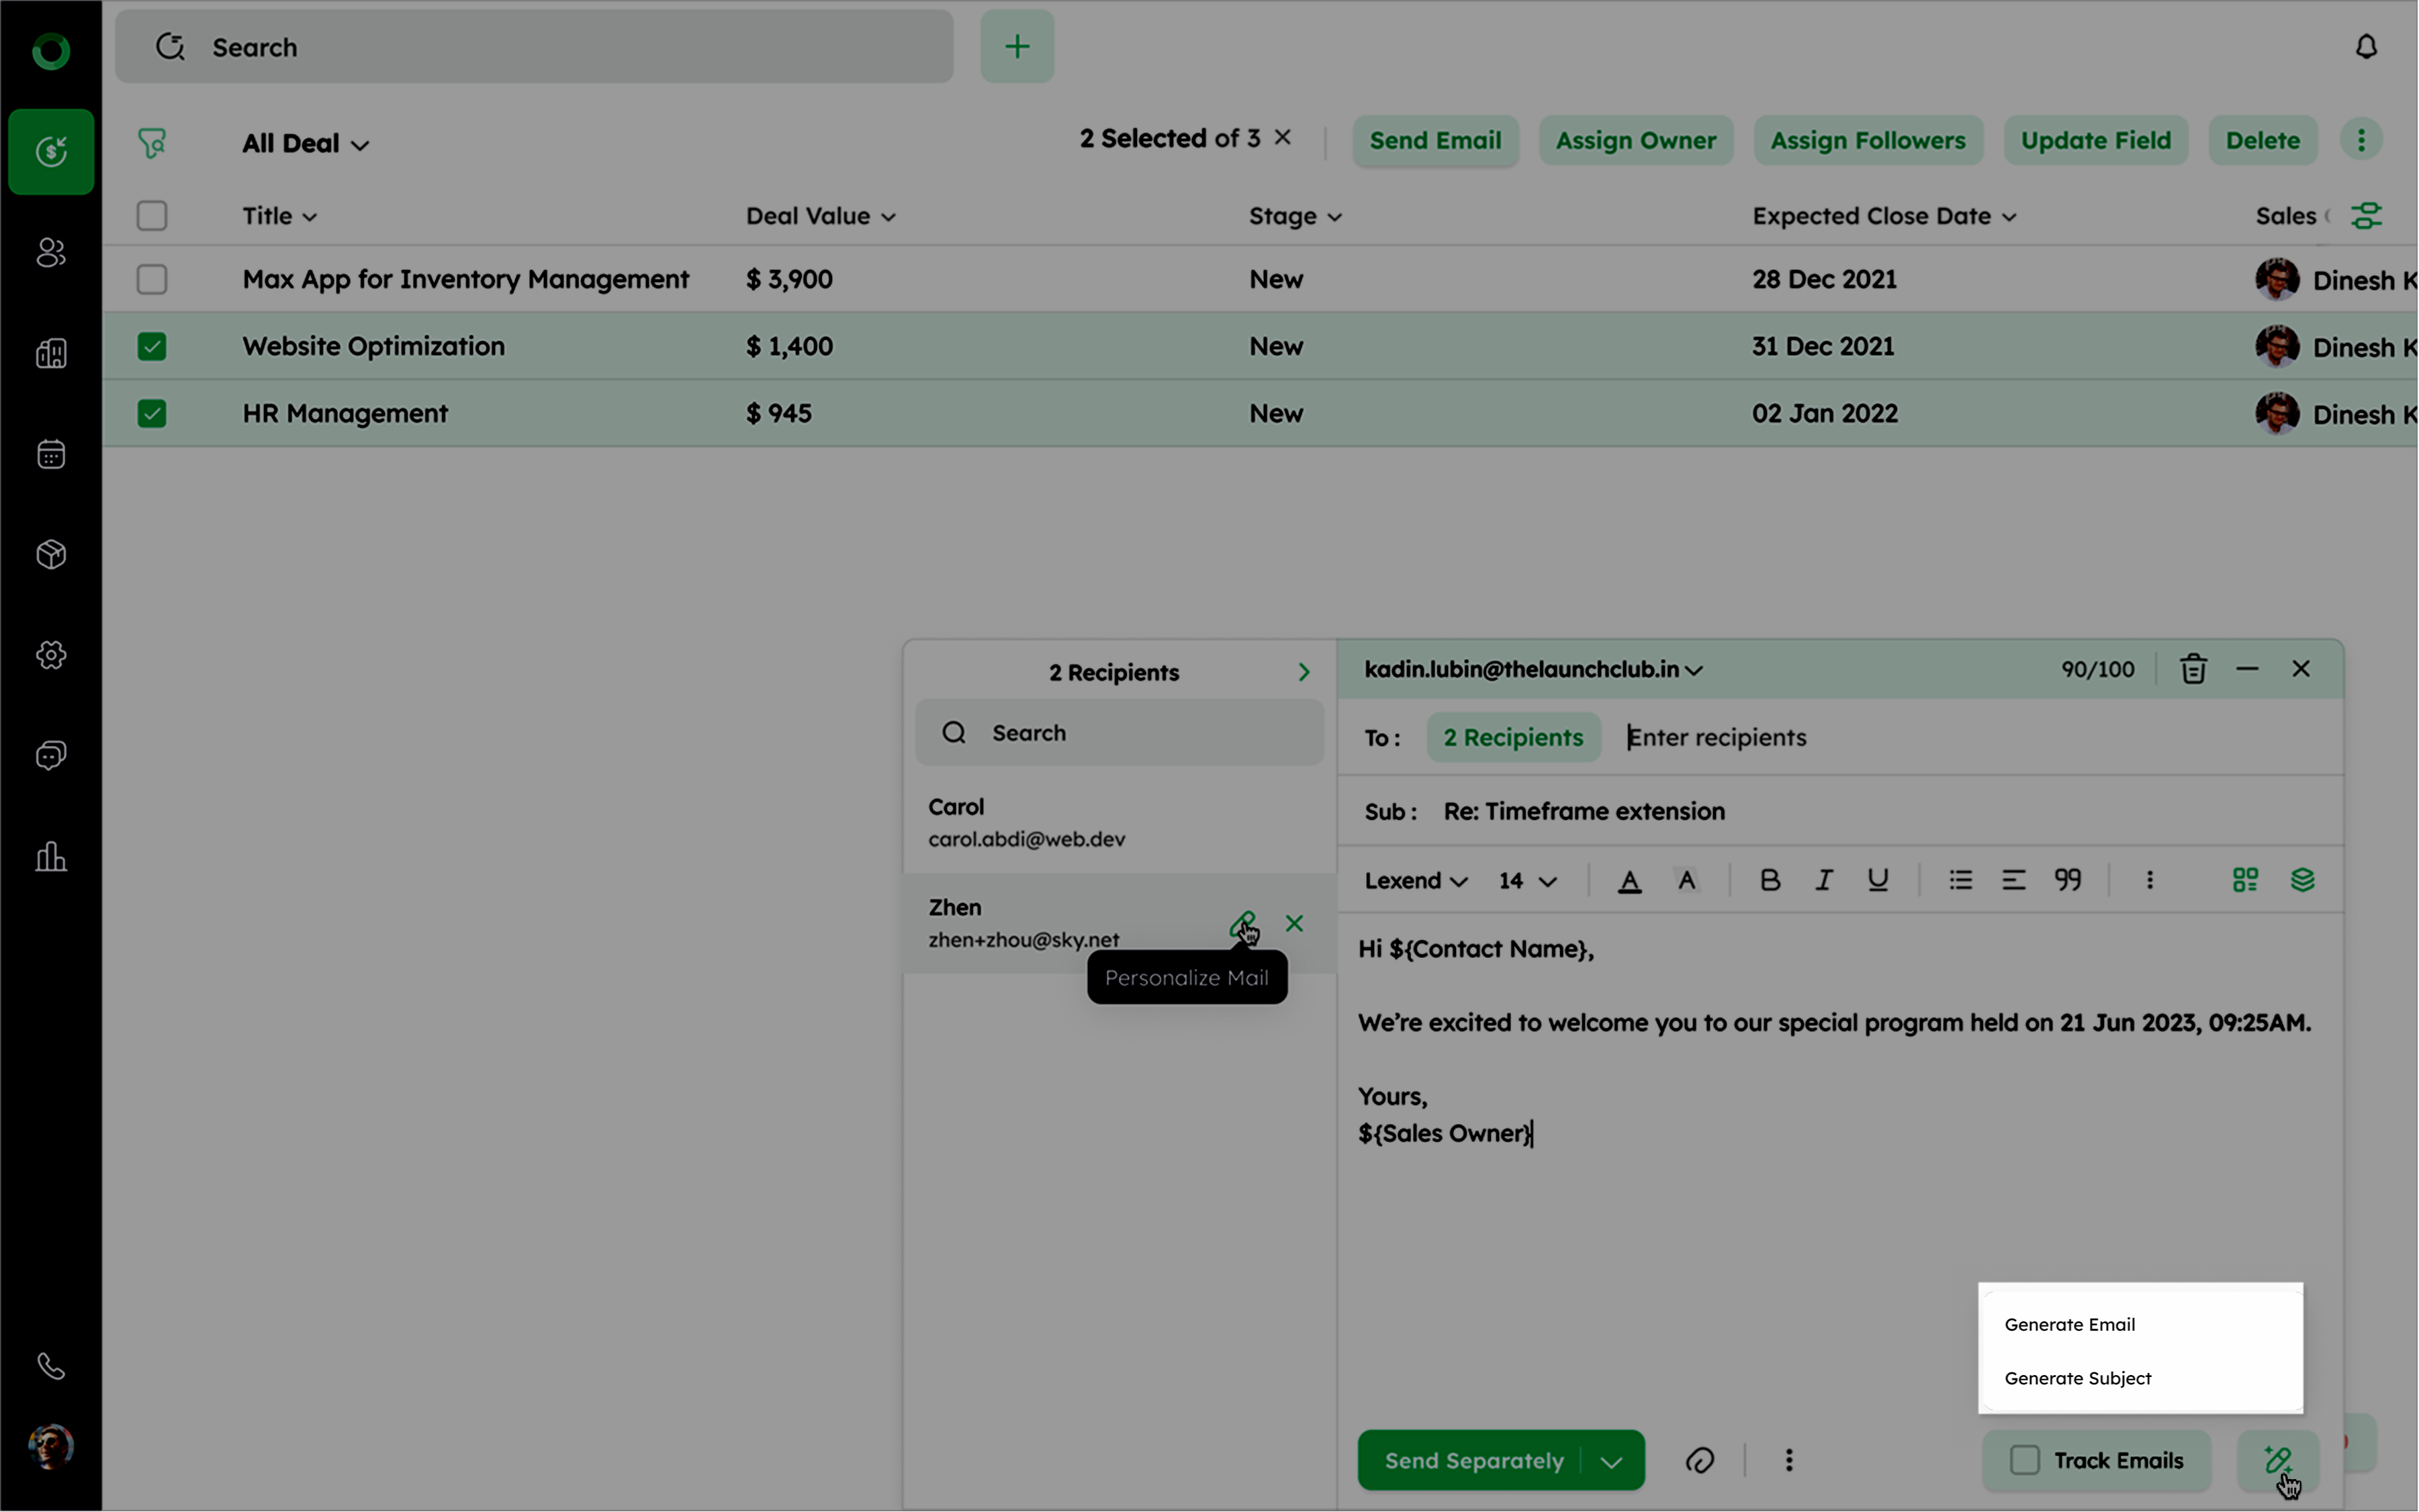
Tip: Use NIRA AI Email Composer to automatically generate optimized subject lines and email content, which can then be reviewed and refined to align with specific requirements.
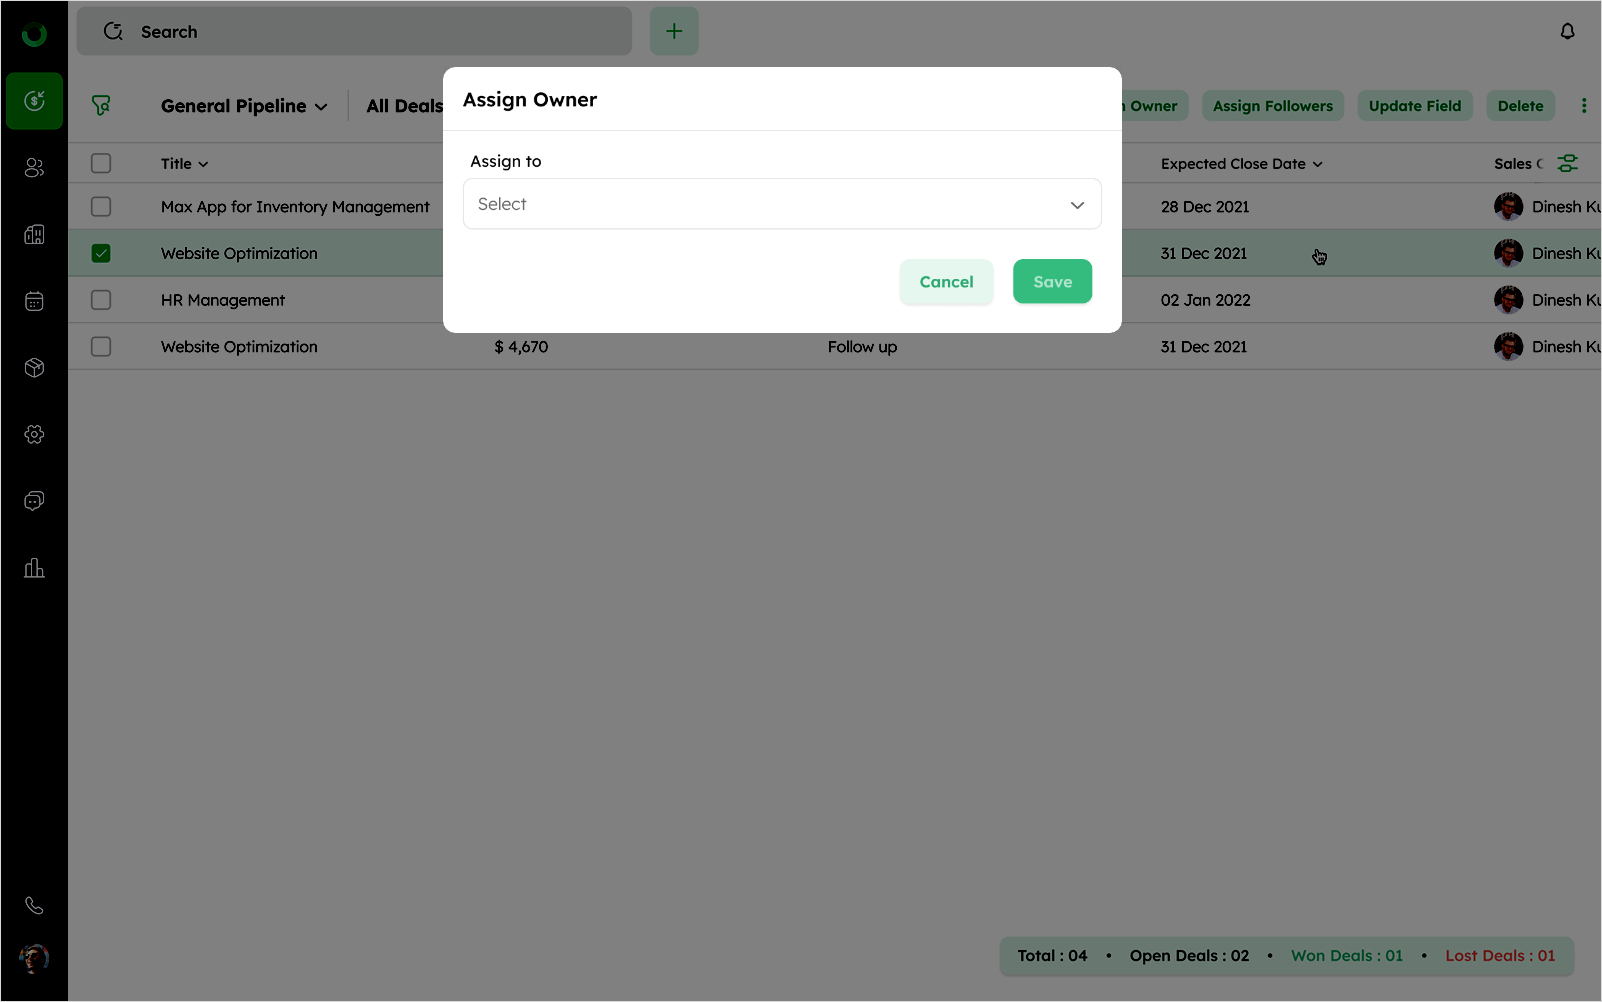
How to Assign New Owners in Bulk
Assigning an owner helps users to track accountability, and reporting by providing a clear point of contact for each lead or deal.
-
Click Assign Owner from the bulk action tray.
-
In the Assign Owner dialogue box, select a user to assign the selected deals from the user dropdown list.
-
The selected user will replace the current owner of the deal.
-
Click Save to confirm and update the deal.
Assigning Followers to Multiple Deals
Assigning followers to multiple deals ensures team members stay updated on deal activities and track deal progress efficiently.
-
Select the deals you want to assign followers to by clicking the checkboxes next to their names.
-
The bulk actions tray will appear at the top.
-
Click Assign Followers from the available bulk actions.
-
In the dialog box, choose the user(s) you want to assign as followers from the dropdown list.
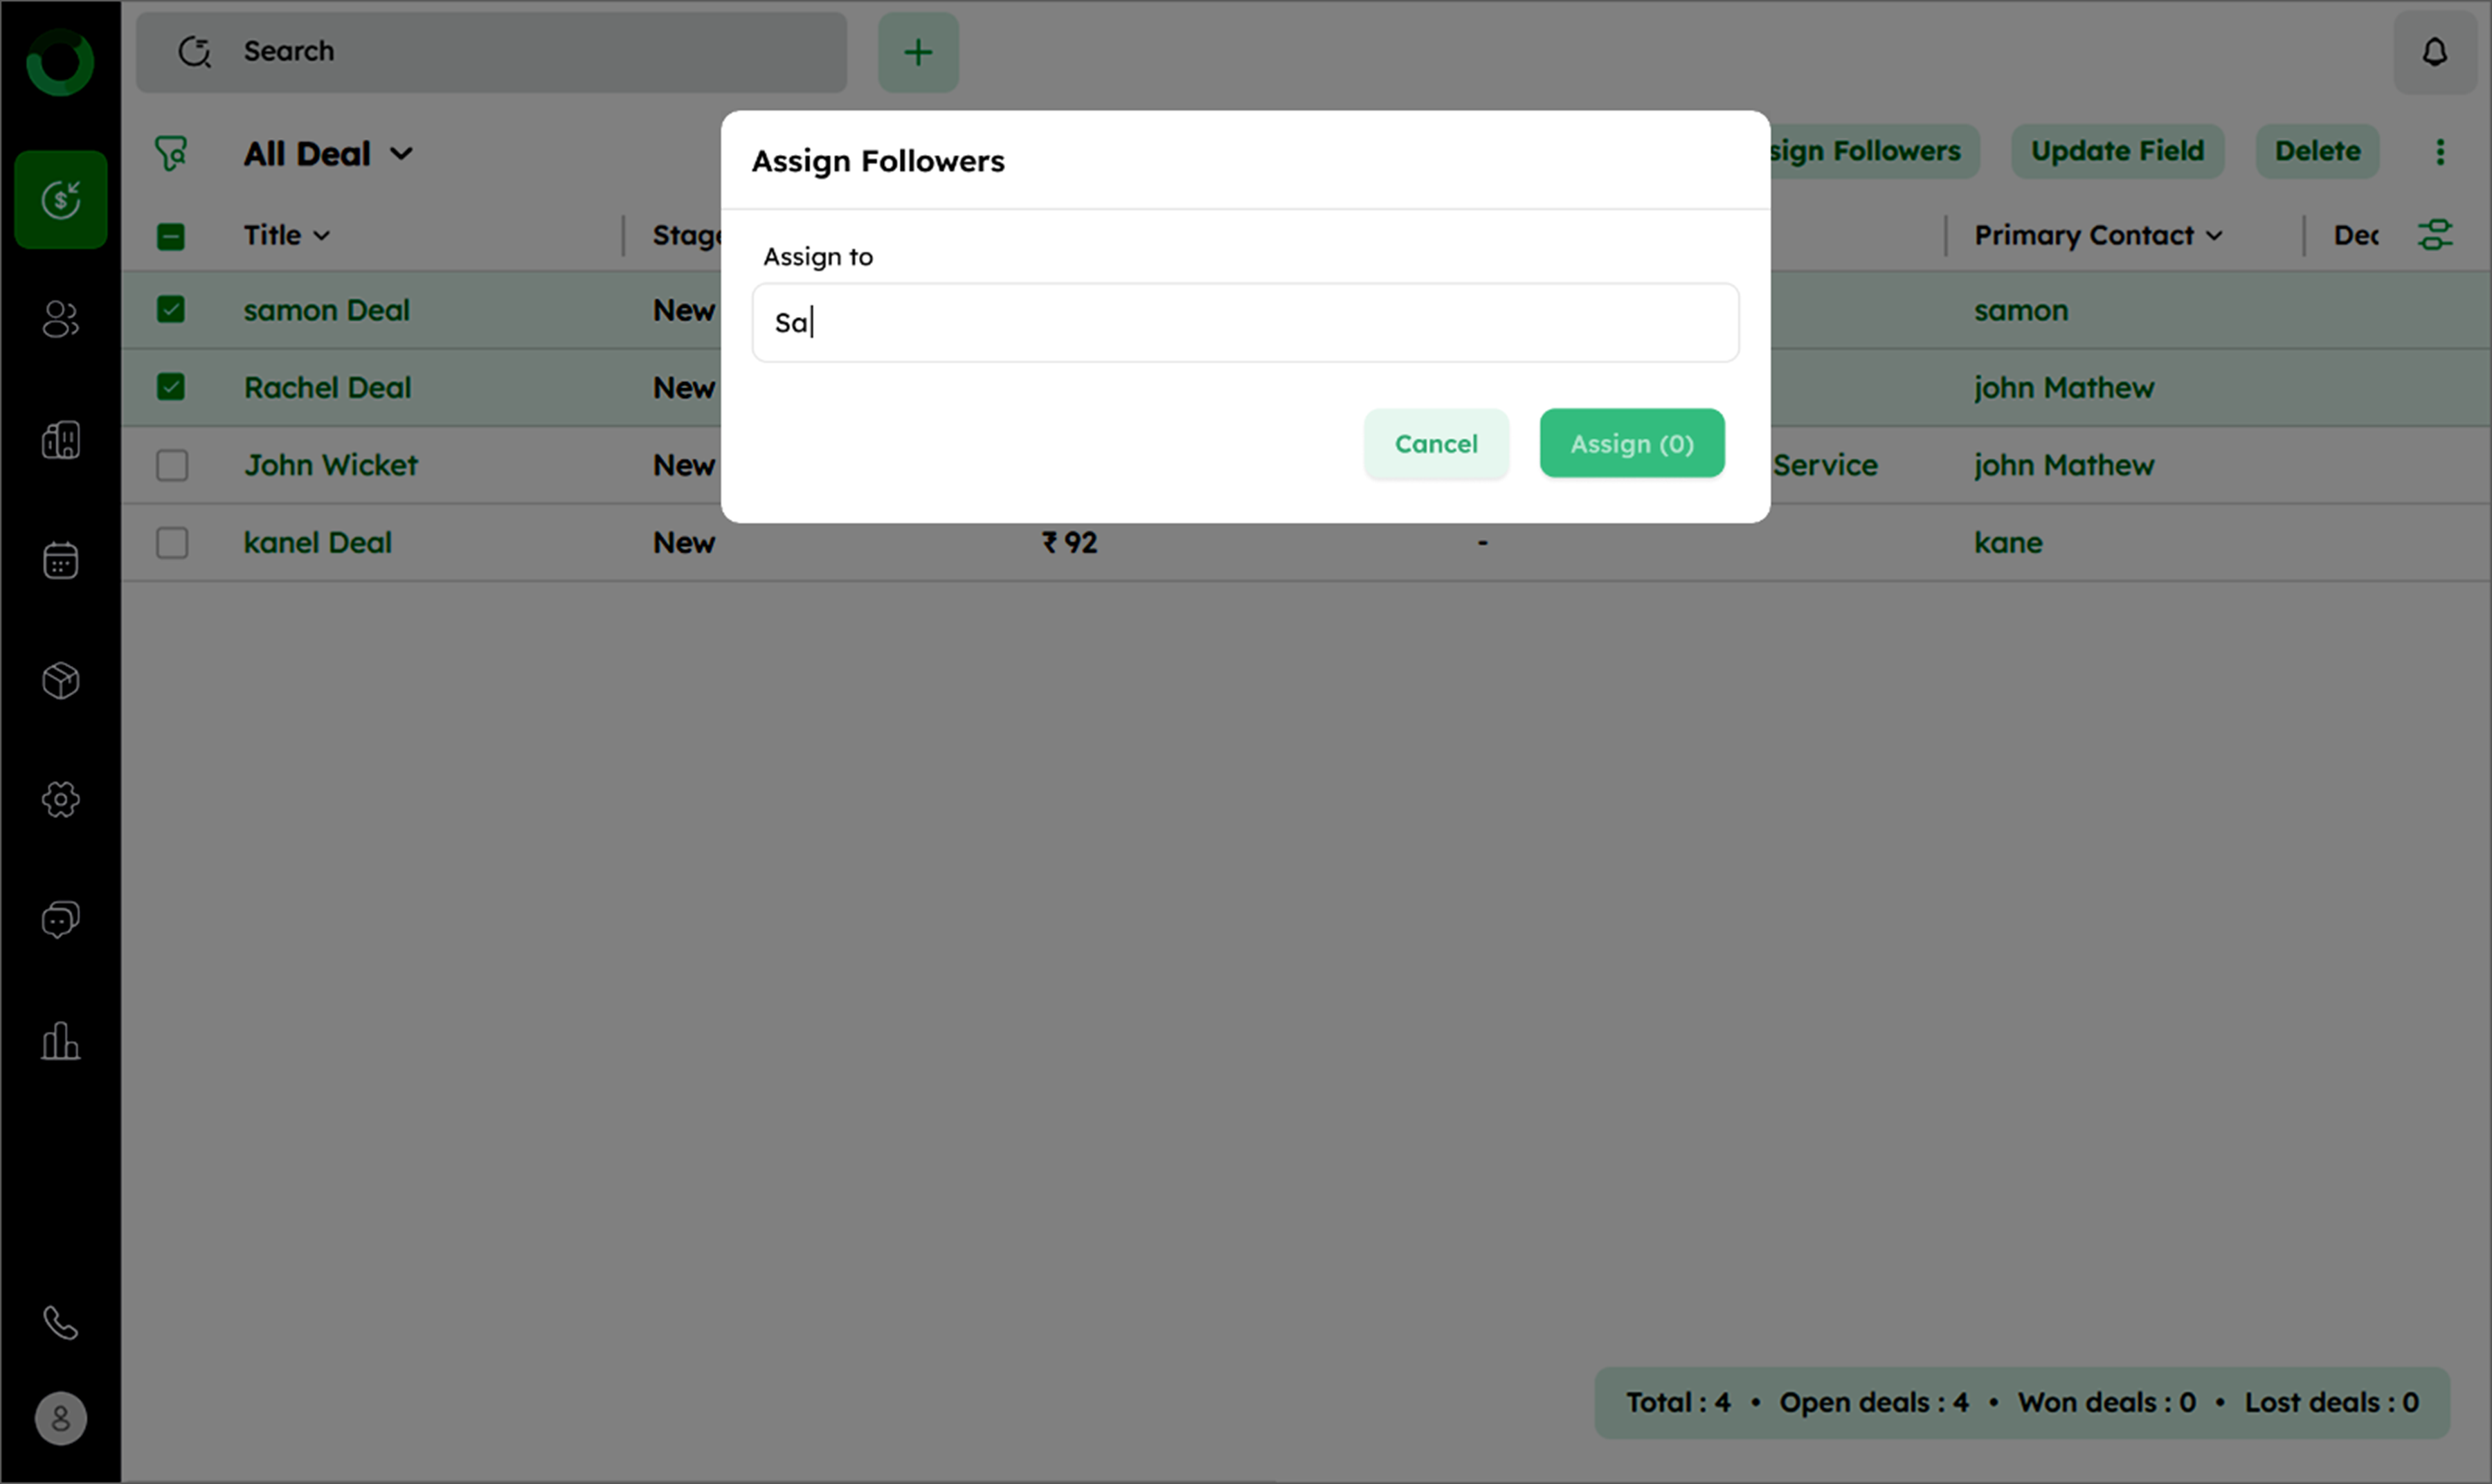
- Click Assign to add the selected followers to all chosen deals.
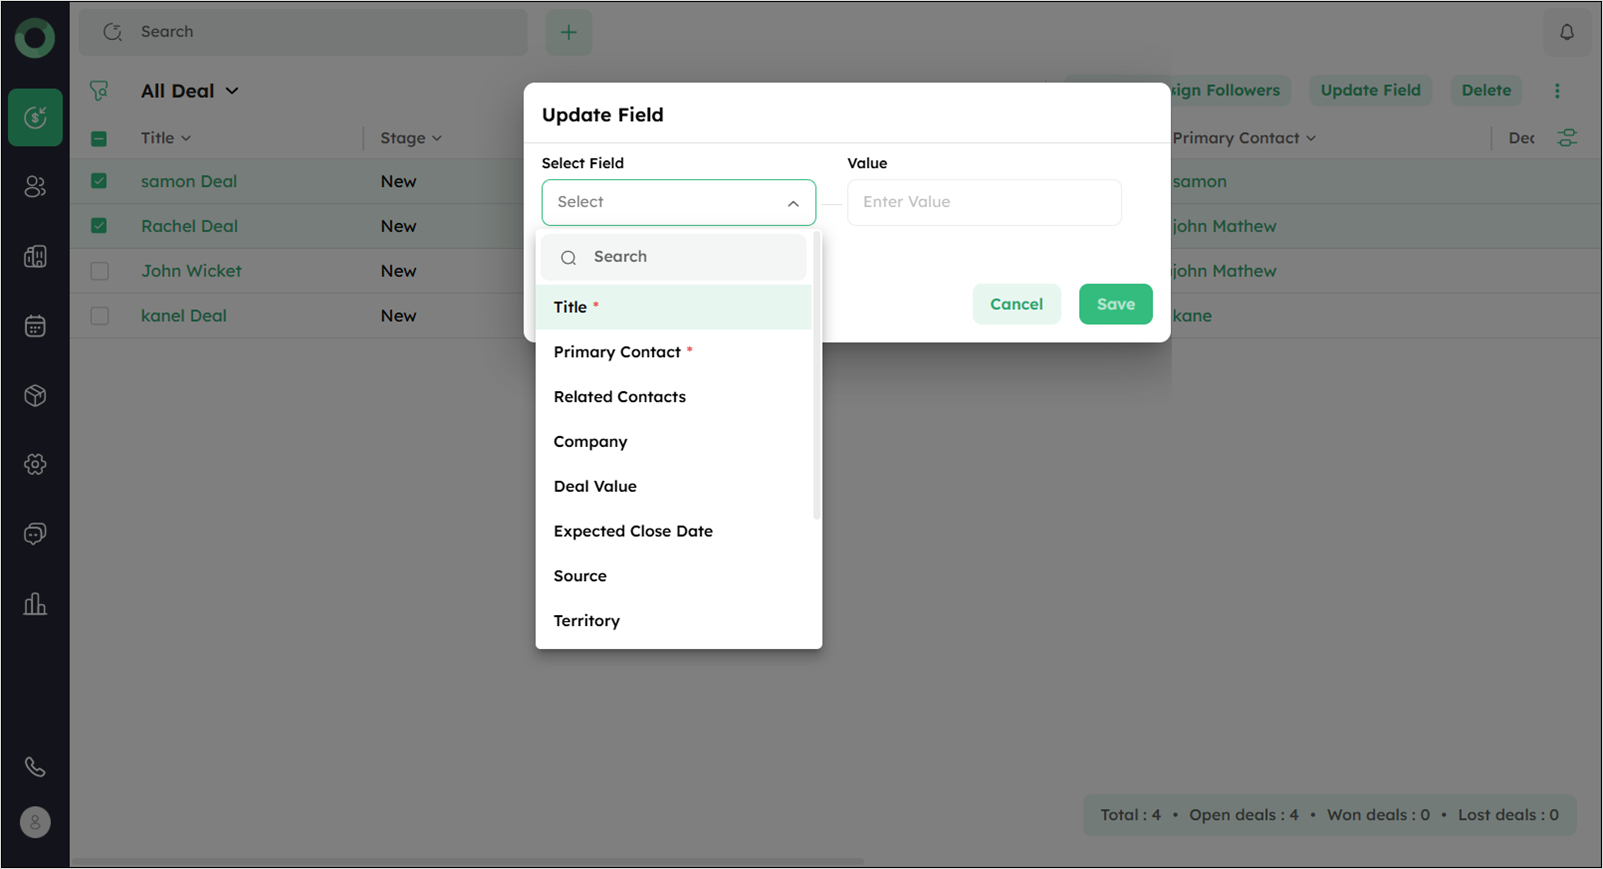
Bulk Updating Deal Fields
Updating fields in the CRM, helps to keep deal information accurate and up to date, ensuring better tracking and decision-making.
-
Select the deals you want to update.
-
Click Update Field from the bulk action tray. Choose the field(s) to update from the dropdown list.
-
All deal fields are available except auto-generated fields.
-
Enter the new value for the selected field.
-
Click Save to apply the update to all selected deals
You can add all available fields from the dropdown and change their values as needed.
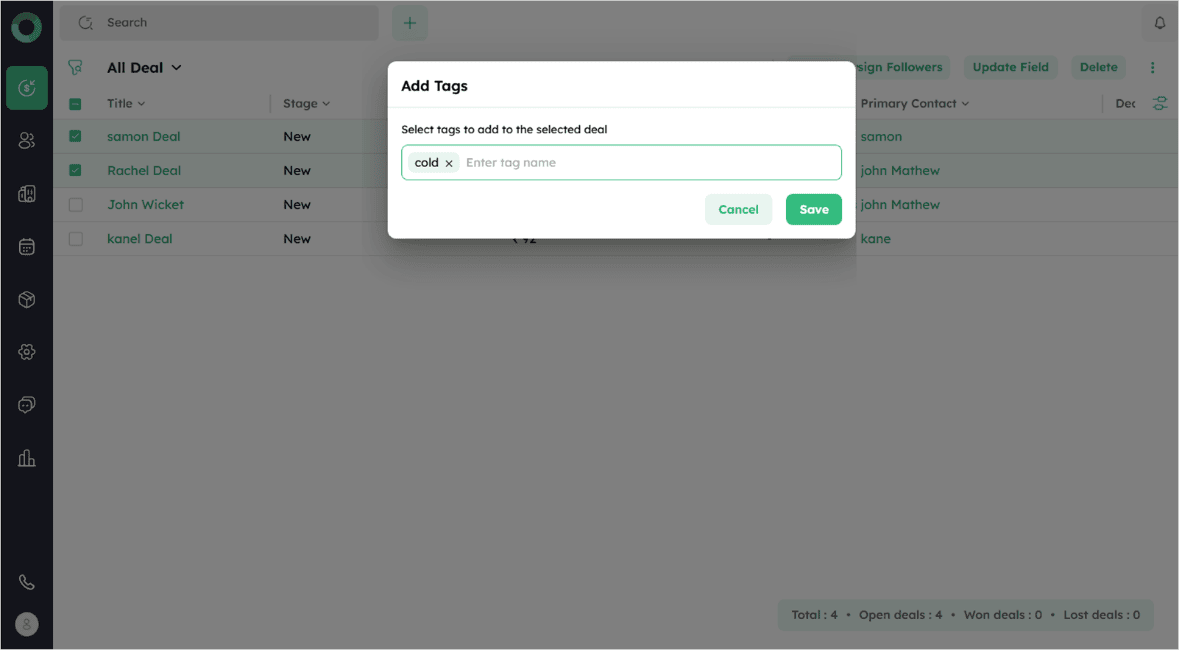
Bulk Adding or Removing Tags
Adding or removing tags helps to categorize and organize deals, making it easier to search, filter, and manage relevant information.
Add Tags:
-
Select the deals to update tags.
-
Select the ellipsis (⋮) menu in the top-right corner and choose Add Tags from the menu.
-
Choose one or more tags from the dropdown list.
-
Click Save to apply the tags to the selected deals.
Remove Tags:
-
Select the deals to remove the tags.
-
Select the ellipsis (⋮) menu in the top-right corner and choose Remove Tags from the menu.
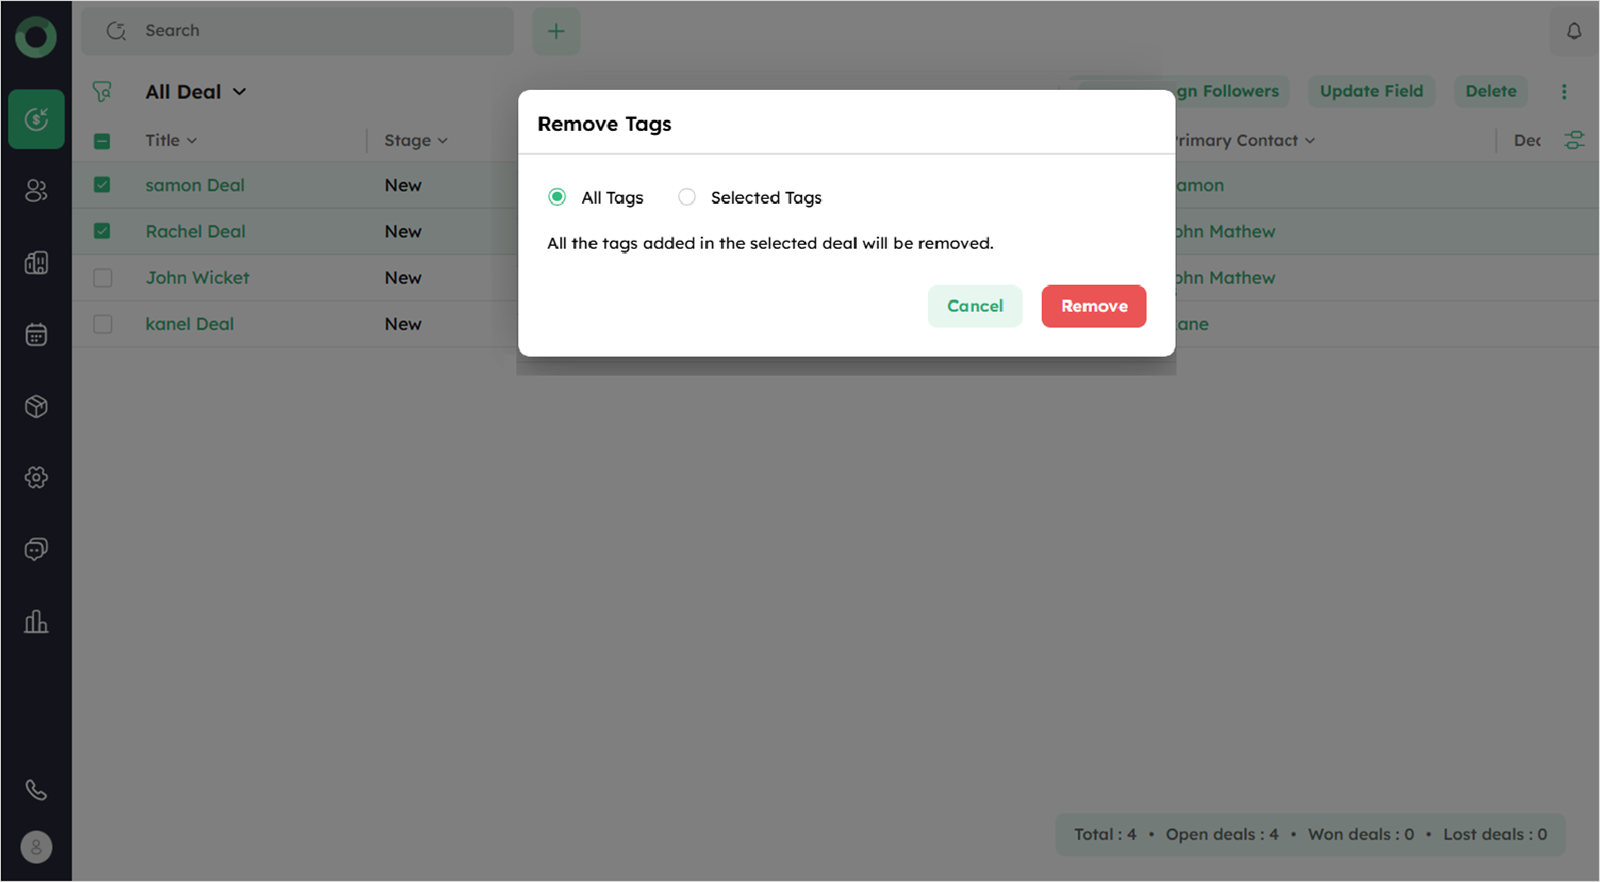
- Choose one of the following:
-
All Tags - Removes every tag linked to the deal.
-
Selected Tags - Removes only the chosen tags.
- Click Remove to update the deal.
Exporting Deals
The Export feature allows you to export multiple deals at once, simplifying the process of extracting deal information.
-
Go to the Deal Module.
-
Select the deals you want to export by checking the boxes next to their names. You can also export all deals by clicking the checkbox next to the fields.
-
Once selected, the bulk actions tray will appear. Click Export.
-
In the prompt, choose a file format (e.g., XLSX, XLS, or CSV) for the download.
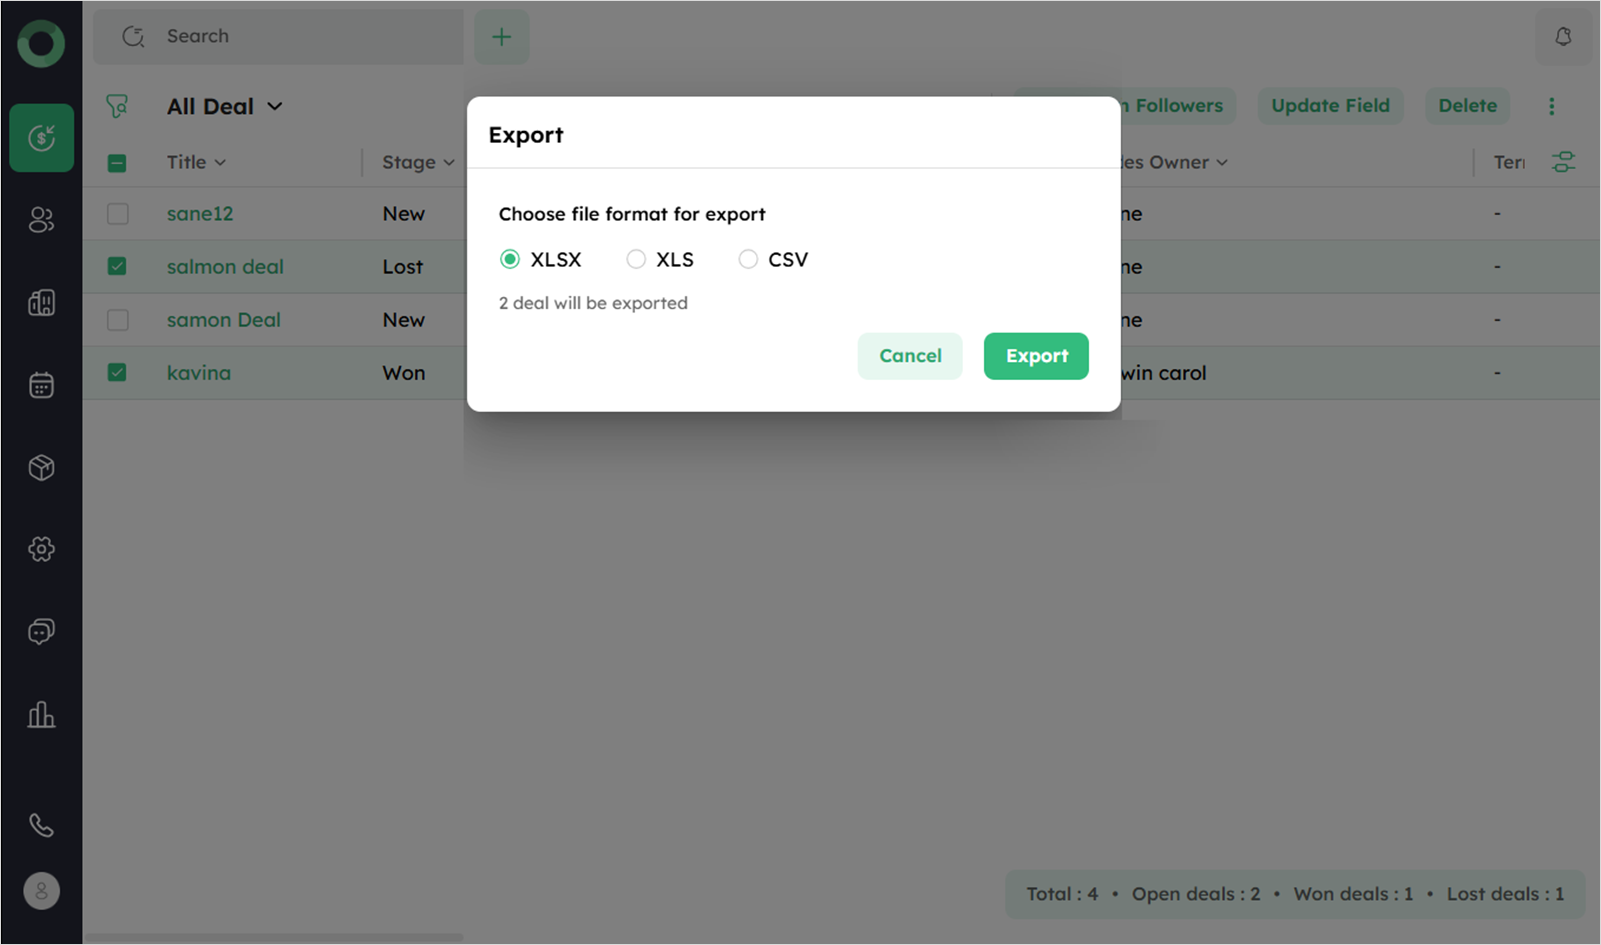
-
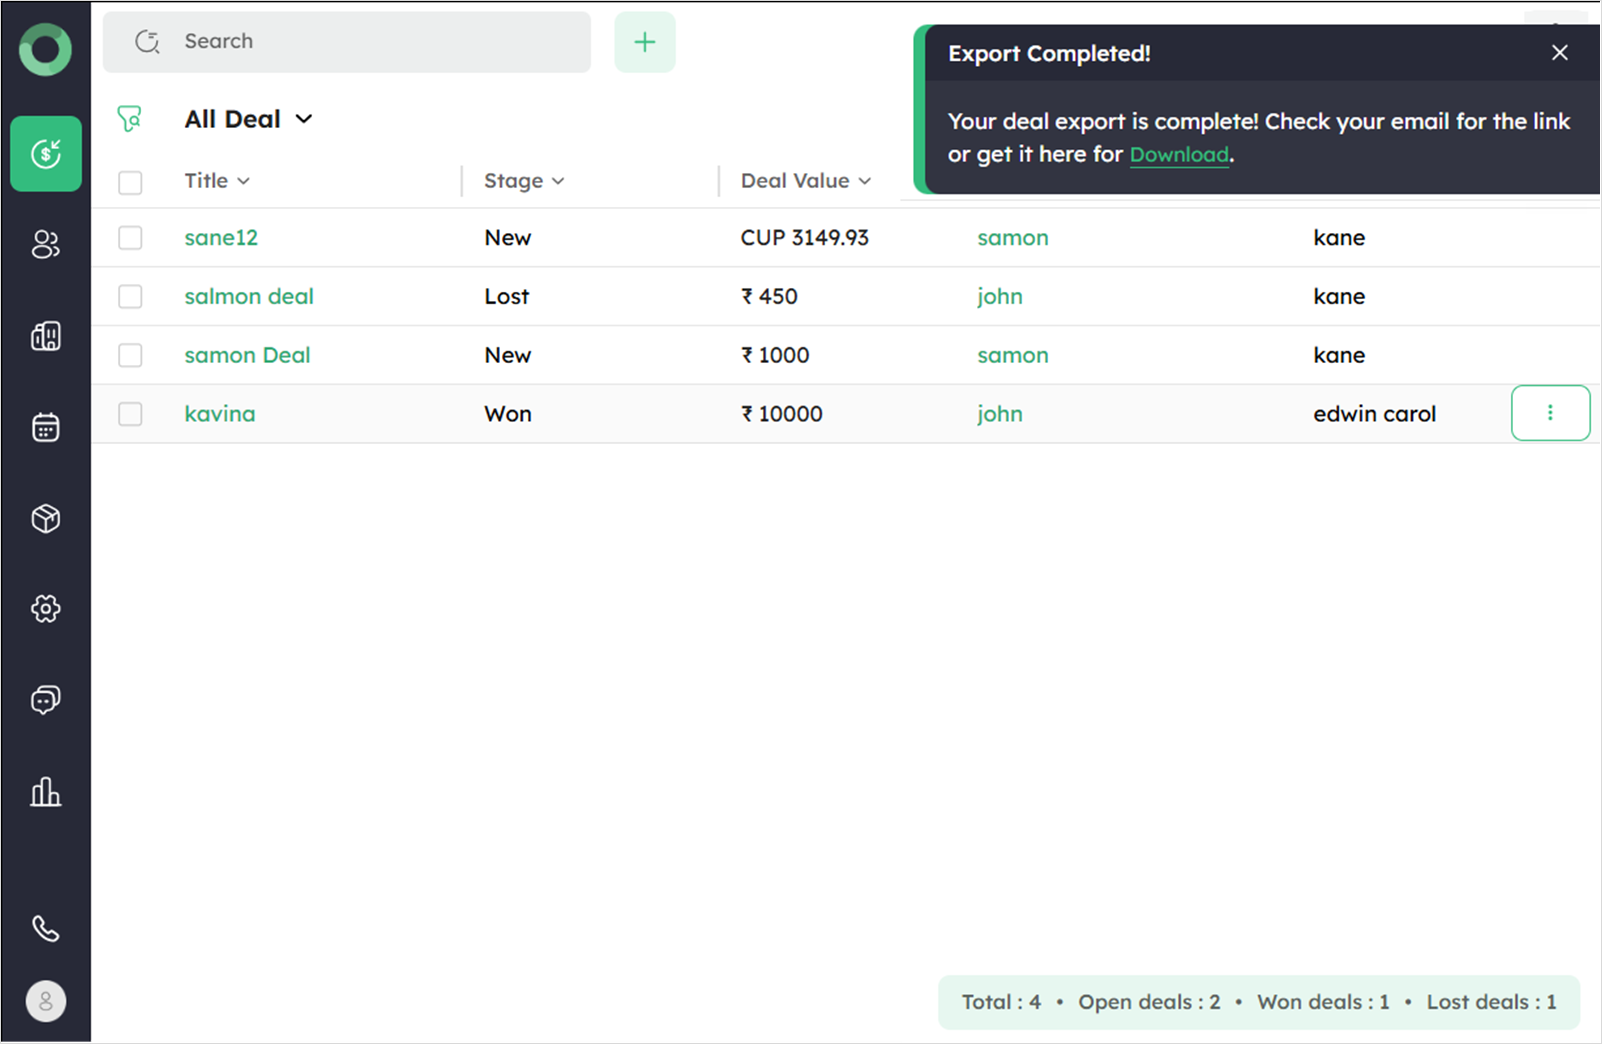
After choosing the desired format, click Export to generate the file.
-
Finally, click Download to save the file for your external use.
Archiving Deals in Bulk
Archiving multiple deals at once helps keep your active pipeline clean while retaining records for future reference.
-
Select the deals you want to archive by clicking the checkboxes next to their names.
-
Once selected, the bulk actions tray will appear at the top.
-
Click Archive from the available bulk actions.
A confirmation dialog will appear asking if you want to archive the selected deals.

- Click Archive to move all selected deals to the Archived View tab.
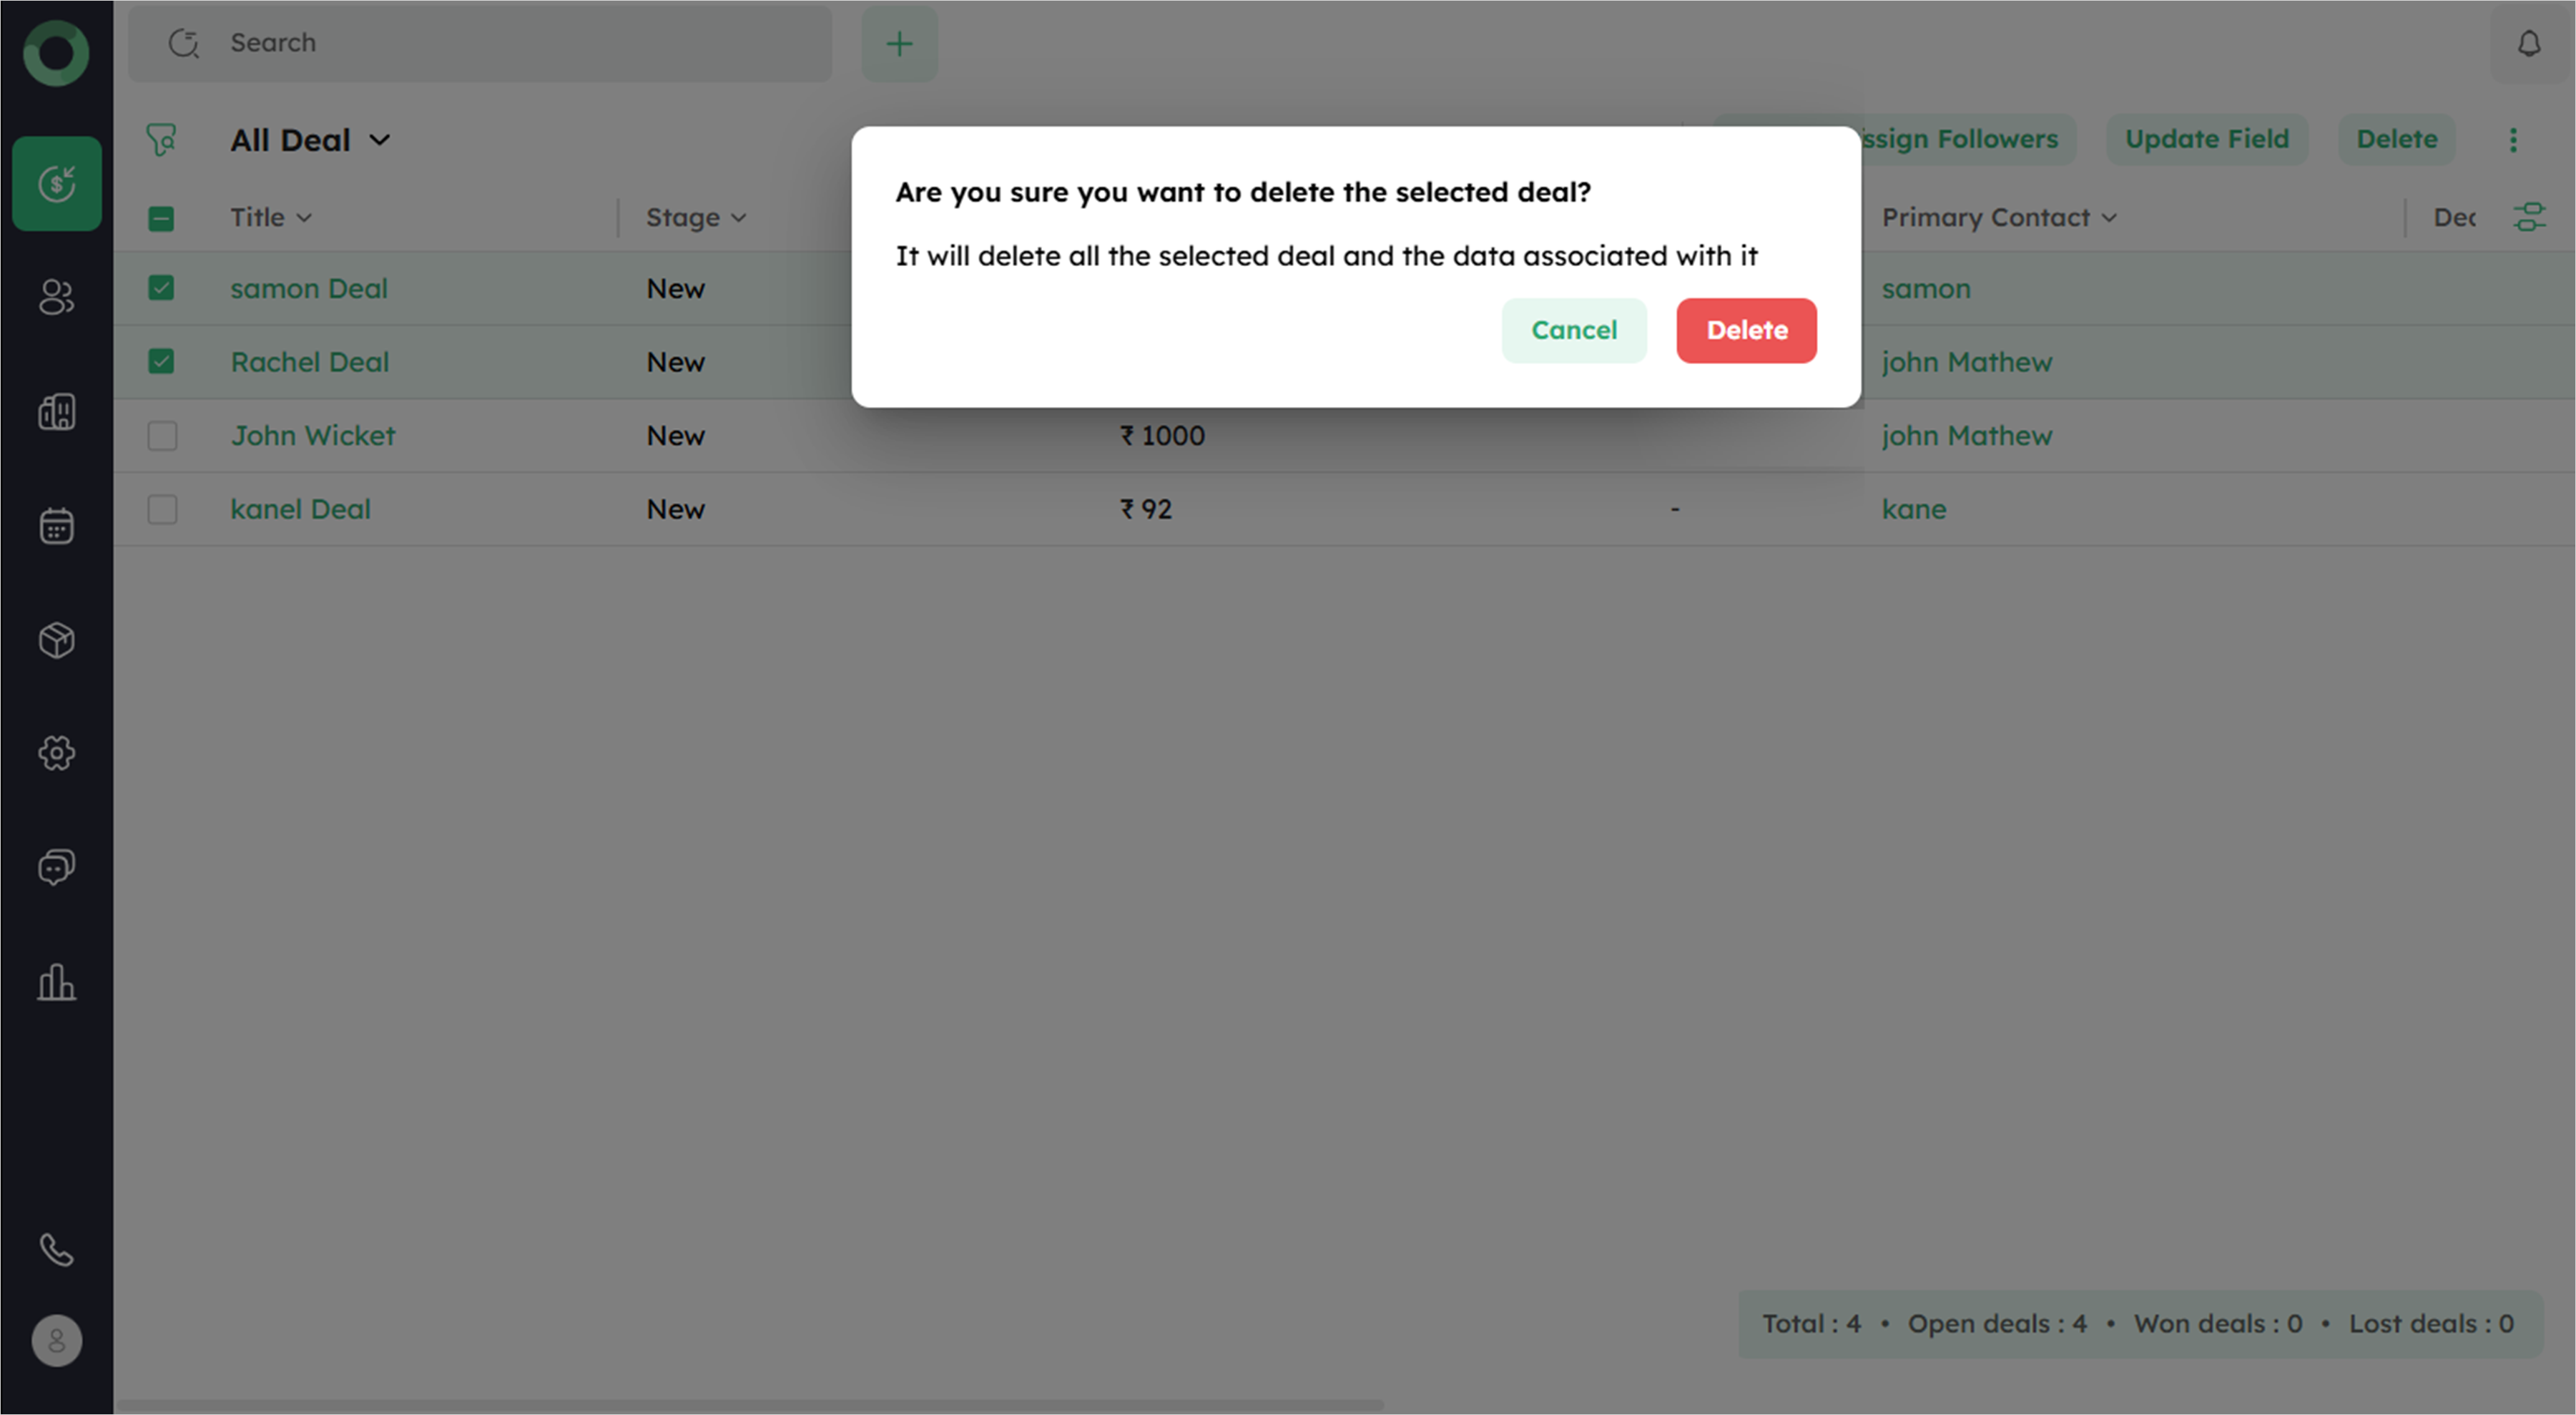
Deleting Deals
Deleting a deal removes it and all associated data from your records, helping maintain an organized and clutter-free database.
-
Select the deals you want to delete by clicking the checkboxes next to their titles.
-
From the bulk action tray, click Delete.
-
A confirmation pop-up appears with the message Are you sure you want to delete the selected deals? this will remove all associated data.
-
Click Delete to remove the selected deals and their associated data.
-
Click Cancel if you do not want to proceed.
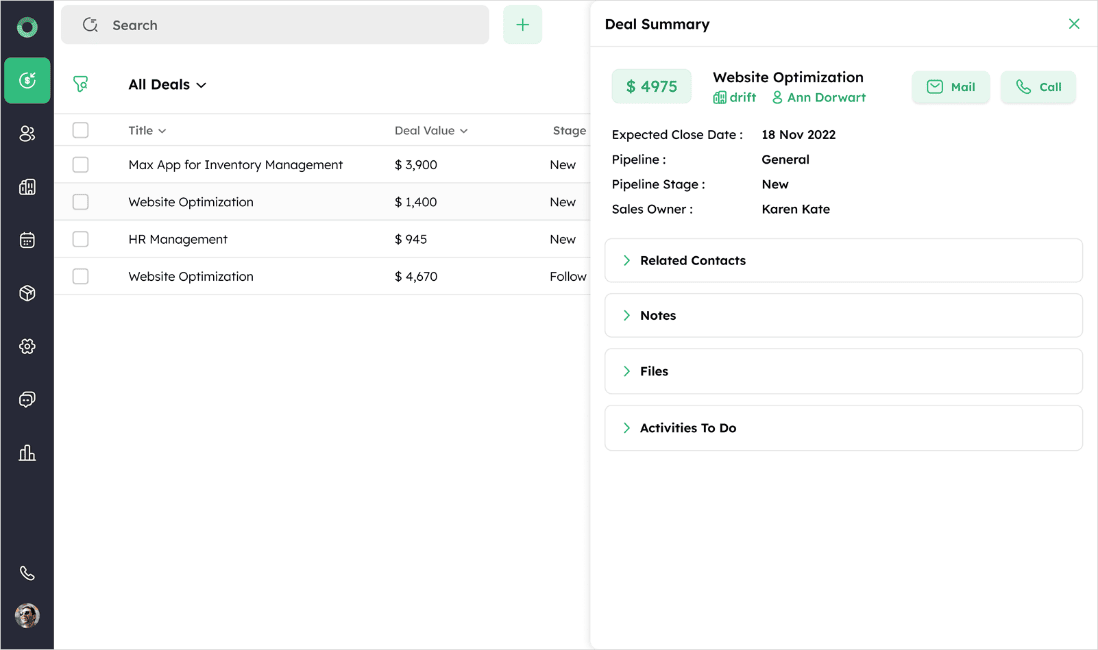
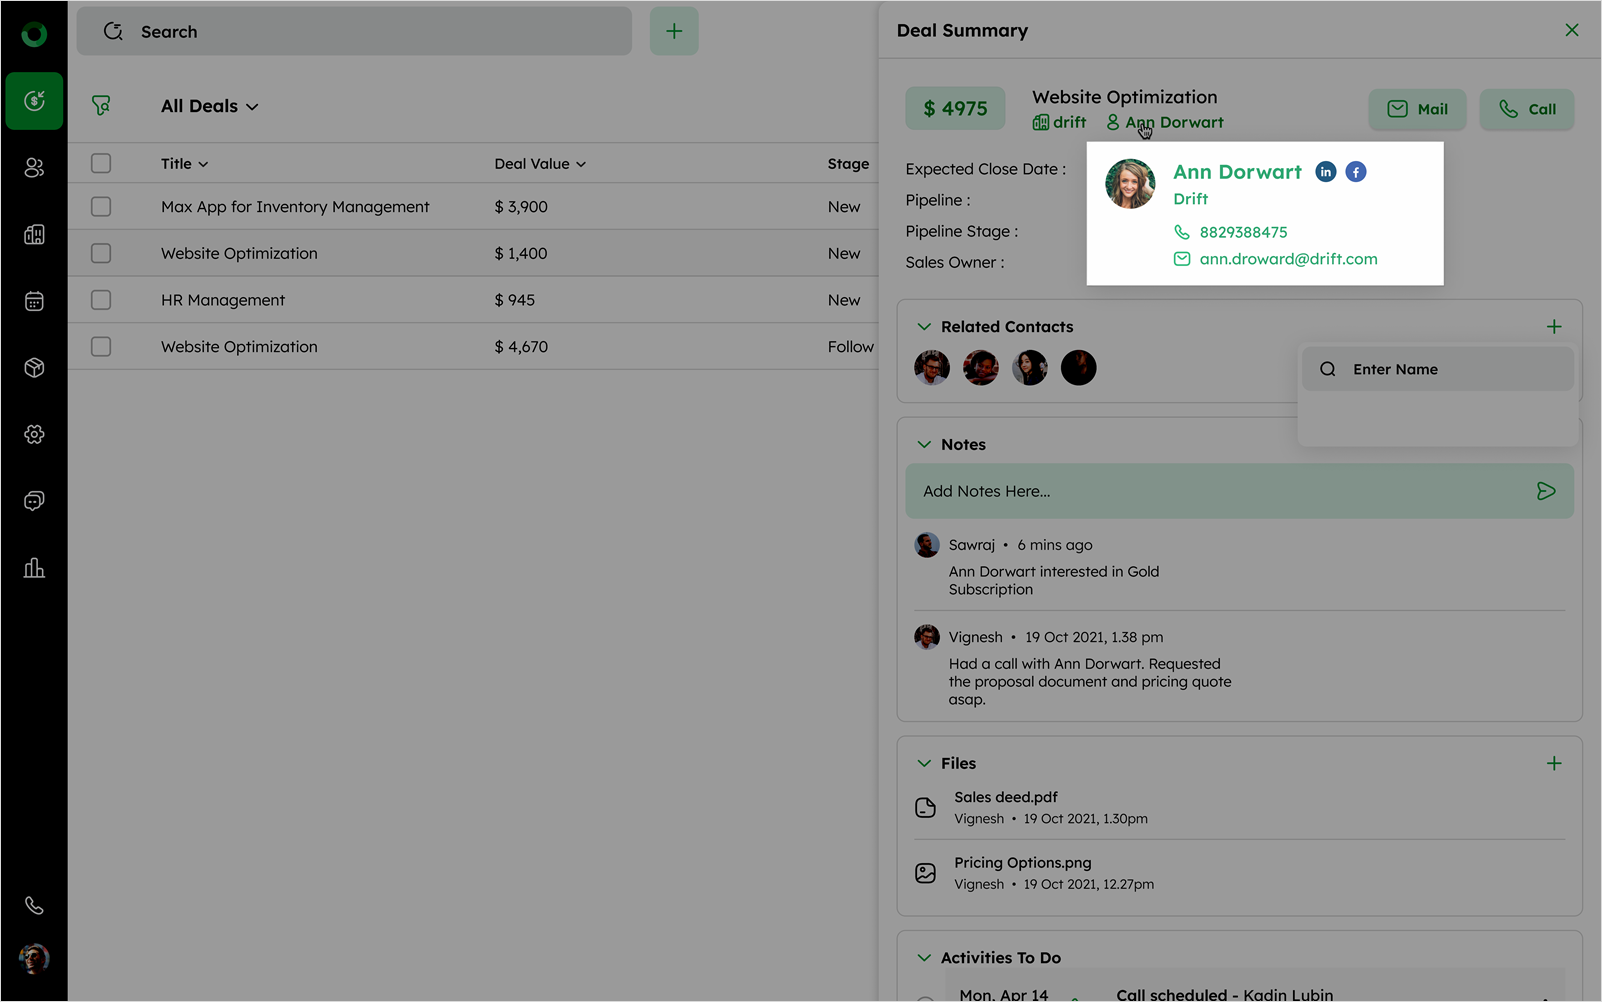
Reviewing Deals in the Summary View
The Summary View provides a snapshot of deal information and allows for quick access to key details. Clicking on a deal from the list view, opens the Deal Summary page on the right side. This page includes essential deal information and provides options for further interactions.
Navigating the Summary View:
-
Click on a deal to open the Summary Page. The page header shows Deal Summary at the top left, with a remove icon to close the page.
-
The Deal Summary initially displays the deal value with currency and deal name. If no value is provided, it shows zero with the default currency. If no company is associated, the contact’s name is shown instead.
-
Clicking the company’s name opens a card with its profile details, and clicking the name on the deal card redirects to the Company Detail page.
-
Clicking the contact’s name opens a card with its profile details, and clicking the name on the deal card redirects to the Contact Detail page.
-
The page displays Expected Close Date, Pipeline, Pipeline Stage, and Sales Owner.
-
Includes a toggle list for Related Contacts, Notes, Files, and Activities To Do.
-
Click the deal title navigates to the Detailed Deal Page, for more in-depth information about the deal.
Managing Archived Records
Archiving keeps your sales pipeline organized by moving inactive or completed deals to a separate archive without deleting them. This helps maintain a clean workspace while retaining historical records for reference.
-
Deals can be archived individually or in bulk from both the List View and Deal Detail Page.
-
Archived deals are moved to Archived View tab.
-
Open the Archived View to see the list of archived deals.
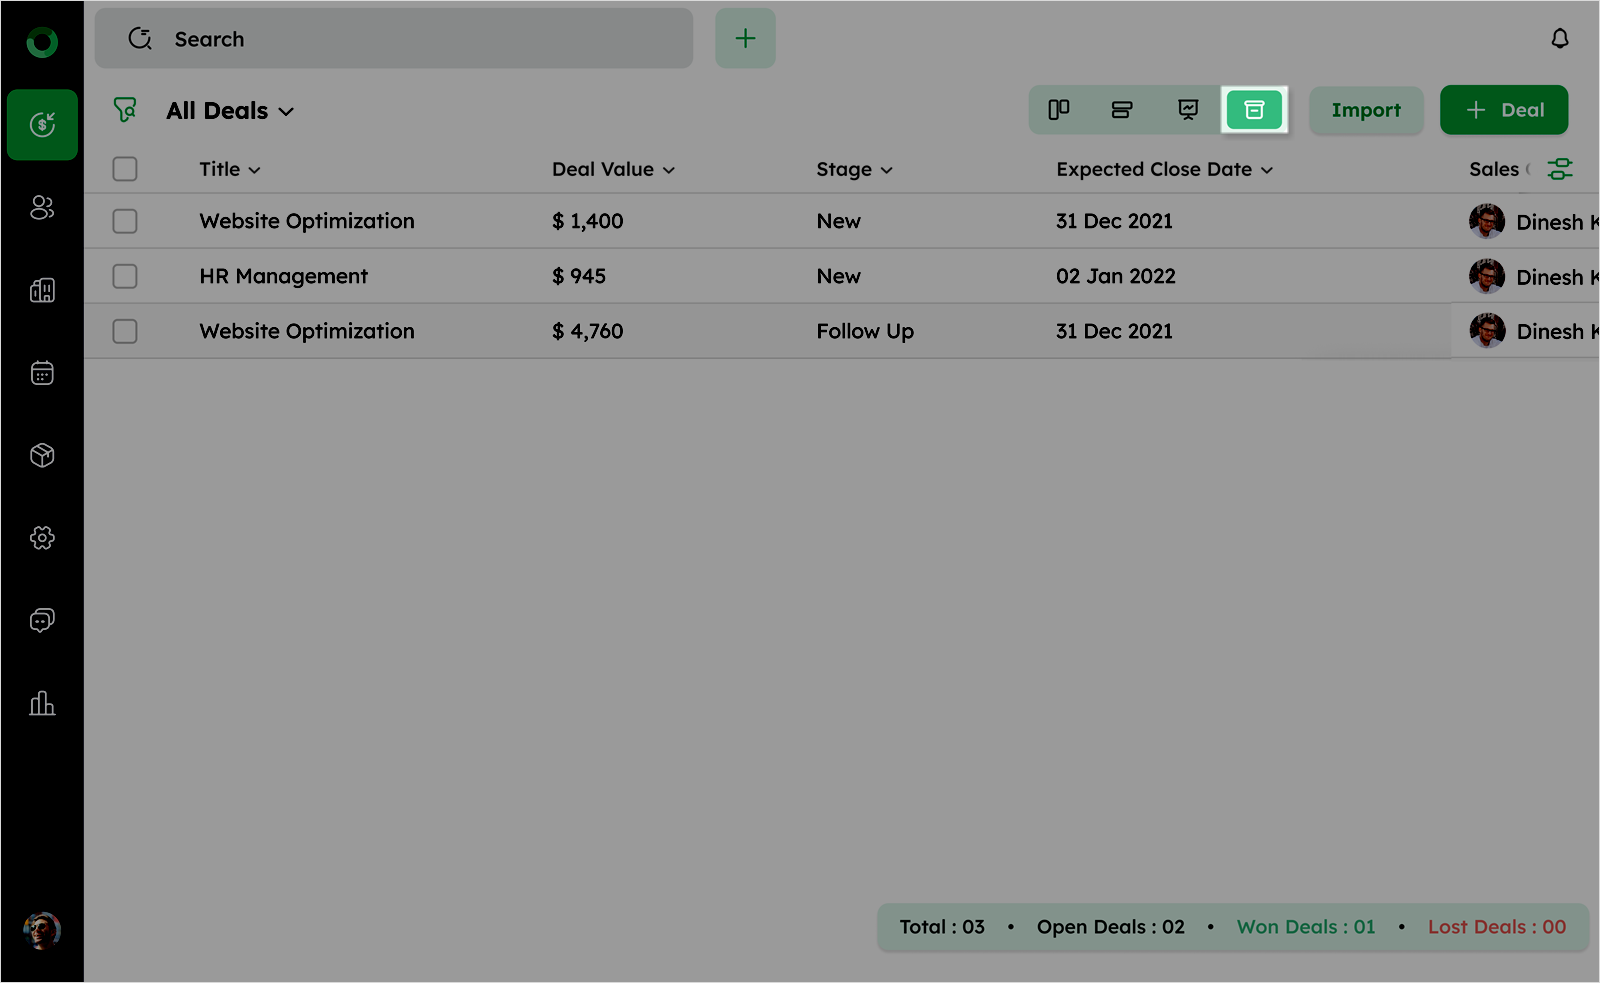
- Hover over any archived deal to display the ellipsis (⋮) menu.
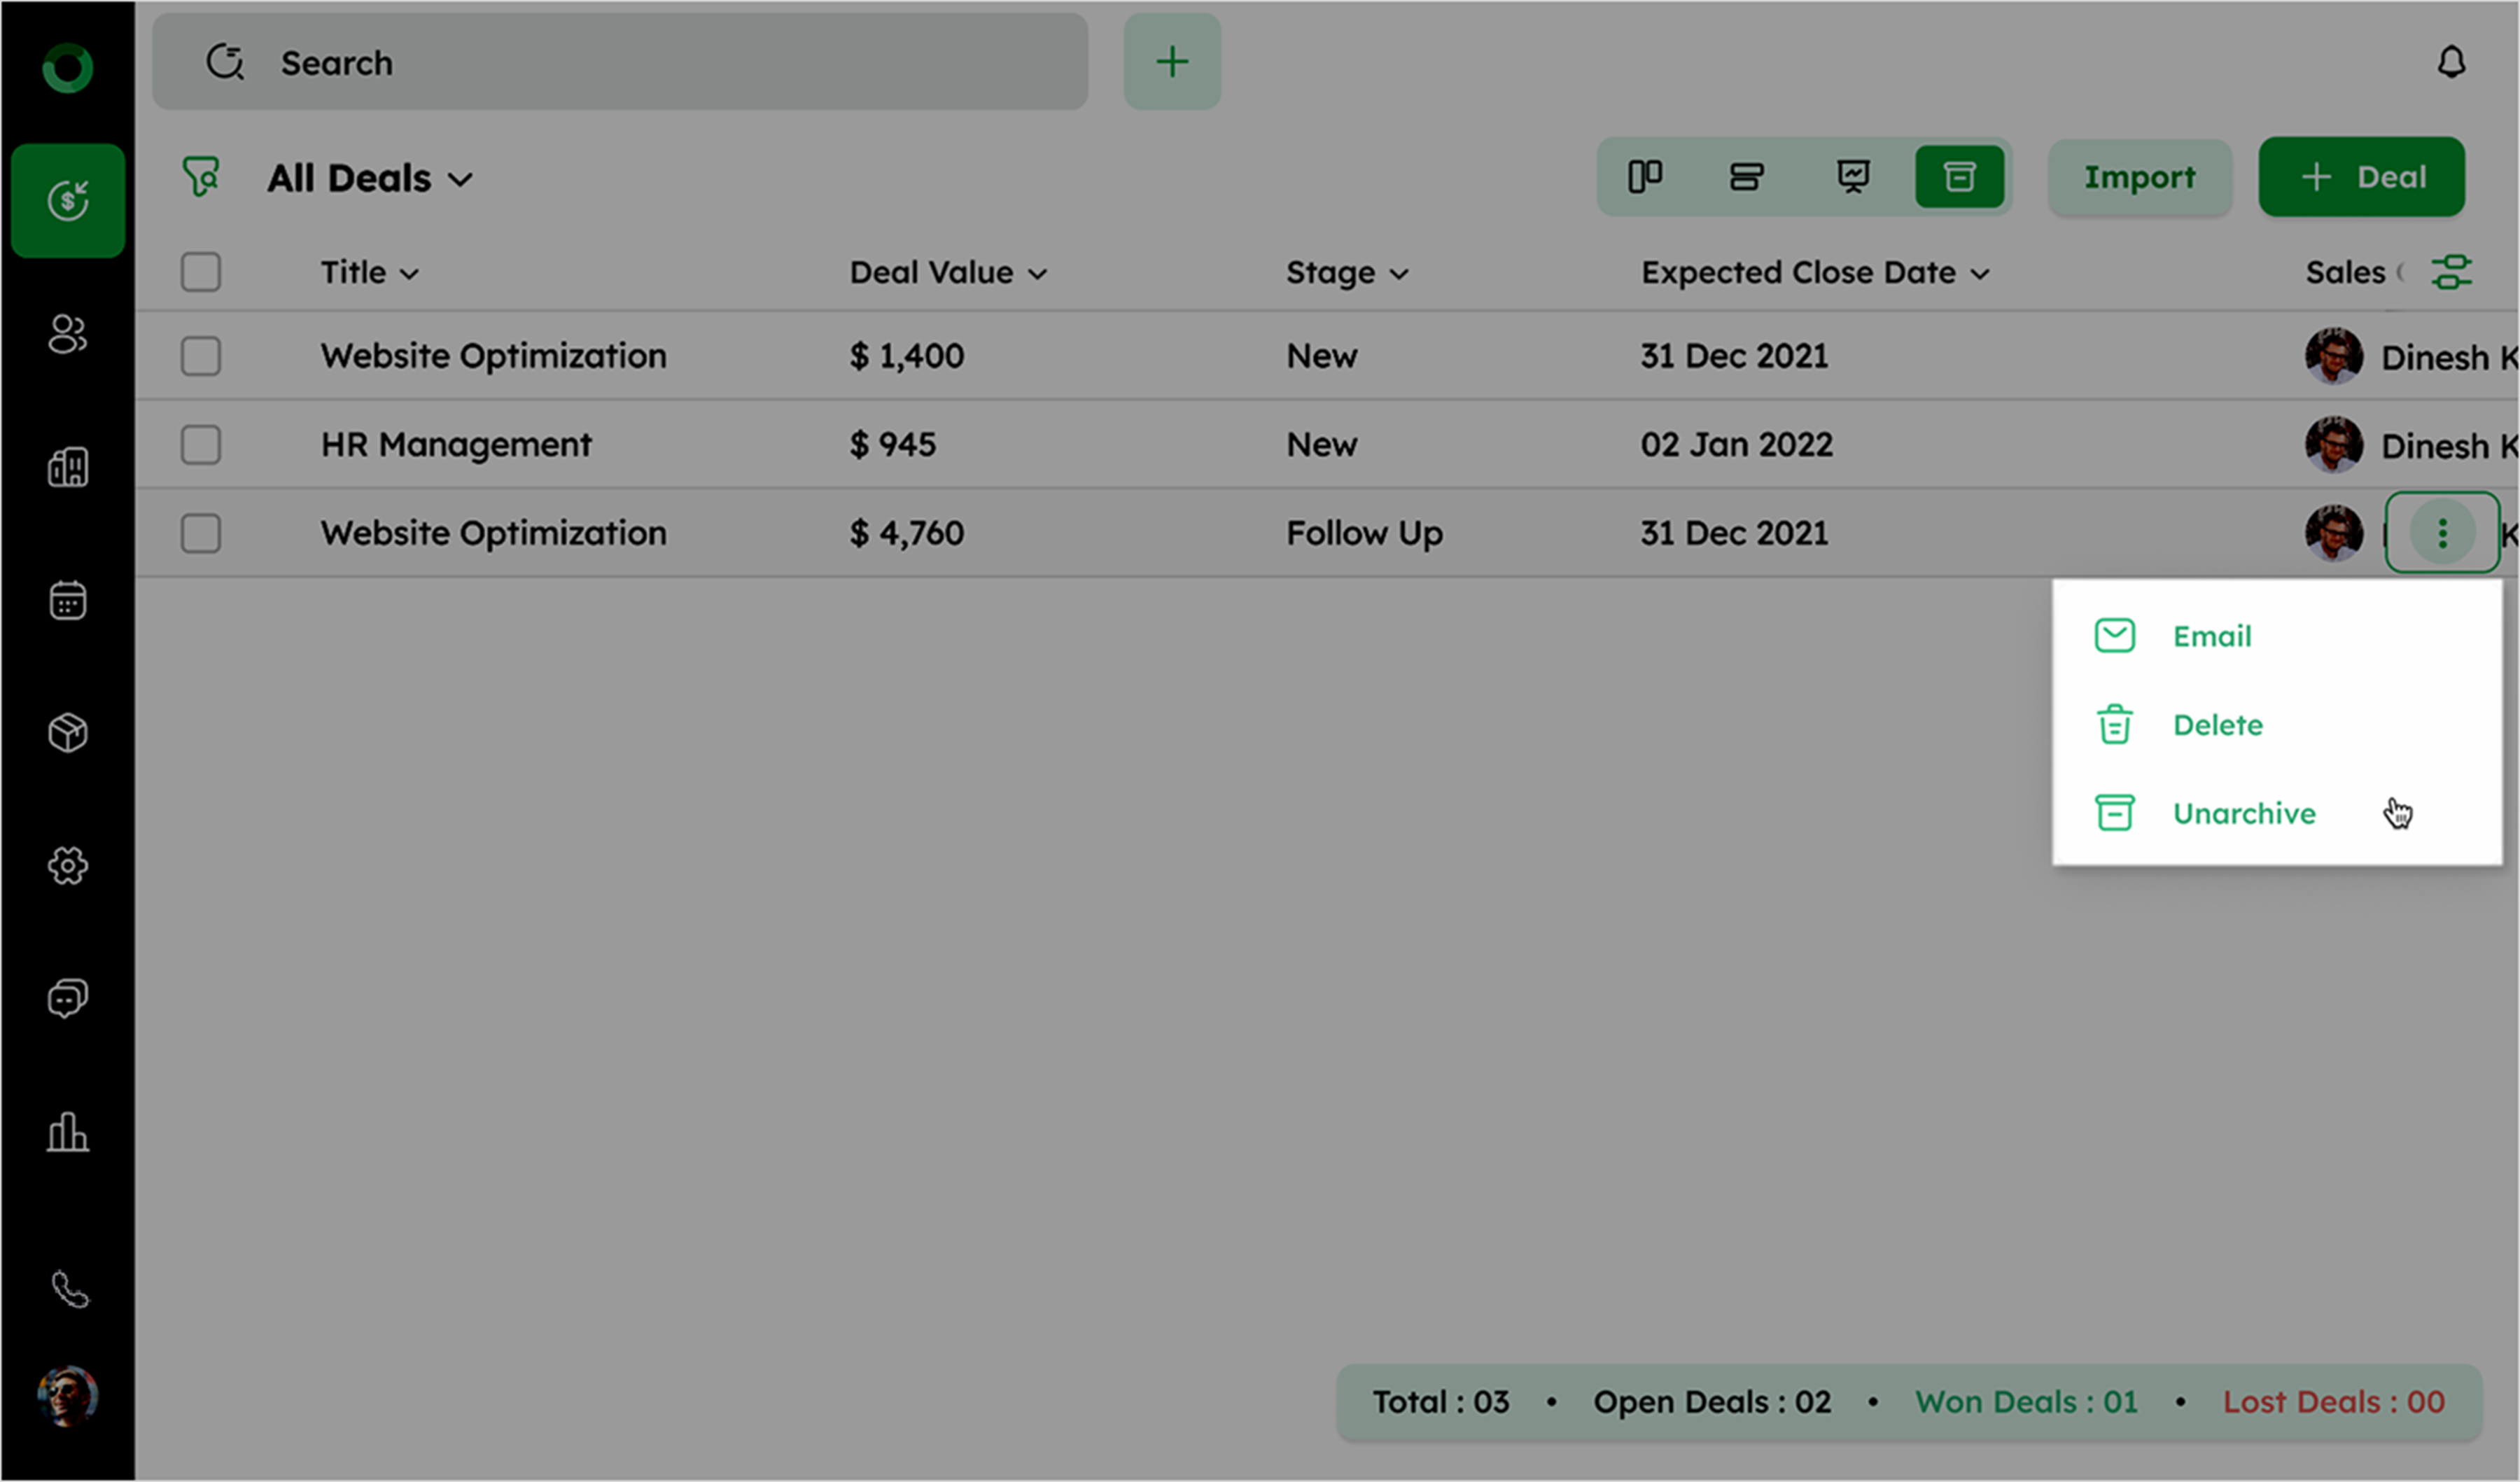
- Click the ellipsis icon to access the following actions:
-
Unarchive – Restore the deal to the active pipeline.
-
Email – Compose and send an email linked to the deal.
-
Delete – Move the deal to the recycle bin.
-
Deal fields cannot be edited, and new activities, contacts, or products cannot be added to archived deals.
-
Archived deals are hidden from List, Kanban, and Forecast views.
-
Workflow automations do not apply to archived deals.
-
Viewing, searching, adding/editing notes, sending emails, exporting, and unarchiving deals remain possible.