Adding and Importing Products
Step-by-Step Guide to Adding a Product
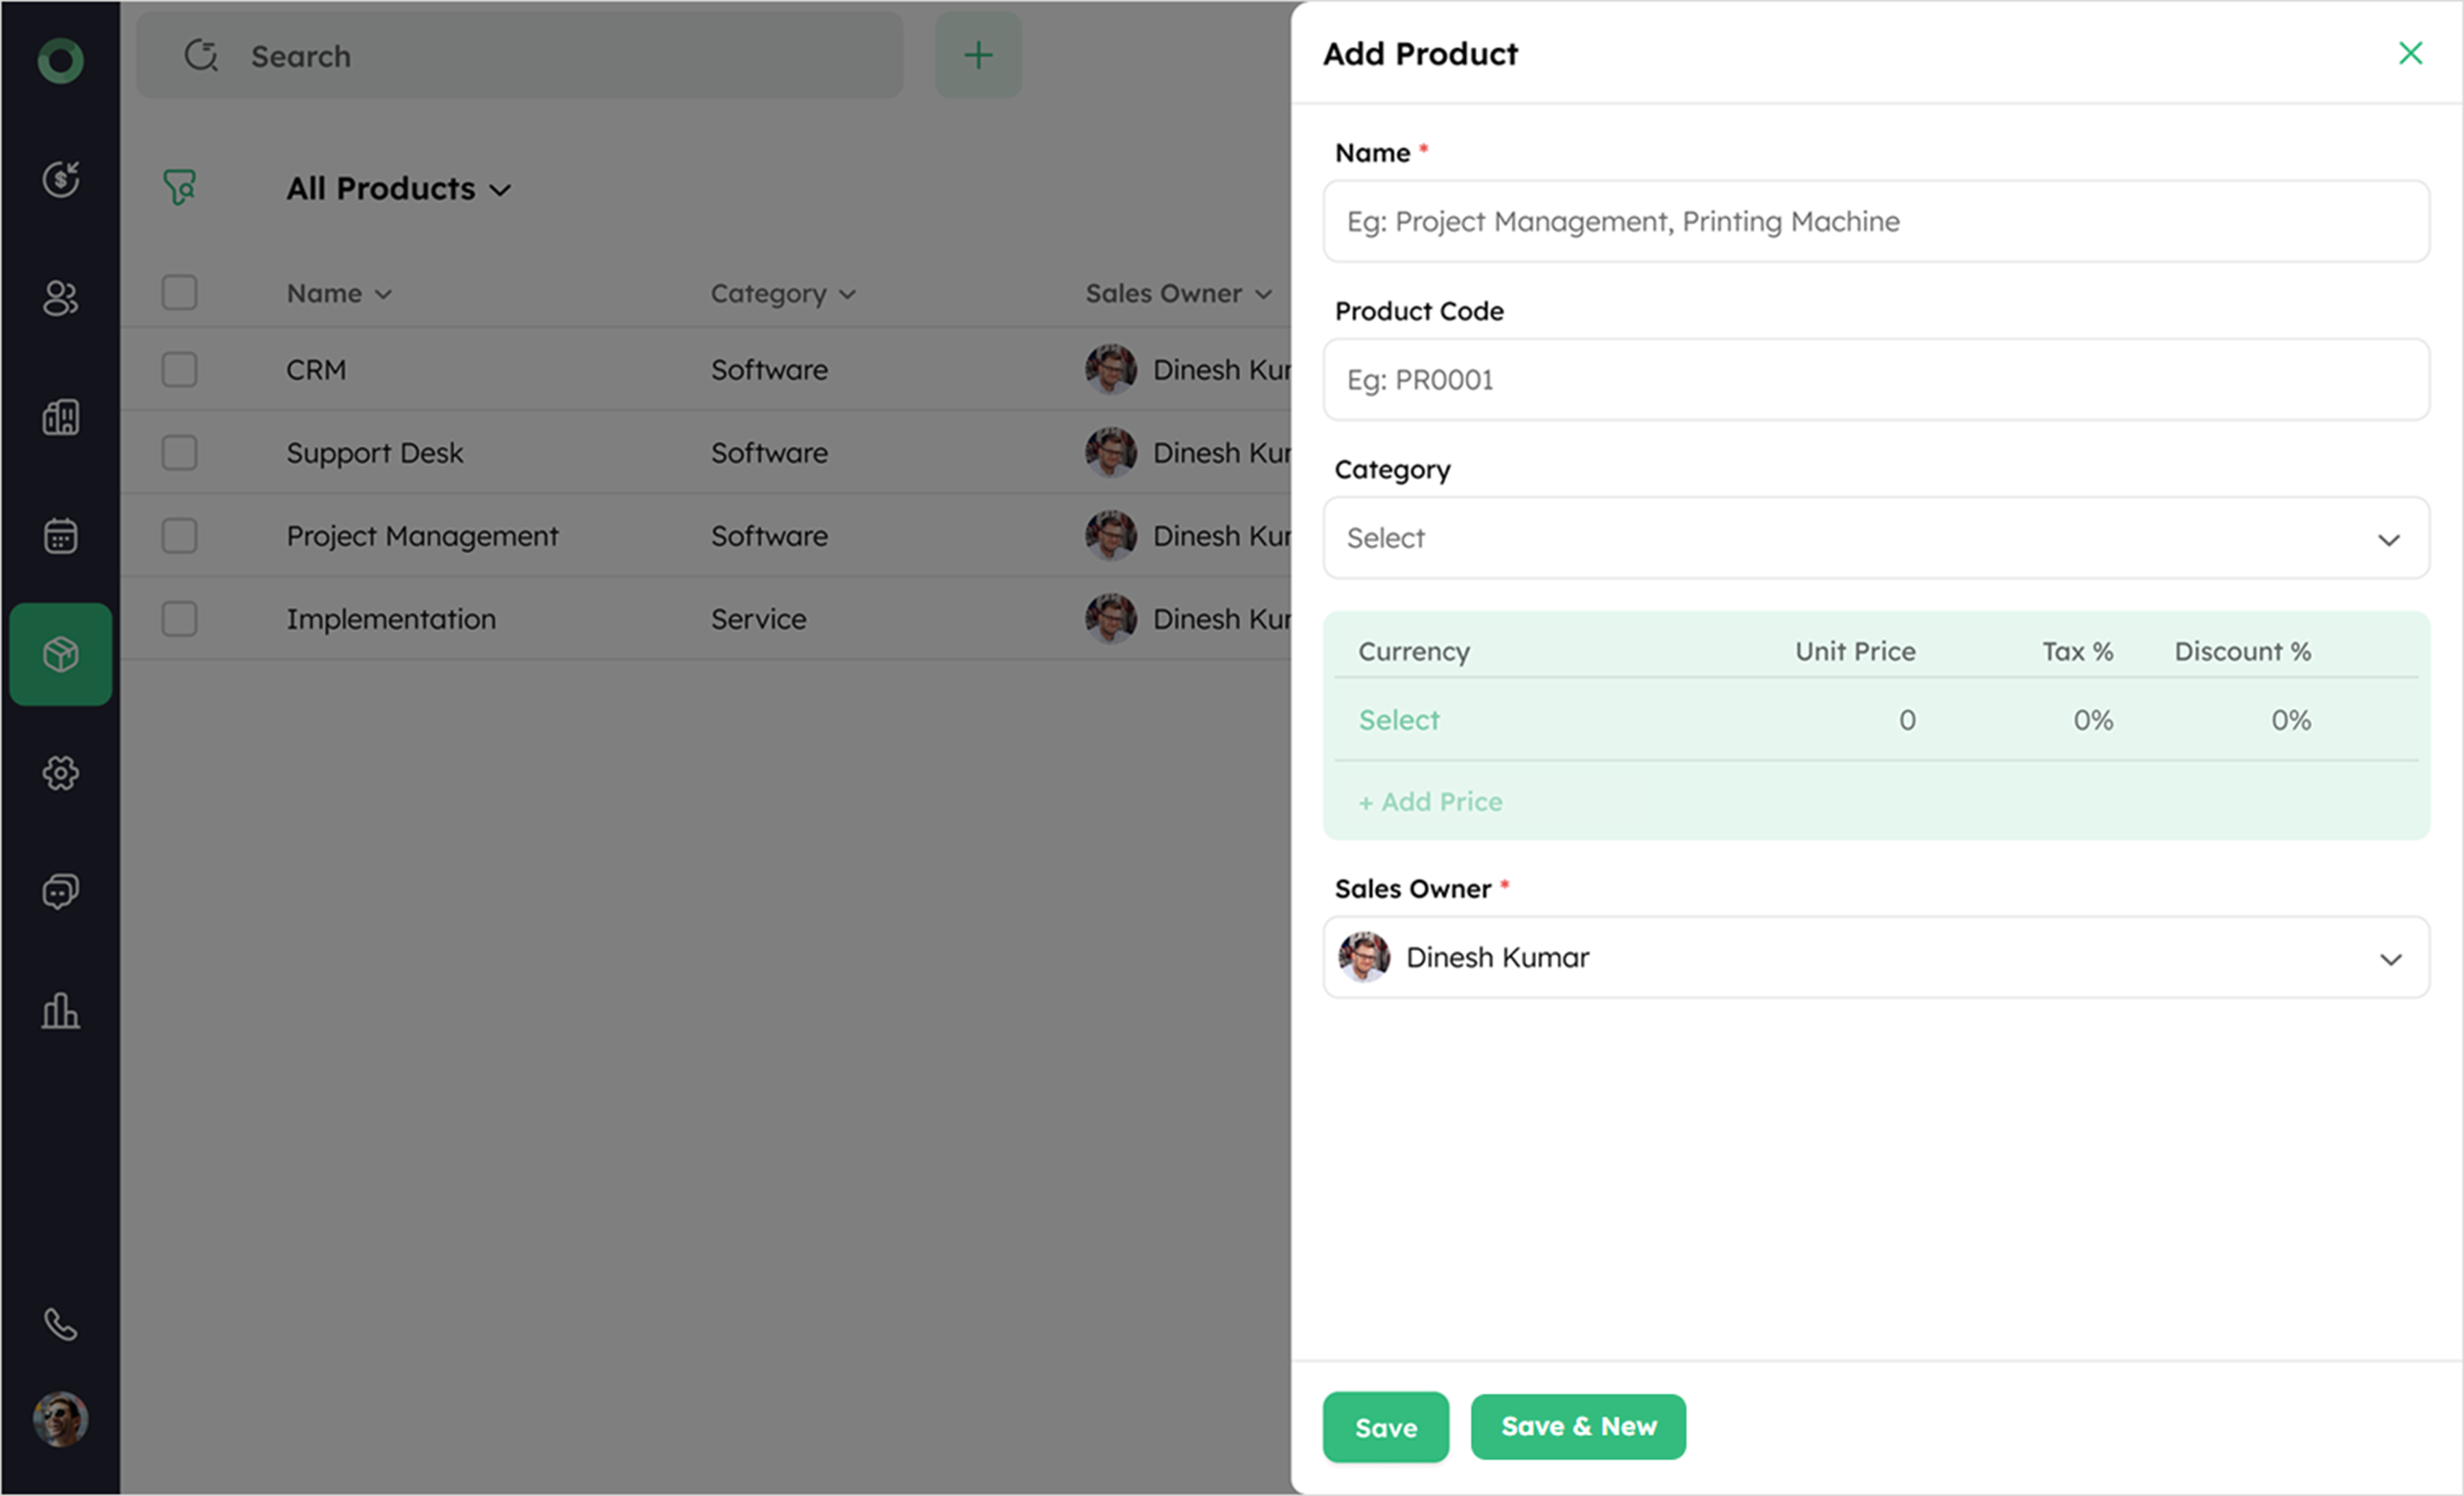
Creating a new product enhances the ability to manage and track items within deals efficiently.
- In the List View of the product module, locate the +Product option at the top right corner.
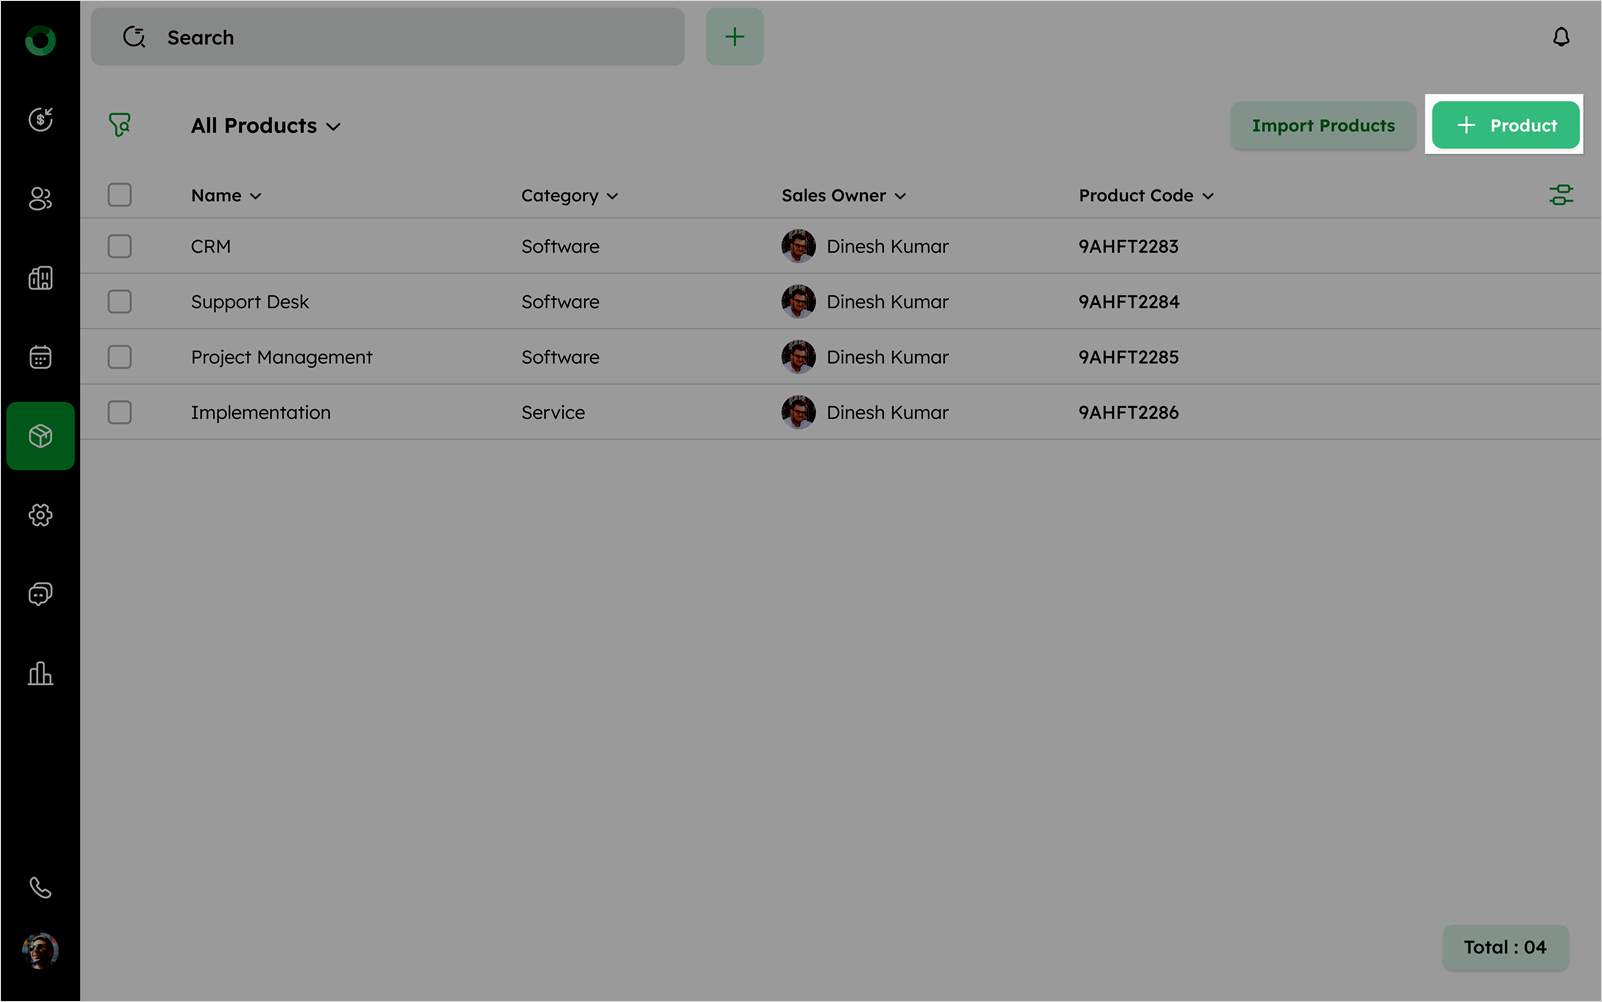
- Click +Product to open the Add Product drawer.
-
Fill in the necessary details, including Name, Product Code, Category, Unit Price, and Sales Owner.
-
Once completed, click Save to add the product to your list.
The list of default fields is as follows:
| Field Name | Description |
|---|---|
| Name* | The unique identifier or title of the product. |
| Product Code | A unique alphanumeric code used to identify the product. |
| Category | A classification that organizes the product into a specific group or type. |
| Unit Price | The cost assigned to a single unit of the product. |
| Sales Owner* | The person responsible for managing and overseeing the product's sales. |
An asterisk (*) indicates a mandatory field.
How to Import Products in Twozo?
Importing products enables efficient bulk data entry while minimizing errors. It ensures product information remains structured and easily accessible.
- Go to Admin Settings > Leads, Data Import & Migration > Import.
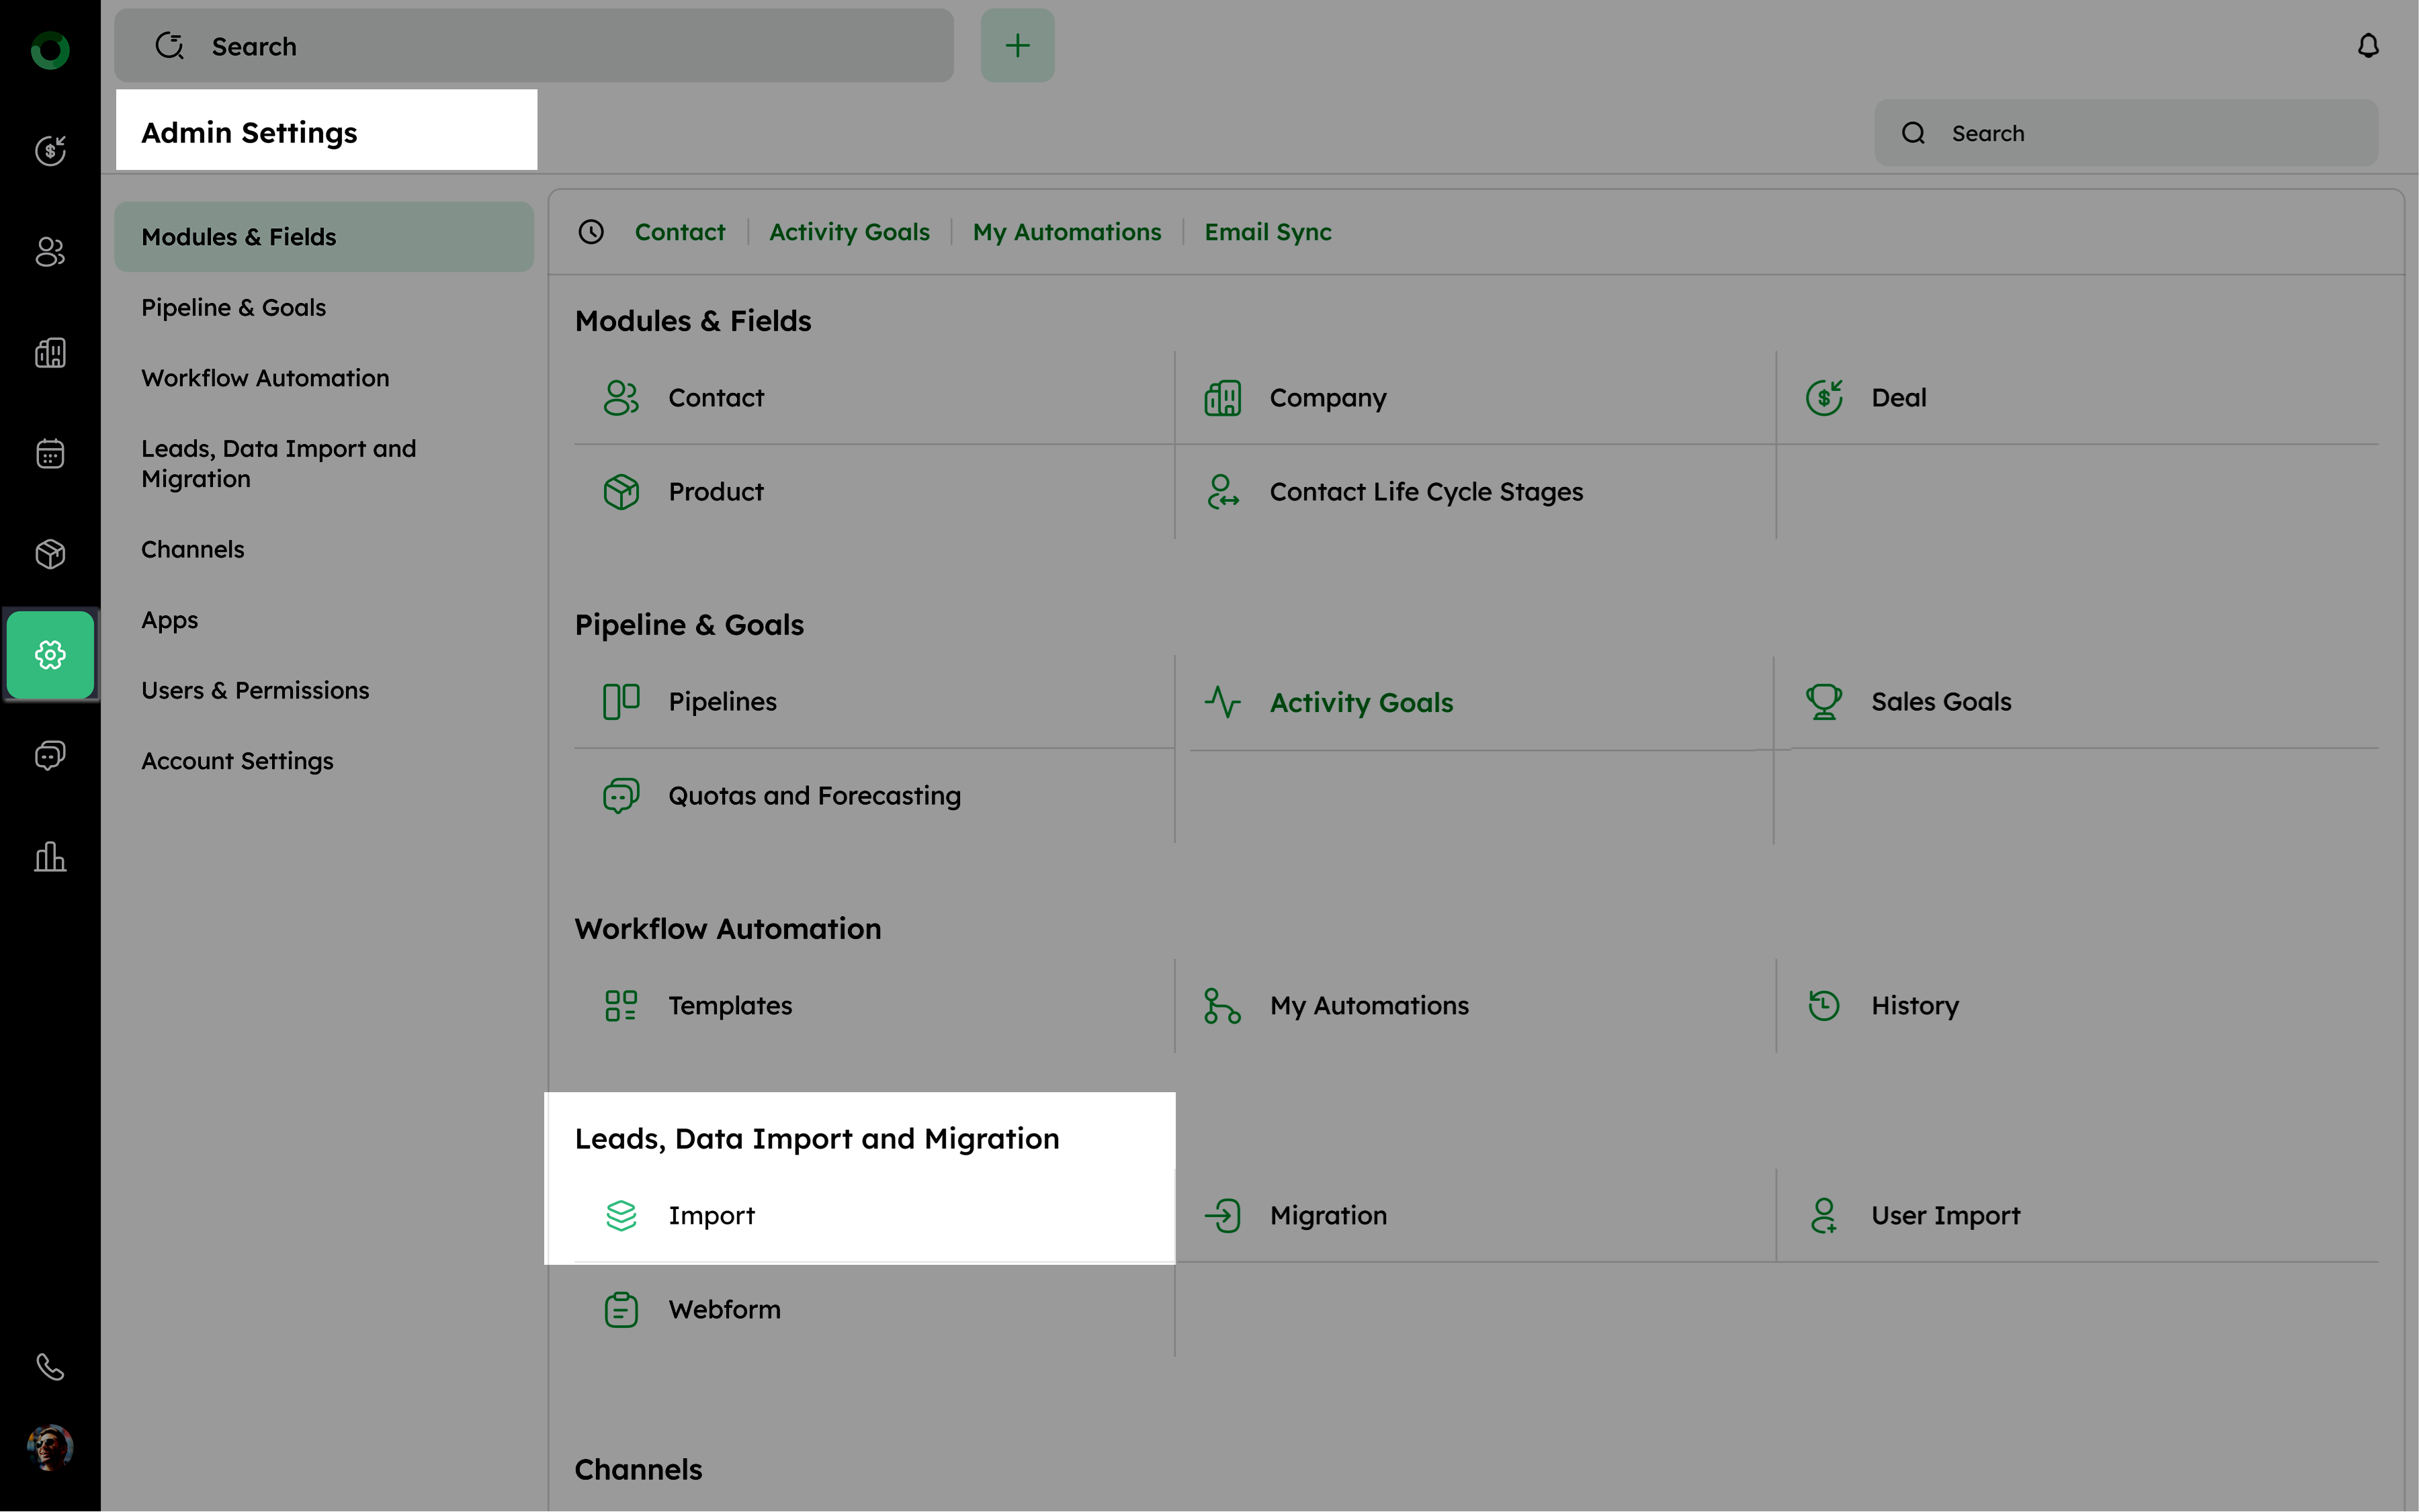
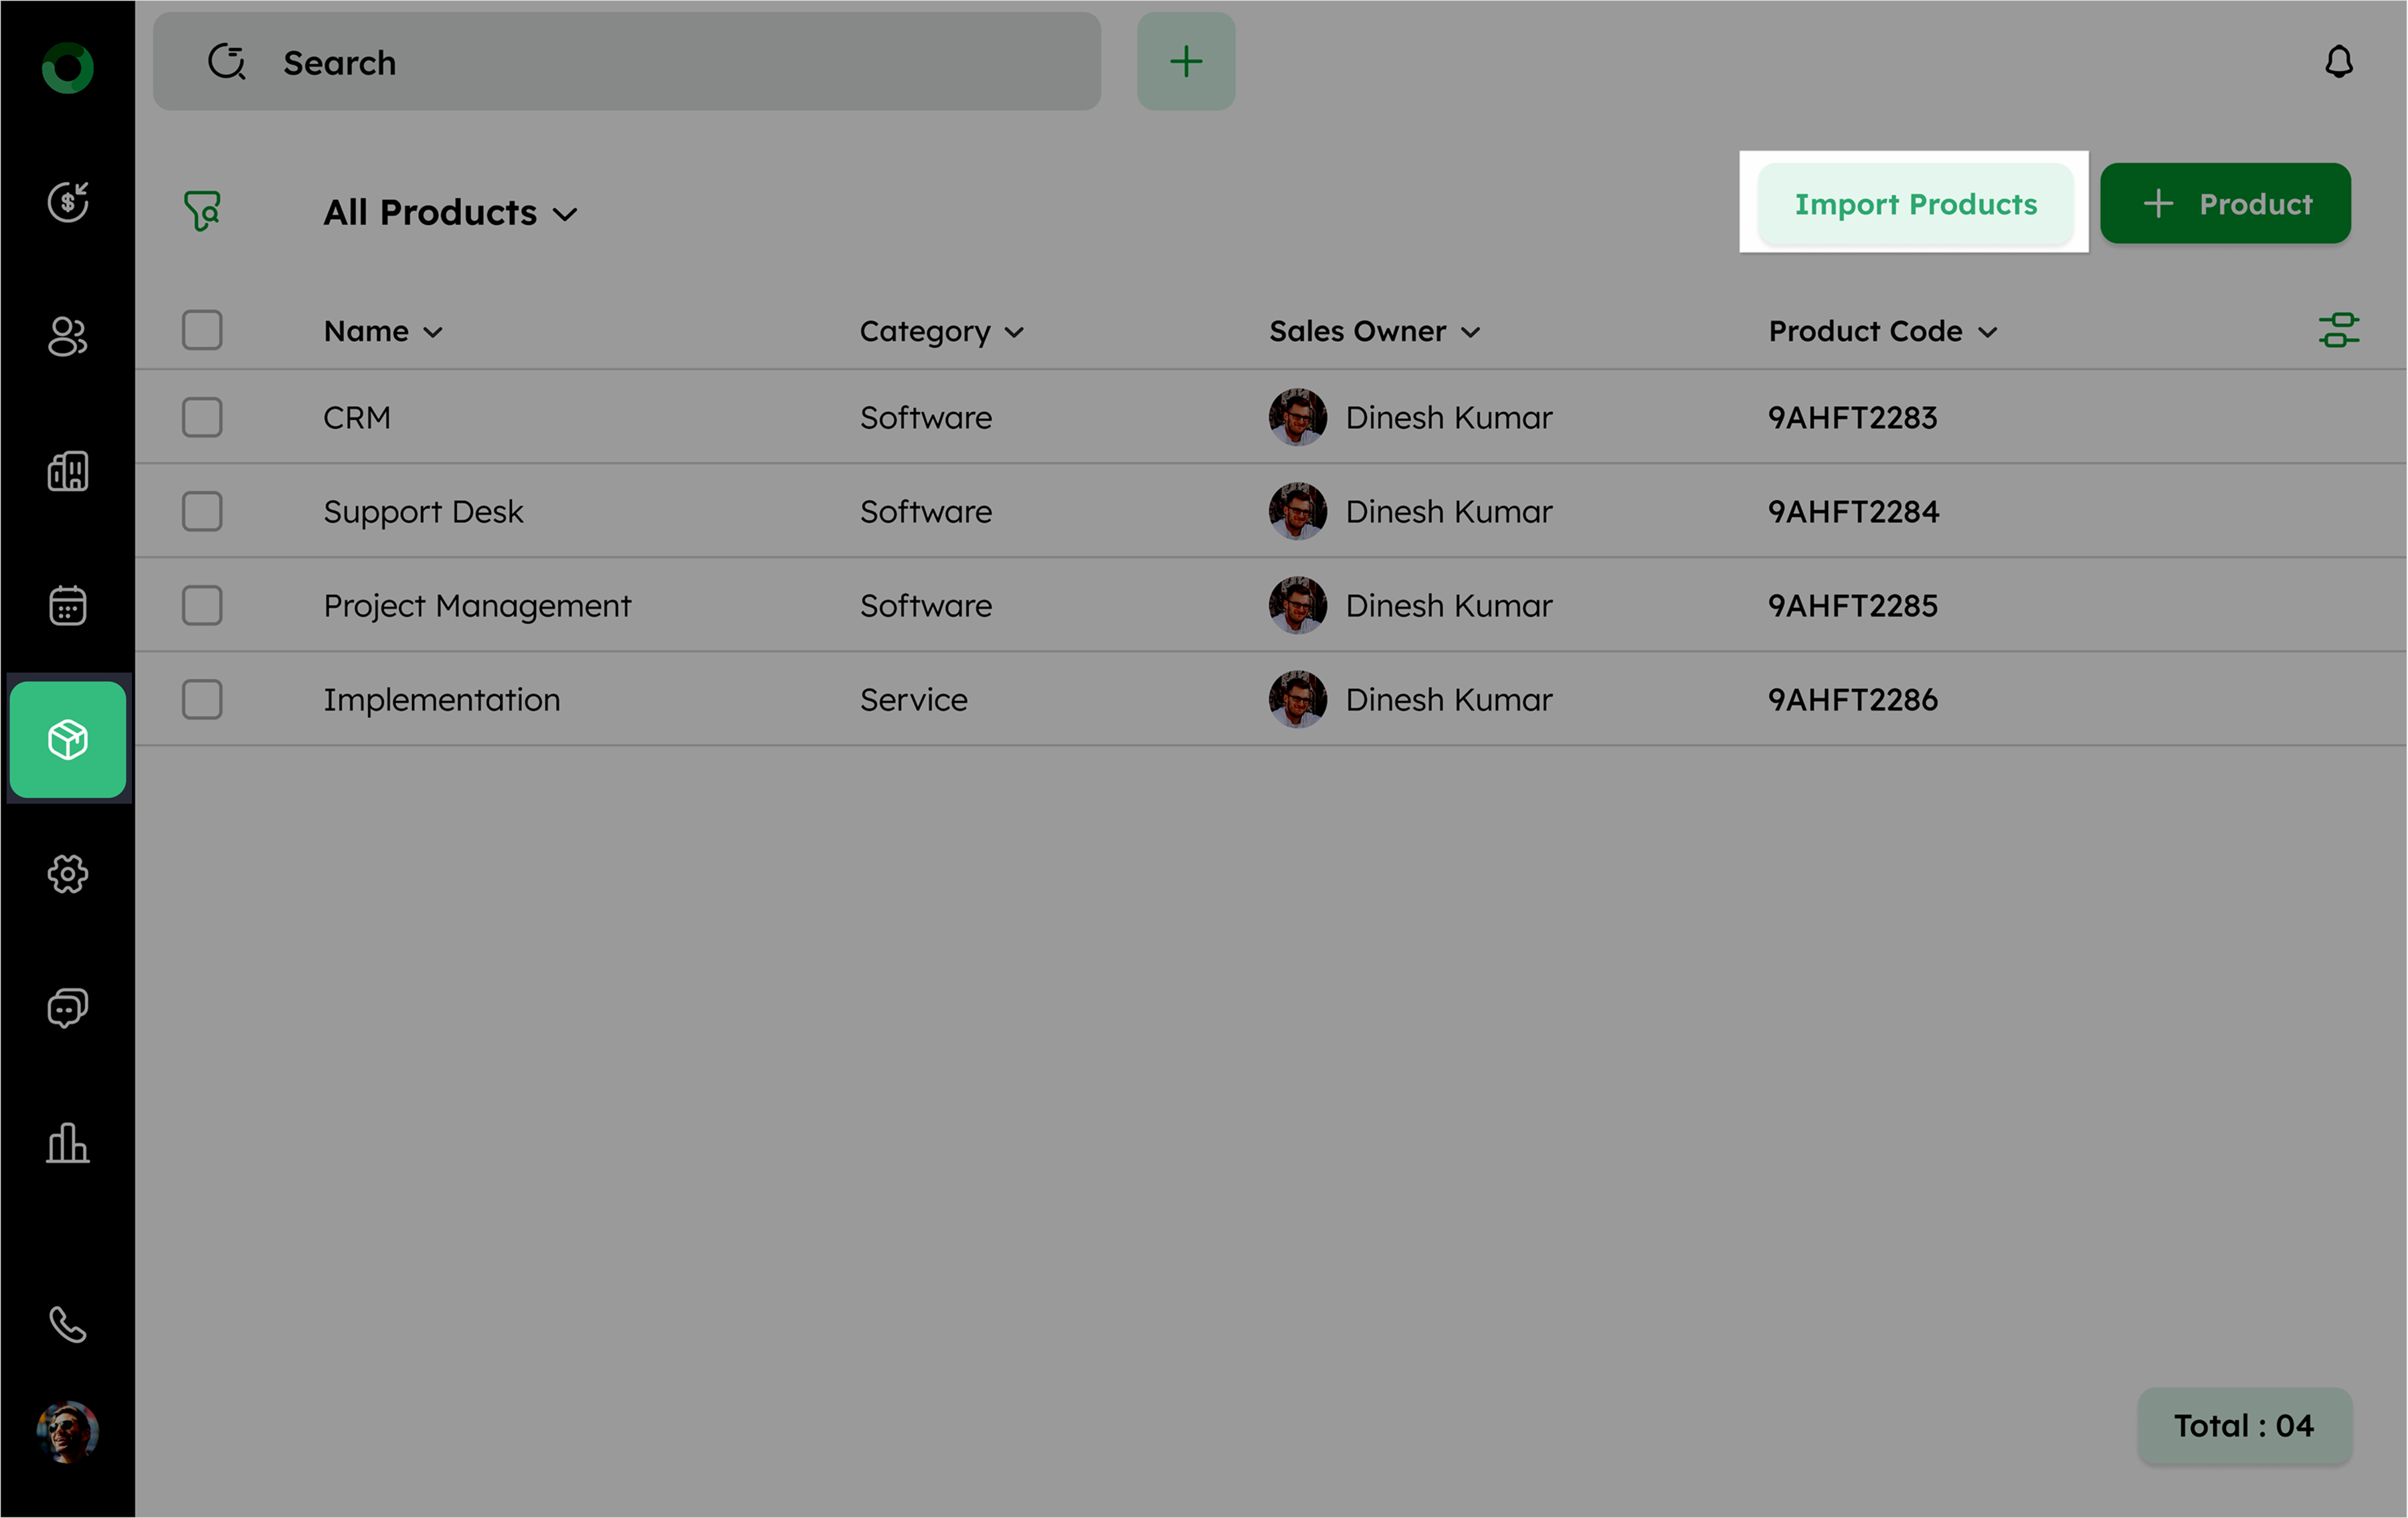
- Alternatively, open the Product Module > List View and click Import Products.
- On the Import page, use the toggle at the top to switch between Import Products and History.
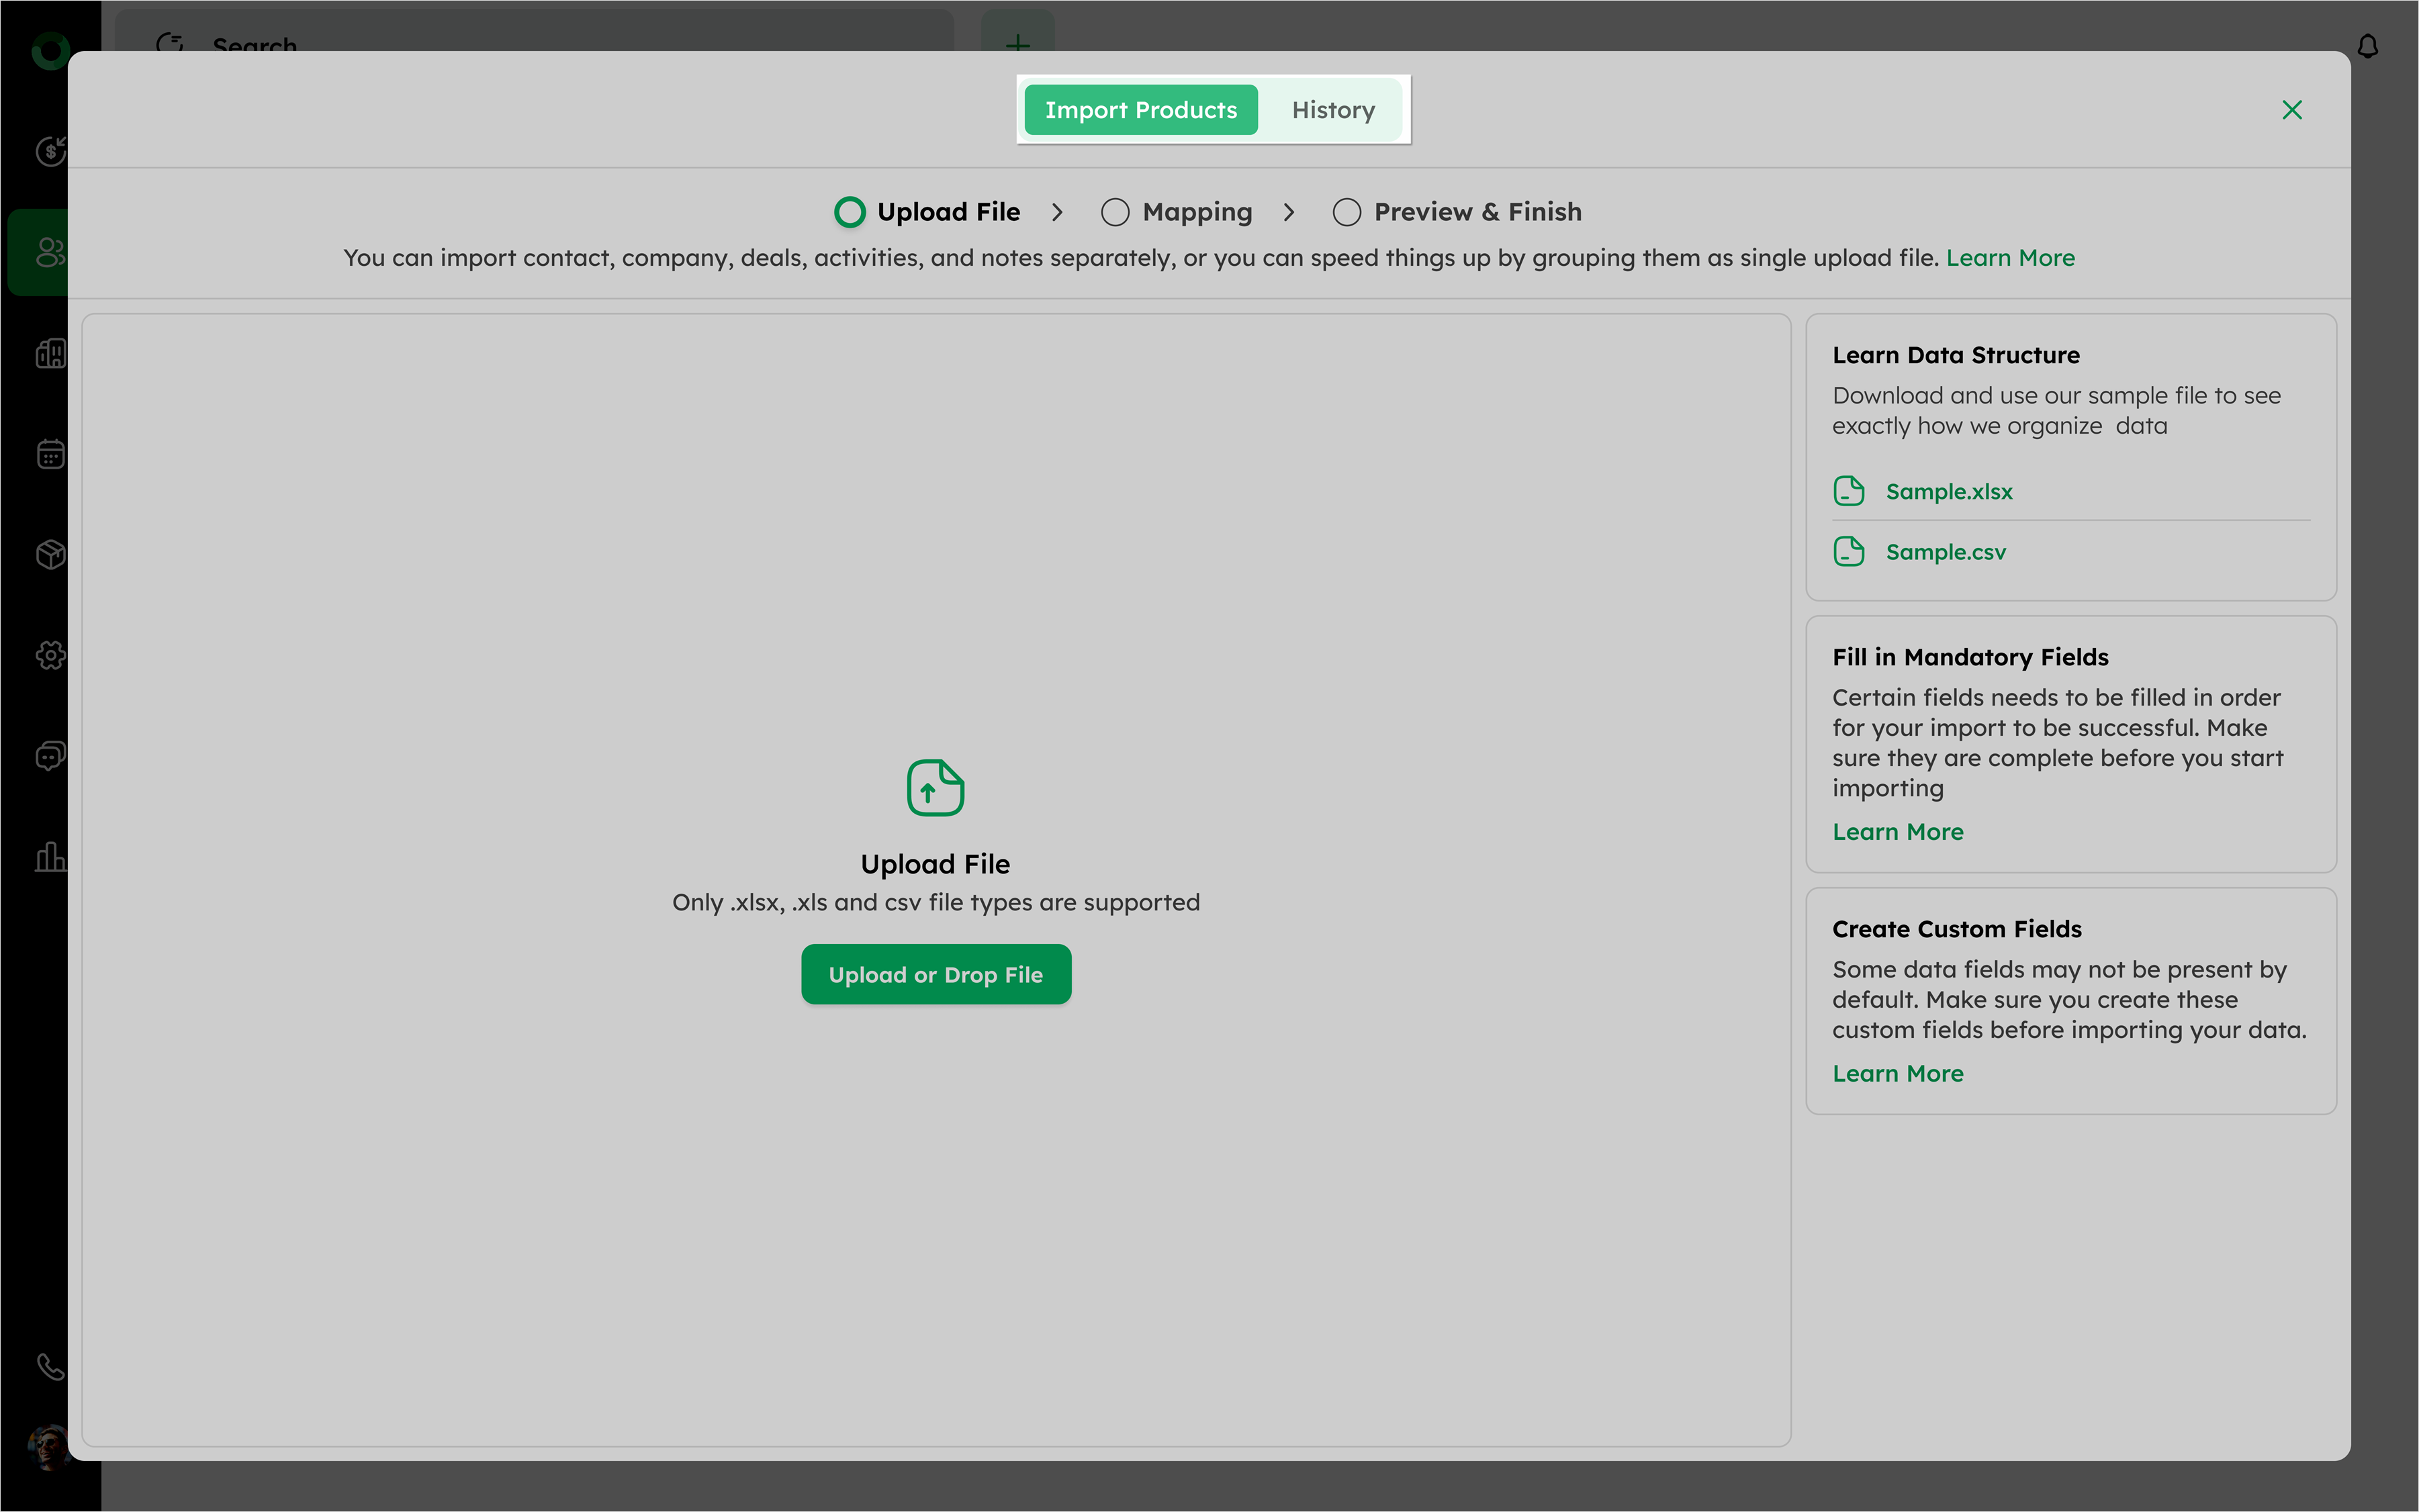
- If you're unsure of the format, download sample files from Learn Data Structure.
-
Select Fill in Mandatory Fields to ensure all required fields are complete.
-
Use Create Custom Fields if your data includes fields not covered by default CRM fields.
-
Click Upload or Drop File to upload your file (.xlsx, .xls, or .csv supported formats).
Tip: Review your data carefully before uploading to avoid duplicate or mismatched records.
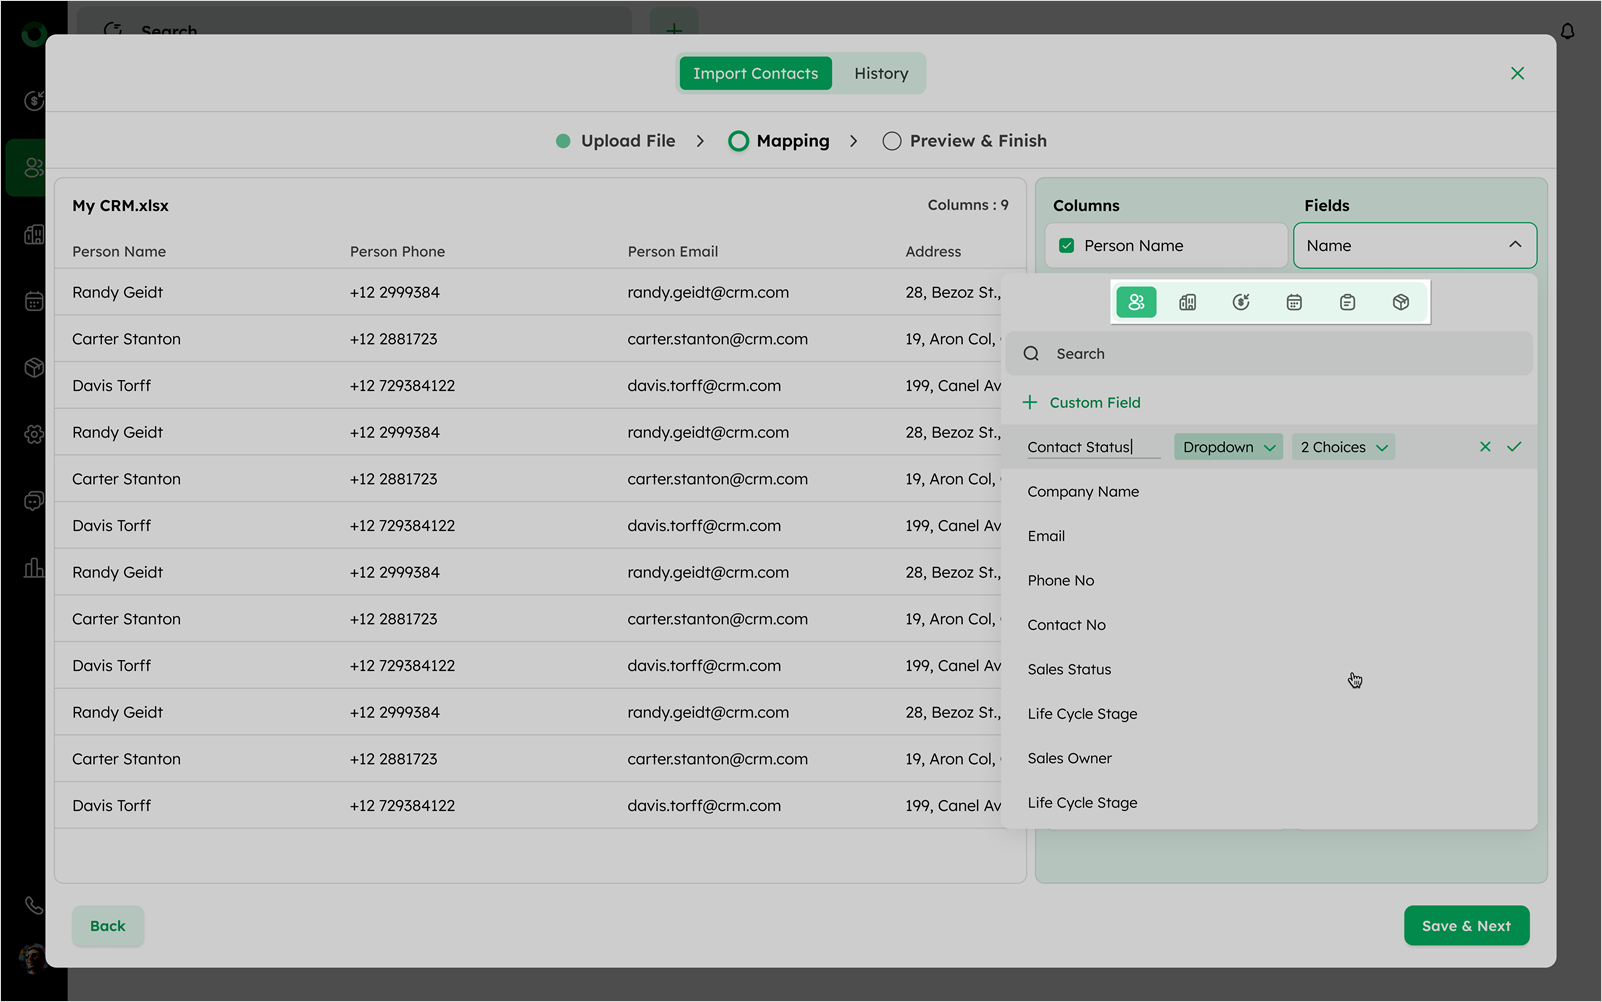
Mapping Product Fields During Import
- After uploading of file, review the import preview, the system will auto-map columns where column names match CRM field names.
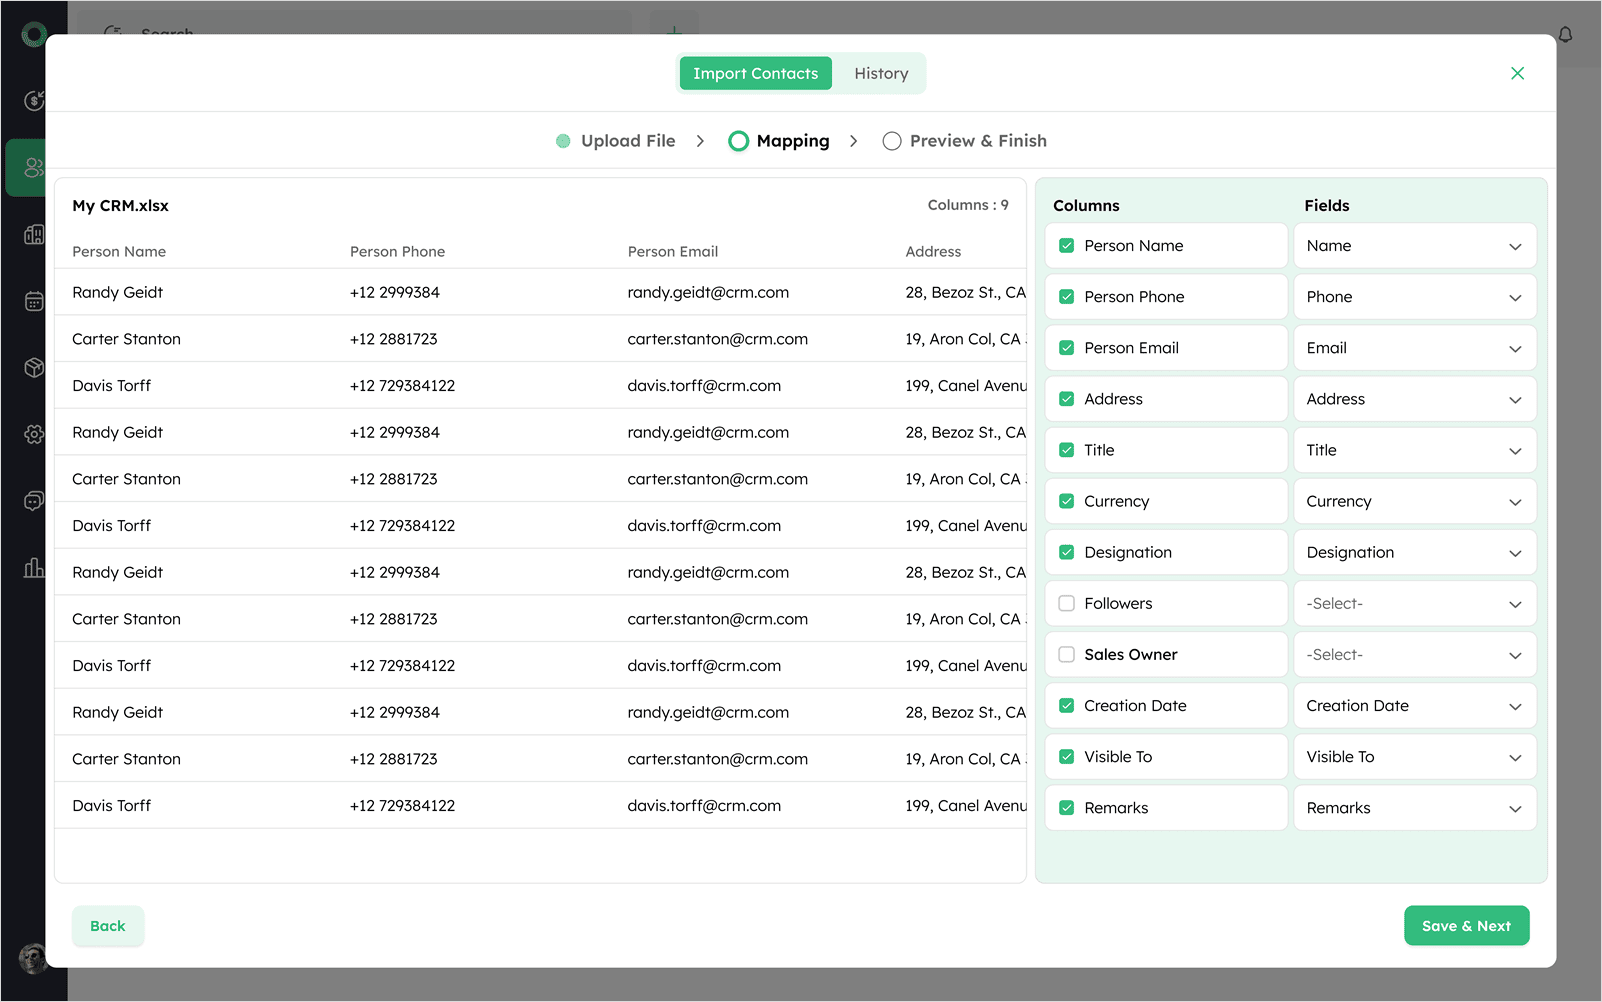
- If any columns are not auto-mapped, manually map them by selecting the correct field from the dropdown for each column.
-
Use the Search bar to locate a specific field when you have many columns.
-
If your file contains fields but not present in the CRM, click +Custom Field to create a new custom field.

-
Click Save & Next to proceed.
-
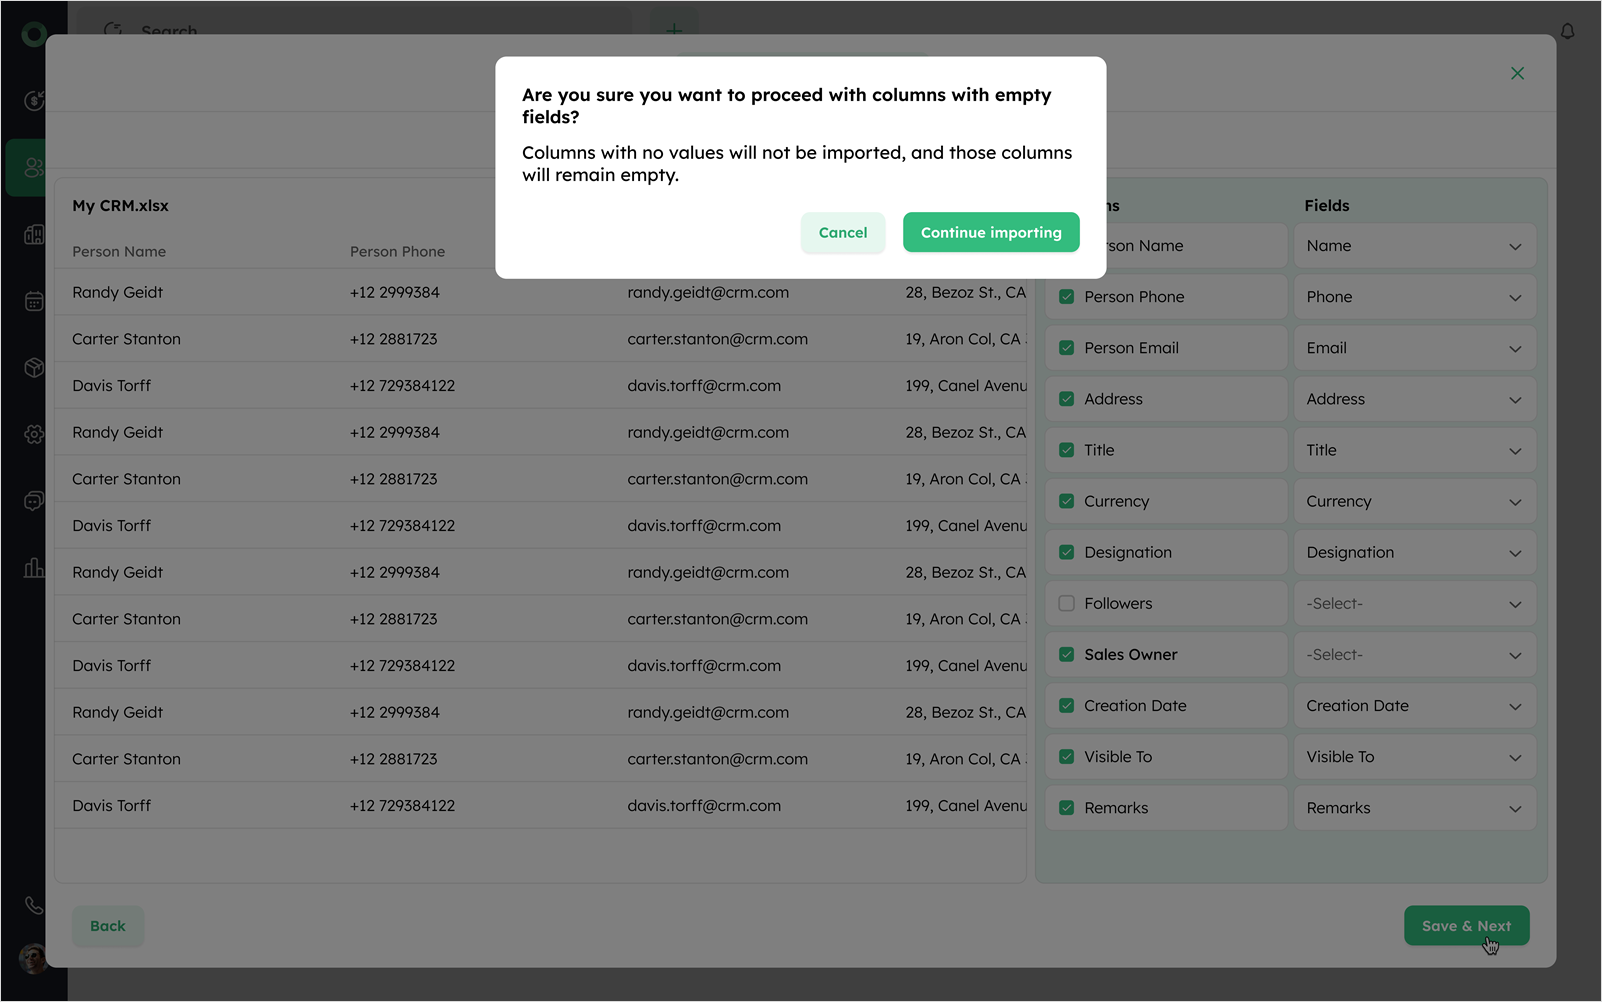
If any checked column remains unmapped, a confirmation dialog will appear choose Continue Importing to proceed without those columns or Cancel to return and finish mapping.
Previewing and Finalizing the Product Import
-
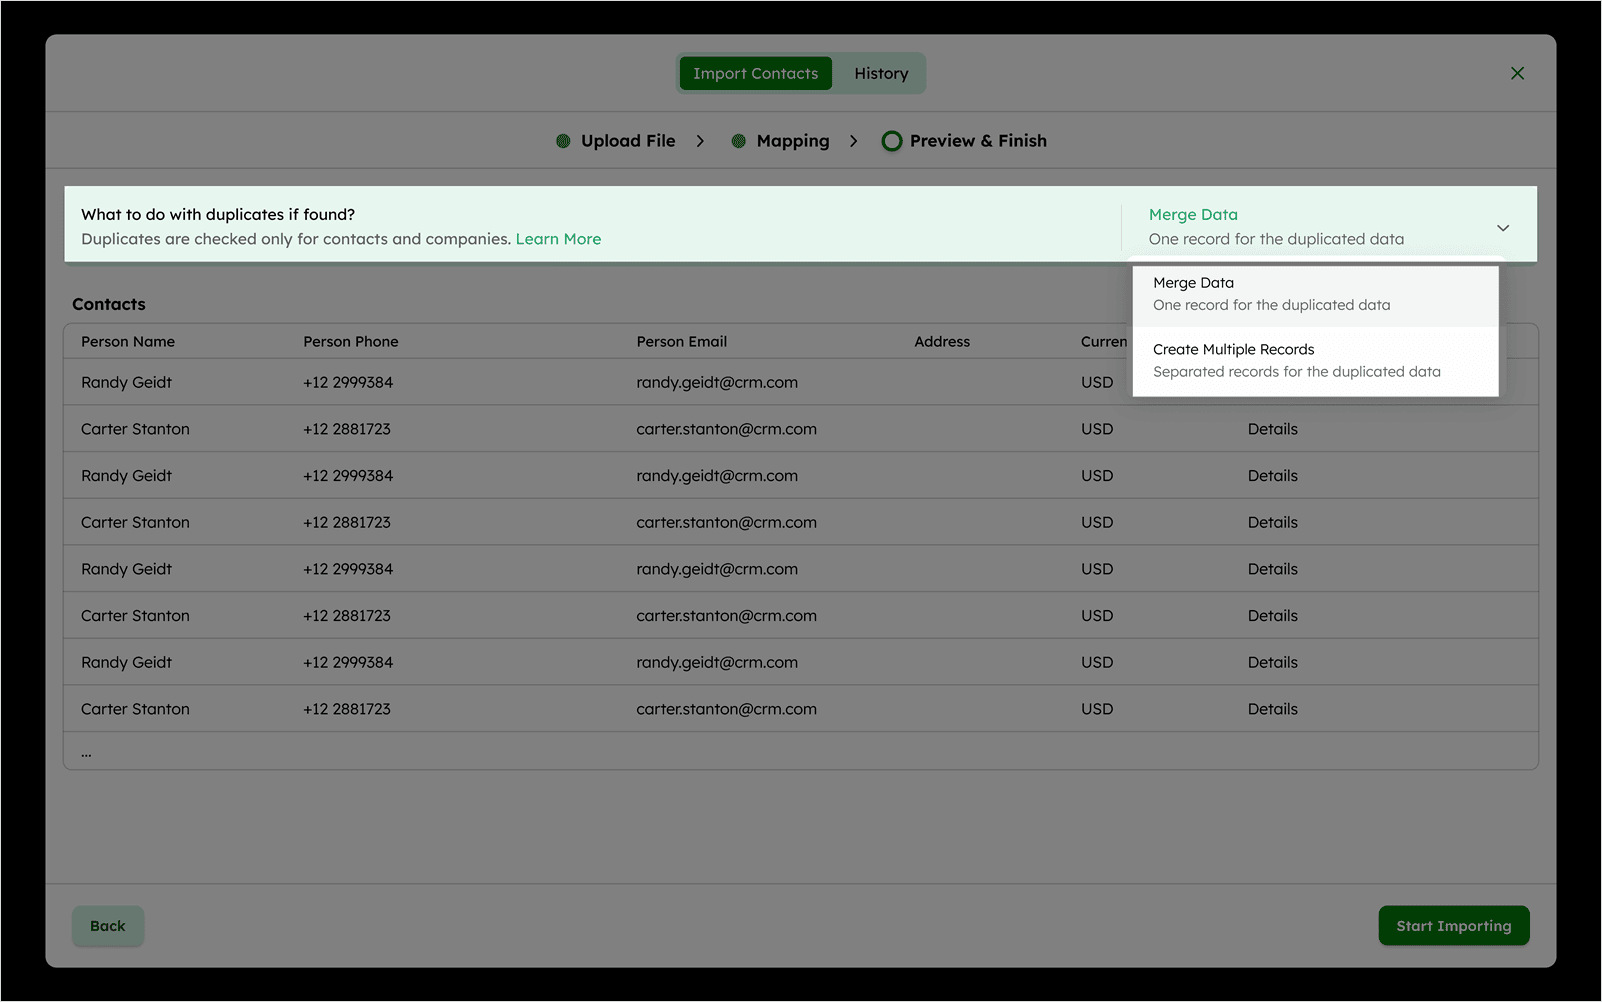
On the Preview & Finish screen, review how your data will appear before importing.
-
At the top of the table, open the Merge Data dropdown to choose how duplicates should be handled:
-
Merge Data - Combines duplicates into a single record.
-
Create Multiple Records - Keeps duplicates as separate records.
- Use the Merge Data dropdown above the contact table to decide how duplicates should be handled:
-
Merge Data: Combine duplicates into a single record.
-
Create Multiple Records: Keeps duplicates as separate records.
-
Ensure mandatory fields for Contact, Company, Deals, Activities, and Notes are unique to avoid duplicate detection.
-
Use IDs when importing records to update existing data. Any changes in columns with IDs will overwrite existing data.
-
Review the file preview for all modules (Contacts, Companies, Deals, Activities, Notes, Products).
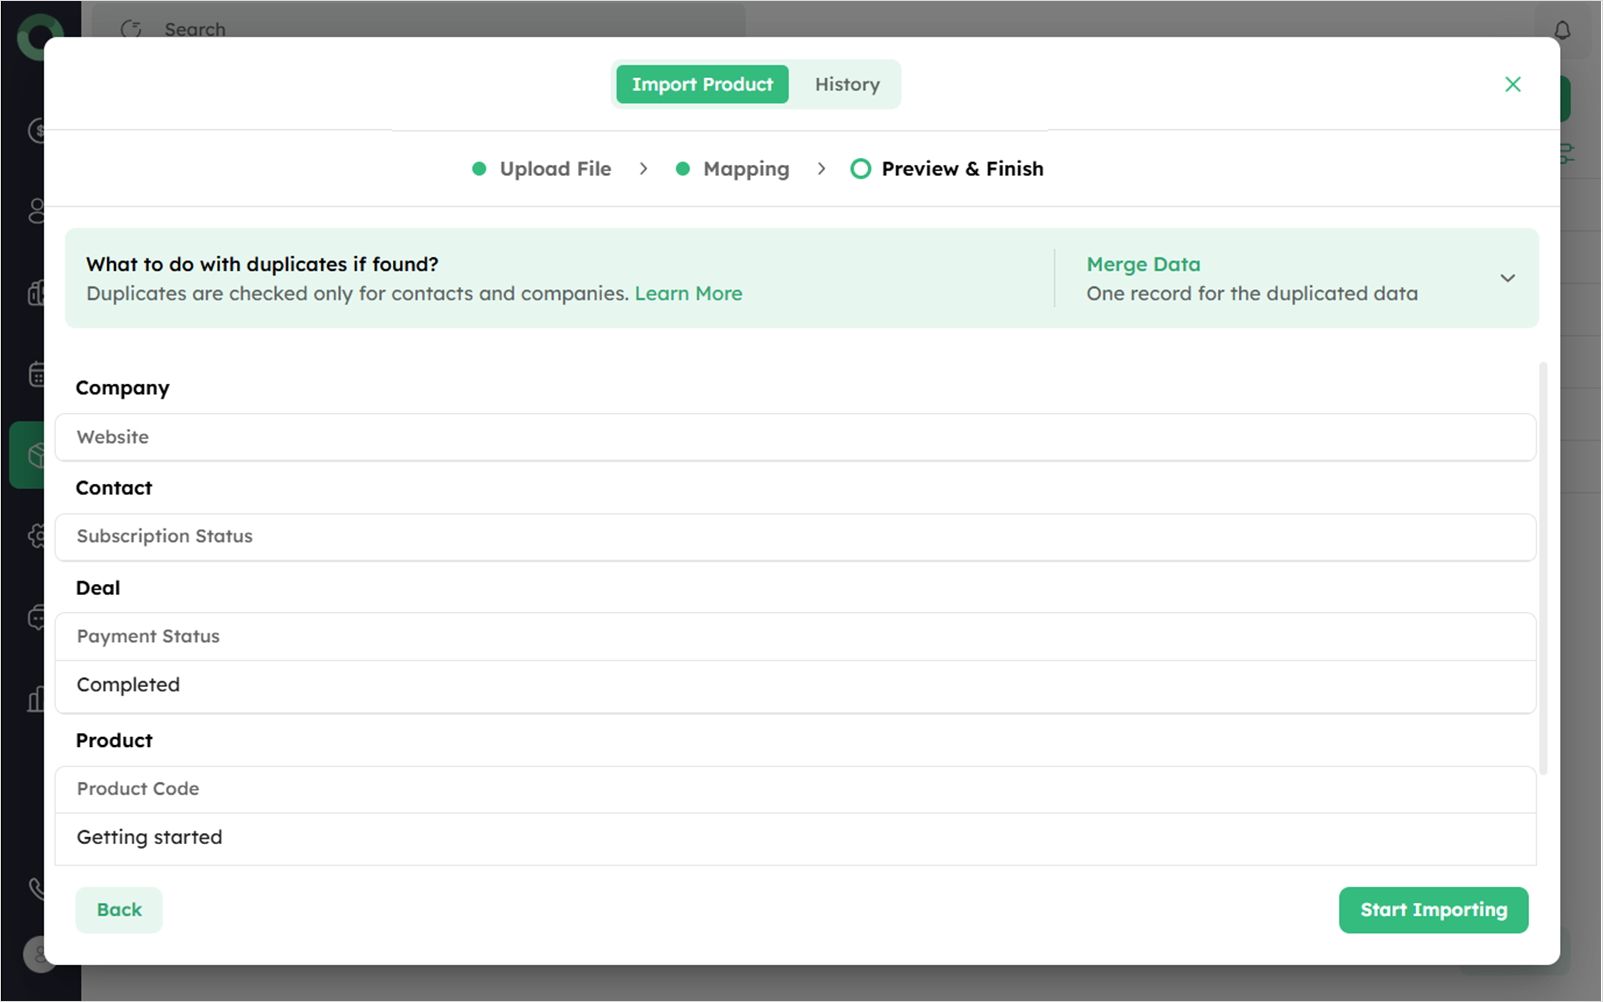
- Once verified, click Start Importing to proceed, or to make changes, click Back to return to the mapping step.
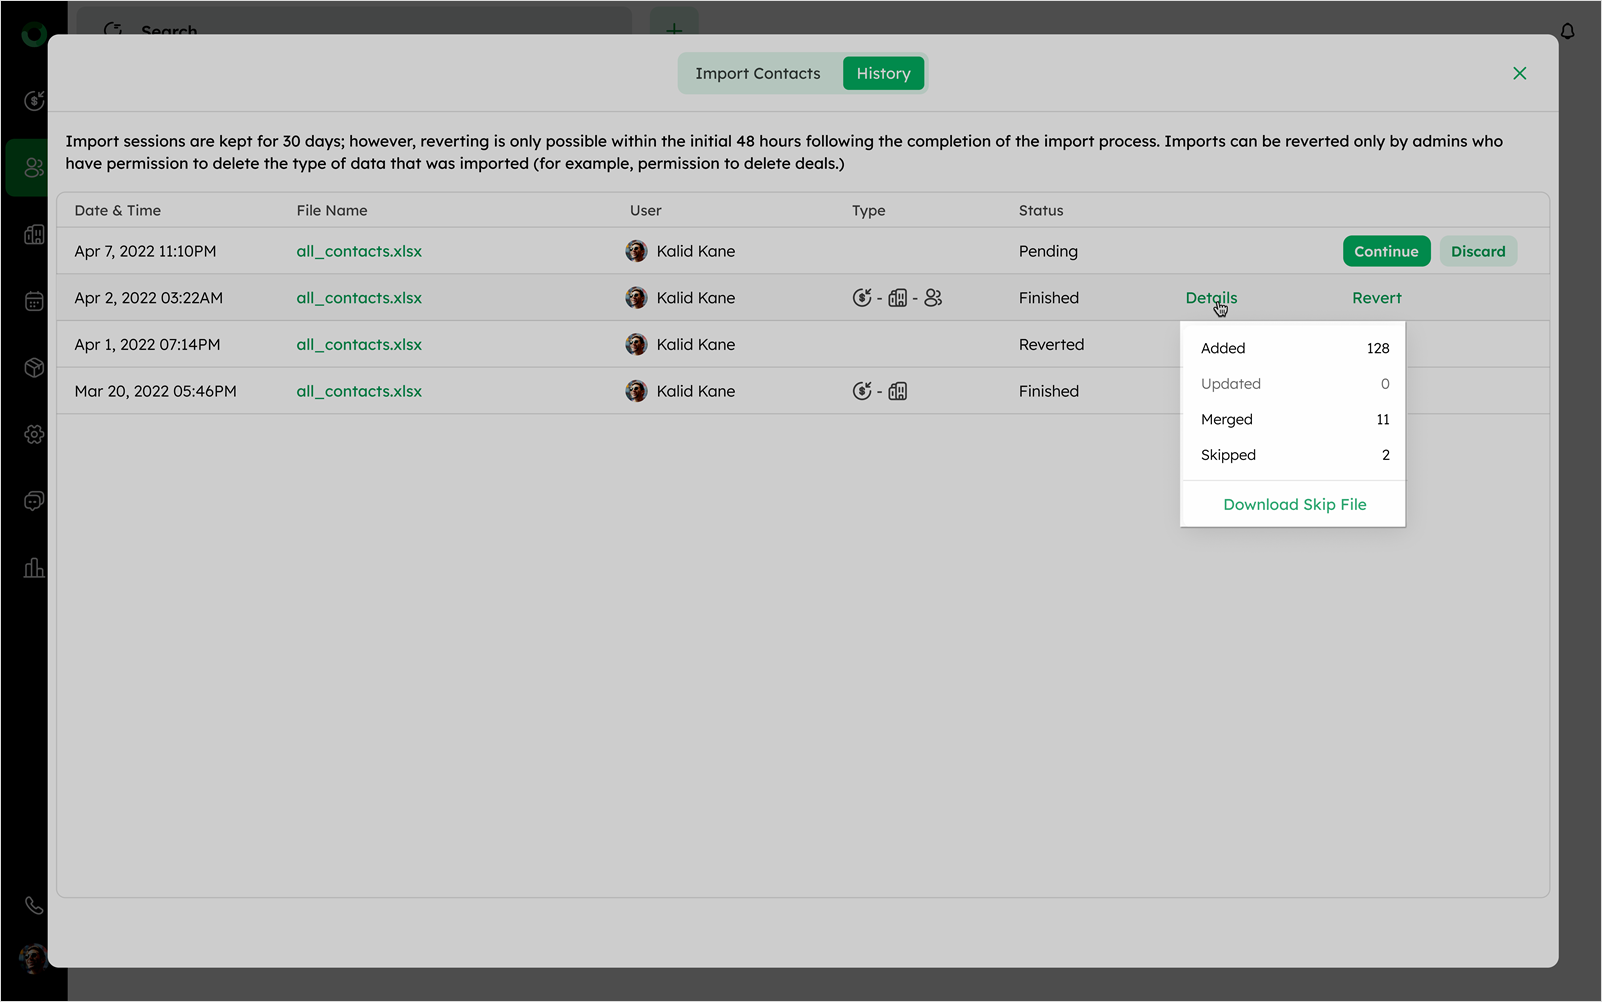
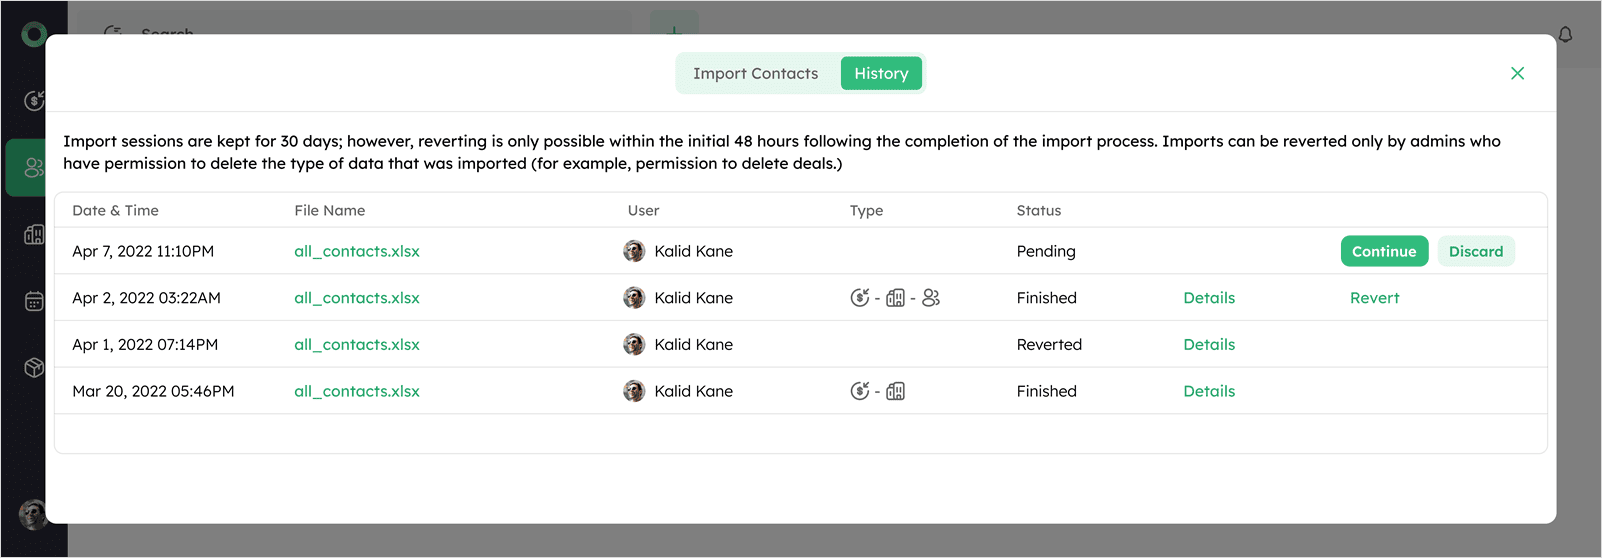
Import History
Import History provides a record of past activities with details like date, status, type, and errors. It allows you to track progress, review completed imports and resolve issues efficiently.
-
On the Import screen, click History at the top.
-
Review details of all previous import attempts with details like Date & Time, File Name, User, Type, and Status.
-
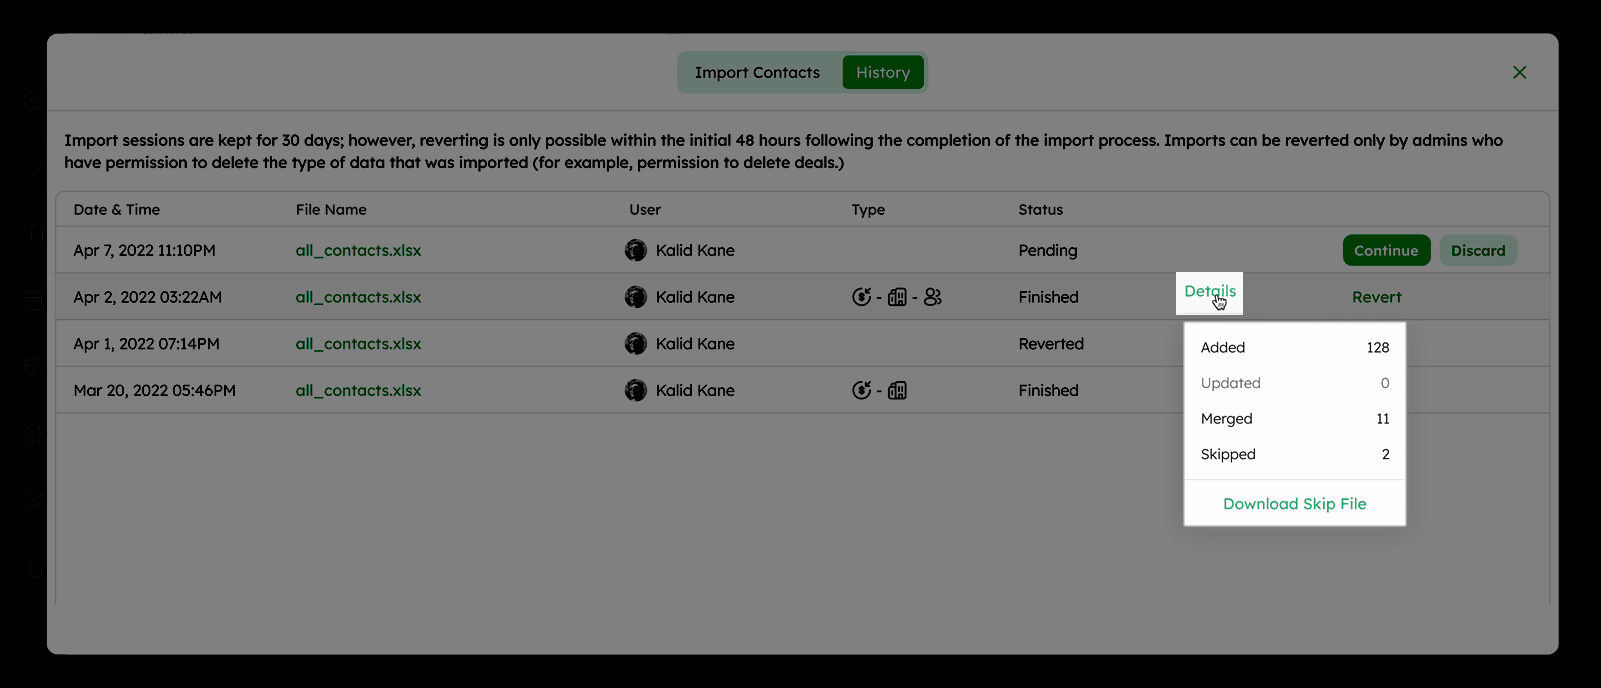
Click Details to view the record status along with counts for Added, Updated, Merged, and Skipped records .
-
To identify unmapped fields or skipped records, download the Skip File.
-
To re-import data without uploading the file again, click Continue in the History section or Discard to cancel.
Overview of Skipped Records in Import
When importing, some records may be skipped if they don't meet the required conditions.
-
Skip records are identified when mandatory fields are missing or the data format is invalid, preventing them from being imported.
-
After completing import, review the summary. The system displays the counts for Merged, Added, Updated, and Skipped records.
-
Click Download Skip File option to see details and reasons for skipped records.
-
The following are possible skip reasons during import.
| Skip Reason | Description |
|---|---|
| Missing Mandatory Fields | Required fields from modules such as the Contact Module, Company Module, Activity Module, Deal Module, and any mandatory Custom Fields are empty. |
| Field Type Validation Error | When a field is of type number, entering text will trigger a validation error, regardless of whether the field is marked as required or not required. |
| Skip During Merge | During the merge process, if any errors occur, a common skip reason appears: This record/row was skipped during the merge process due to invalid values. This can include issues like missing mandatory fields, mismatched field types, invalid data formats, exceeding data limits, or data structure issues. |
| Duplicate Entry Limit Exceeded | When an existing contact has reached the limit of 10 phone numbers or email addresses, importing a duplicate file with the same number will result in the skipping of those duplicate entries |
| Wrong Format | Certain fields must follow specific formats: • Email Address: Must follow the standard email format, for example, user@example.com.• Company Website: Must include a valid URL structure, for example, https://www.example.com.• Date Fields: Should be in a supported format, such as MM/DD/YYYY or YYYY-MM-DD.• Unit Price: Must be in a valid numerical or currency format, for example, 50, 50$, or 50 USD.If any of these formats are incorrect, the affected records will be skipped during the import process. |
| Exceeded Data Limits | If the import attempts to add more entries than the allowed limit (e.g., 10 phone numbers or emails per contact, or phone numbers outside 4–17 characters), the extra entries will be skipped. |
| Non-existent ID | If an ID referenced in the imported file doesn’t exist in the CRM, that record will be skipped to ensure only valid IDs are processed. |
| Update Limit Exceeded | If the number of records that can be updated through import exceeds the admin-defined limit per day (up to a maximum of 50,000 rows per day), those updates will be skipped. Admin can set this limit through user permission settings, ensuring that the import process remains efficient and within operational limits. |
-
Import sessions are retained for 30 days, but reverting an import is only possible within the first 48 hours after the import is completed.
-
Only admins with the appropriate permissions can revert an import. (e.g., permission to delete deals)
Using the Global Add Button Effectively
The Global Add button lets you quickly create products from anywhere in the CRM, streamlining workflows and helping you avoid extra navigation.
Steps to add a product:
-
Click the Global Add (+) button at the top of your CRM.
-
From the dropdown menu, select Add Product to open the product form.
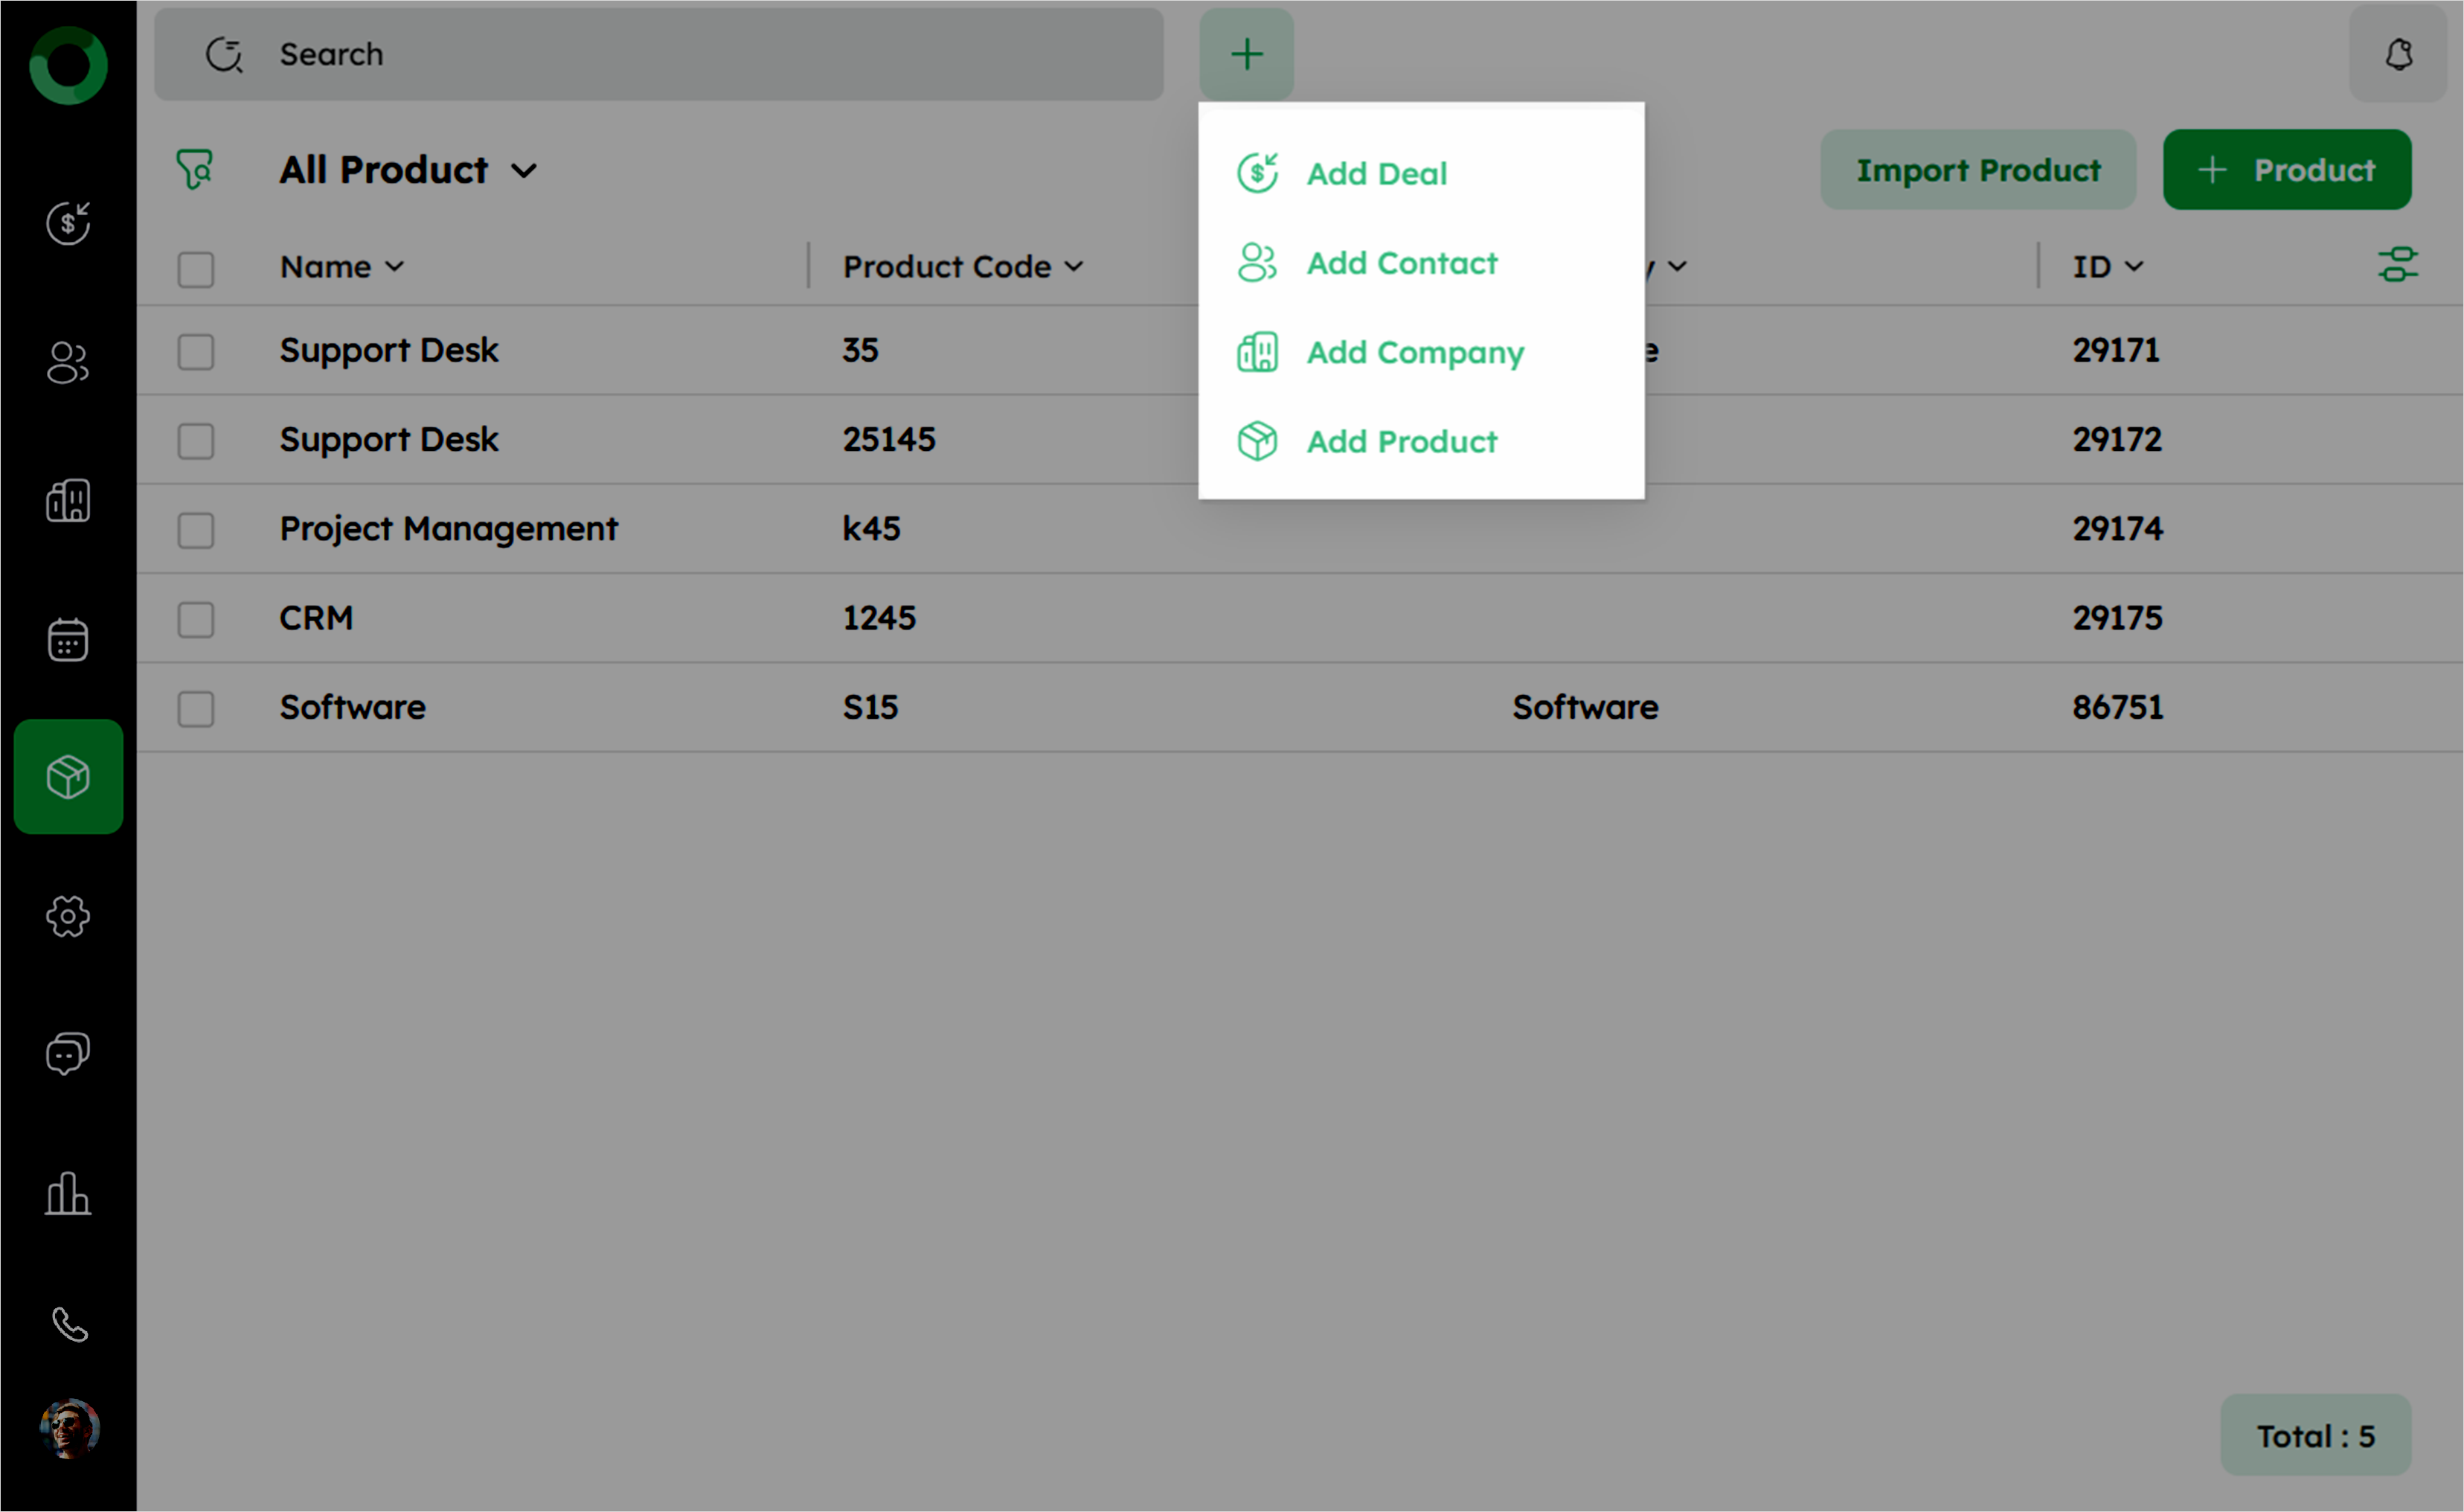
- In the product form, enter the required details such as Name, Sales Owner, Product Code, Category, and Unit Price.
- Once all details are entered, click Save to add the product.